Whether or not you use any form of hybrid cloud, I think it's important to at least know what's available, and how it's being used. There are two primary uses: One is to extend the traditional datacenter to the cloud, including virtual machines (VMs), networking and storage. The other main use is in building cloud-native applications.
The Microsoft Azure cloud offers a lot of options for both uses, and continues to add services, making it extremely useful and flexible. I've listed some of my favorites here, demonstrating that Azure is a lot more than just a bunch of Hyper-V VMs running Windows.
- SQL Server Stretch Database: This service, which is currently in preview, enables "bottomless" cloud storage for SQL Server 2016 databases, while still having it on-premises. This is a hybrid application for perhaps one of the most critical applications in any datacenter.
The fundamental idea with a SQL Server Stretch database is that hot and cold data can be placed in the right type of storage. This is an absolute game-changer for those familiar with their SQL Server data profiles at a table and database level. For example, a critical application may use one database, but typically only a few tables are actively used. There may be other tables (taking up a lot of storage) that would be a good candidate for a SQL Server Stretch Database.
- DocumentDB: You don't have to use SQL Server, though; Azure has a fully managed NoSQL implementation. NoSQL has similarities to relational database technologies SQL, but scales out well; it also won't lock you into relationships that may not work at huge scale.
- Azure Active Directory: A big concern organizations have with any technology service is authorization and access. Active Directory (AD) is the arguably the most common authentication framework in the world for business datacenters, so it was natural for Microsoft to extend it to Azure. What may surprise you, however, is that Azure AD can integrate with its on-premises namesake. This is a good control element when services, accounts and access needs to be added, changed or revoked.
- Nearly 400 Linux Virtual Machines: As I said earlier, Azure isn't just a bunch of Windows VMs. Some of the most interesting Linux VMs I found include Wordpress, the Tenable Nessus security scanner, Oracle Database 12.1 and Docker on Ubuntu Server. Of course, the traditional Linux distros like Debian, CentOS, Asianux, Red Hat and SUSE have images as well.
- Cognitive Services: This service is in preview, but I want to think big here. This is a significant innovation for future frameworks such as additional factor authentication, security surveillance and even creating metadata on images after they're created. One example is the Face API, offering services like face verification, face identification, face searching and more. Other services include Recommendation API, Speech API, Emotion API and more. Fascinating stuff!
Within the next year -- or maybe even sooner -- I'll do an updated version of this post, listing more Azure innovation.
Do you see a use for new cloud services from Azure? Are you the hybrid cloud seeker? Are cloud-native apps making their way into your environment? Share your comments below.
Posted by Rick Vanover on 05/06/2016 at 12:30 PM0 comments
It's standard operating procedure to check the VMware Compatibility Guide before doing anything significant, like purchasing equipment, upgrading a cluster, installing a new feature and so on. The compatibility guide is a great online research tool, and it's important to give it a look when it comes to ensuring proper support.
If you have a four-year-old storage system, for instance, it doesn't make sense to purchase new servers and vSphere 6, then run it on that infrastructure for another four or five years.
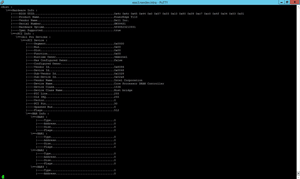
For this to work, of course, you also need to know exactly what you've got. But from a host perspective, it can be difficult to determine what you have vs. what's in the compatibility guide. Fortunately, there's a command line tool for that: esxcfg-info. This is especially helpful for a large number of hosts, as the same command can be run for each.
I recently found esxcfg-info when I stumbled across VMware KB TV. The videos have practical tips for a number of tasks, and one of the more helpful videos is titled "Confirming ESX/ESXi host hardware (System, Storage, and I/O) compatibility".
The esxcfg-info command is explained in the KB; if you run it with the recommended parameters (esxcfg-info | less –I), you get a long scroll onscreen scroll, as shown in Figure 1.
 [Click on image for larger view.]
Figure 1. The esxcfg-info command reports on all things hardware for the ESXi host.
[Click on image for larger view.]
Figure 1. The esxcfg-info command reports on all things hardware for the ESXi host.
That's a lot of data! You'll eventually cancel out of this after the first few lines. If you have a number of hosts, you'll want to get this as a text file and analyze it on your computer, rather than on the SSH session of the Putty host.
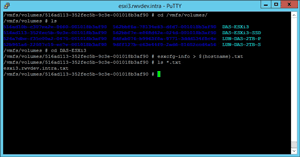
I tweaked an esxcfg command to cause it to output to a file that is the named the system's hostname. Here's the command:
esxcfg-info > $(hostname).txt
The trick is to put it in a place that you can pick it up easily, which is why I've put it in a VMFS datastore, as you can see in Figure 2. Note that the file is around 9MB; it's bigger than you may think.
 [Click on image for larger view.]
Figure 2. The file placed on a datastore becomes easier to centralize with the datastore browser.
[Click on image for larger view.]
Figure 2. The file placed on a datastore becomes easier to centralize with the datastore browser.
This is one example where the default "datastore" name may be helpful in finding a file for locally attached storage.
I've found the esxcfg-info command to be a simple, effective way to reconcile VMware compatibility guide results with the contents of your ESXi host system.
Have you used esxcfg-info much? If so, how have you reviewed the results? Share your comments below.
Posted by Rick Vanover on 04/18/2016 at 12:17 PM0 comments
As virtualized infrastructures get more complicated, sometimes you need a way to troubleshoot things quickly, in simple terms above the infrastructure. One of the areas I've looked closely at is network throughput. This is partly because I've worked in a lot of virtualized infrastructures that use more NFS, SMB3 or iSCSI communication for VMs, and less fibre channel, as I've gone along.
While using the network storage protocols in lab environments in particular, I don't always separate interfaces that provide the storage network (iSCSI, NFS, SMB3 and so on) from the network interfaces that guest VM operating systems use. Whether in a lab or production setting, the iPerf tool is a handy way to measure network throughput above the infrastructure. The latest iteration is iPerf3.
If you're not familiar with iPerf3, it's time for an introduction. According to its Web home, iPerf3 is principally developed by ESnet and the Lawrence Berkeley National Laboratory, and released under a three-clause BSD license. I think it's the easiest way to do active measurements of network bandwidth between devices at the operating system level. The best part is that support, once limited to Windows and Linux, now includes Android, iPhone and MacOS X as well. (Note that the latest version, iPerf3, isn't backwards compatible with the first version).
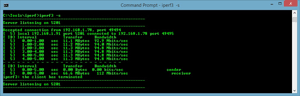
I recommend putting this tool in your arsenal or downloading it as needed. It doesn't need to be installed (at least on Windows; I haven't used the Linux version of iPerf3, but note that some Linux distributions have it embedded as Iperf), and can function as a standalone tool. On a Windows system, I run the server side element as iperf –s
(this is shown in Figure 1).
 [Click on image for larger view.]
Figure 1. iPerf3 clearly shows throughput and network communication.
[Click on image for larger view.]
Figure 1. iPerf3 clearly shows throughput and network communication.
Once that server process started, I went to another system and ran iPerf3 to connect to the first system. The –s parameter was run first to establish a server, then the –c parameter (and the host name),
to connect to it from a different system. It looks like this: like this: iperf3 –c d-think2. In Figure 1, you can see the connection established. Figure 2 shows the connection being made (highlighted in green).
 [Click on image for larger view.]
Figure 2. Showing the connection being established.
[Click on image for larger view.]
Figure 2. Showing the connection being established.
Notice in Figure 2 that the second connection was much faster. This is because both the iPerf3 client and server roles are VMware VMs on the same port group. We'd expect to see a high throughput here as they use CPU resources for network transfer, rather than actively going over the network interface.
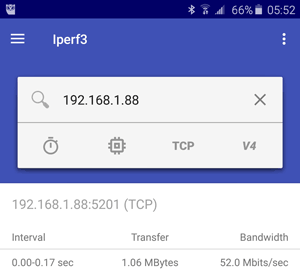
I also had a chance to install the very handy Android application to communicate to these VMs with iPerf3. While this is of course only accessible via Wi-Fi, it's an additional way to test the experience from the datacenter down to a device. The Android interface is shown in Figure 3.
 [Click on image for larger view.]
Figure 3. iPerf3 (the capitalization is different in the PC and mobile device versions) on an Android device.
[Click on image for larger view.]
Figure 3. iPerf3 (the capitalization is different in the PC and mobile device versions) on an Android device.
Practically speaking, this is very helpful for testing things like communication between VMs in different infrastructures. From a network role perspective, iPerf3 can also be helpful in an infrastructure that is very "stacked" on top of itself.
So learn iPerf3, and the next time someone says an application is slow, use this handy tool to look for clues, especially to and from other VMs that aren't reporting any issues.
Posted by Rick Vanover on 03/24/2016 at 2:26 PM0 comments
When Microsoft announced that the Microsoft Azure Stack would be a thing, I had to stop and think about the fundamental impact on the cloud. I'm a co-host of the In Tech We Trust podcast, and when this was announced on an episode, I latched on to it.
This is a very important time for IT practitioners. Everywhere I look, the cloud and service provider angle becomes an option in how datacenters are run, leveraging key technologies like virtualization and modern storage systems. The benefits of the cloud model are clear, with a crucial differentiator: the applications used. What I would call a cloud-stack application model vs. a traditional application-stack model is an important decision point for an enterprise.
However, the Azure Stack bridges an important gap here. The cloud style of consumption and user experience is provided, yet the application offerings are right in line with what IT practitioners have deployed and supported for years. Now, those offerings have been expanded with capabilities like containers.
Consider also the advantages of running Azure on your own infrastructure. I'm doing this now, and think you should, too. To that end, I've created a simple Q&A to help you get started:
What is the Azure Stack? It's a way to run the Azure experience on your own infrastructure. Azure Stack provides Infrastructure-as-a-Service (IaaS) and Platform-as-a-Service (PaaS) capabilities.
Does it only work with Microsoft OSes and applications? No. You'll see Linux images and third-party applications in the form of Azure Resource Manager templates.
Can I just throw it in to my environment as a VM? Not really. The Azure Stack has some significant requirements, and they should be taken seriously. Things in this document to note:
- 128 GB of RAM and 2 sockets with 16 cores recommended -- but not enforced
- Windows Server 2016 Datacenter Edition TP4 needs to be installed and updated
- A Microsoft Azure Active Directory account must be in place (Azure Active Directory costs $6 per user, per month)
Will I have to use PowerShell? Unfortunately for some, yes. A lot of the Azure Stack configuration elements in the preview are PowerShell scripts. The good news is that most of the scripts are provided, and that the finished product will be a Web experience that consumes the IaaS and PaaS resources.
I expect the Azure Stack to be a game-changer in the datacenter. It will answer many IT questions about its validity, and help determine if the cloud model will meet an organization's requirements.
Posted by Rick Vanover on 03/08/2016 at 9:19 AM0 comments
In vSphere 5.1, the vSphere tag framework was introduced, and has been improved steadily since. It's an organizational construct at a management level above the infrastructure, and is great for a number of things. Let's start by my own definition for each of these two concepts and then I'll outline some good use cases.
A tag category is a parent object of many tags, and can have a fundamental rule of permitting one tag per object or permitting many tags per object. This is called cardinality in the vSphere Web Client; for more, see the documentation.
A tag is a label applied to any object in vSphere (host, cluster, virtual machine, datastore and so on). This tag has a category assigned to it. Here's the VMware documentation reference for creating a tag.
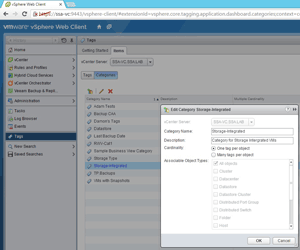 [Click on image for larger view.]
Figure 1. An example tag category in the vSphere Web Client.
Possible Tag Uses
[Click on image for larger view.]
Figure 1. An example tag category in the vSphere Web Client.
Possible Tag Uses
Now that you have a definition, the next step is to learn to use tags. Here are a number of use cases I think many environments can benefit from:
- Tag a GRC infrastructure. If there are any workloads subject to governance or risk management or compliance (GRC), this may be a good way to easily identify them in the Web Client. For example, one category could be called "In-Scope," and tags could be labeled "PCI", "HIPPA" or others; it's pretty clear what responsibility those VMs, datastores, hosts or clusters would be governed under.
- Use tags to define business and department ownership. If there are many stakeholders across the organization and possibly multiple sites, tags and categories can help identify role and ownership. An example would be categories such as "Business Systems" and tags such as "Accounting" and "Human Resources"; another category may be "Operations," with corresponding tags such as "Timekeeping" or "Manufacturing Support." This is of course in addition to (hopefully) names on VMs that make sense as well.
- Set up protection requirements. Tags and categories can be used to make a software-defined set of rules for things like backup, storage snapshots, offsite replication and more. Categories like "Backup" and tags like "Daily" or "12-Hour" can be used to design protection.
Here's a usage tip: Make your tags specific. That can include self-documenting tag and category names. "Category1" or "Test Tag" doesn't really tell us much about what the tag and category are being used for.
As you can see, there are a number of use cases here for the tag and category framework in vSphere. Have you been using this new mechanism yet? If so, what use cases have you found beneficial? Share your comments below.
Posted by Rick Vanover on 02/04/2016 at 9:58 AM0 comments
I find that the virtualization industry is very dynamic, yet I'm a bit guilty of having "tunnel vision" for the two most popular Type 1 hypervisors, VMware vSphere and Microsoft Hyper-V. But there are other good ones out there, and you should know about the options. To that end, here's a quick rundown on who's who for 2016 in the hypervisor market:
- VMware vSphere: The current version is vSphere 6.0 update 1 (b). Most are familiar with vSphere, as it's still the standard. A lot of innovation around this hypervisor has come in the storage industry, and more is coming.
- Microsoft Hyper-V: The current version of Windows Server is 2012 R2, which means the latest edition of Microsoft's hypervisor is Hyper-V Server 2012 R2 or Windows Server 2012 R2's Hyper-V role. Windows Server 2016 is right around the corner, with new Hyper-V features on the way.
- Huawei FusionSphere: I had no idea this was even an option! Currently on version 3.1, this is an implementation built on OpenStack, and is more relevant for cloud-stack data centers.
- Oracle VM: This hypervisor is on version 3.3 and has fans in large Oracle shops, as well as those looking for SPARC support in the datacenter. I used to love using Sun xVM VirtualBox; and even after the Oracle-Sun merger, it's still here (as a Type 2 hypervisor) and ready for download.
- Red Hat Enterprise Virtualization: This hypervisor is positioned to be an OpenStack implementation and is based on the KVM hypervisor. It's currently on version 3.5.
- KVM: Kernel Virtual Machine, or KVM, is on version 1.3 and is the pure standards-based hypervisor that Red Hat Enterprise Virtualization is based on. Many Linux distributions can add KVM (SUSE Linux Enterprise Server (SLES), for example).
- Citrix XenServer: This commercial hypervisor is based on the Linux Foundation Xen Project. Citrix's XenServer currently is on 6.5 SP1.
- IBM PowerVM: This is different from the others in that it's targeted for AIX and other enterprise datacenter systems. Further, it's limited to support on a few hardware systems (such as POWER6 and POWER7). Also in this category also is the IBM z/VM hypervisor -- currently on version 6.3 -- which provides a virtualization layer for mainframe systems. While not broadly applicable, it's interesting to note that the other types of enterprise data center platforms have a virtualization option.
Posted by Rick Vanover on 01/14/2016 at 9:46 AM0 comments
One of the things I love nowadays is doing little things that make a difference. That was the spirit of my recent post on 7 random tips for vSphere. I thought now it'd be a good time to do the same for Hyper-V. As before, this is a list of random tips to help make day-to-day Hyper-V tasks easier.
1. Wouldn't it be nice to know the IP address of a Hyper-V virtual machine (VM) without logging into it or going to the networking tab in Hyper-V Manager? You can with PowerShell. A simple PowerShell script makes this easy; see this MSDN blog for details. This is a great way to get a list of every VM you have, including its name and IP address.
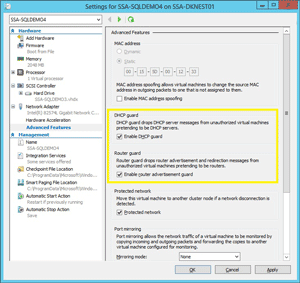
2. Don't forget Hyper-V's built-in router guard and DHCP guard, which prevent unauthorized guest networking. This is a great one to set in VM libraries or PowerShell. The Set-VMNetworkAdapter cmdlet will allow you to set these powerful options as well, as shown in Figure 1.
 [Click on image for larger view.]
Figure 1. Hyper-V's Router guard and DHCP guard can boost your network's security.
[Click on image for larger view.]
Figure 1. Hyper-V's Router guard and DHCP guard can boost your network's security.
3. Another PowerShell tip: A very good cmdlet to get some quick resource utilization on Hyper-V VMs is the Measure-VM command. Major resource utilization is reported here, and it's a good way to take a look at the VM's usage. Make sure you also enable resource metering on the VM.
4. If you have a Hyper-V cluster, you should be using the Cluster Validation Wizard. Remember to run the validation wizard occasionally after the cluster has been deployed, following tasks like:
- Critical updates
- Adding servers to, or removing servers from, a cluster
- Adding new storage arrays or shared volumes
- Other key tasks
5. Windows Server 2016 includes nested virtualization; keep that in mind with your upgrade cycles. I'm personally super excited about nested Hyper-V, and am also very curious how it will impact Azure. I was a bit early with my news of this feature in July; but now things are a lot clearer.
6. Related to the new technologies coming from Microsoft, keep in mind that Nano Server is coming. Nano Server is an extremely small footprint operating system that provides four key roles: Hyper-V (yay!); failover clustering; file server; and other storage roles and forwarders for reverse application compatibility (e.g., Ruby, Node.js and so on). My colleague Clint Wyckoff did a vBrownBag Tech Talk on this topic; check out this video.
7. If you're getting serious about Hyper-V, it may be time to
look at the Azure stack. You can run Azure-style services in your own datacenter. This is a significant endeavor, but it's got everything most environments need in an easy-to-consume model.
Posted by Rick Vanover on 11/20/2015 at 1:46 PM0 comments
I've been wanting to do a post like this for a while, and have finally gotten around to it. I've learned a few things over the years (it's true!), and some of the things we take for granted in our daily practice can be used to help others along the way. Here's a list of seven random tips that don't merit a separate blog post, but can help you today (and tomorrow) with your vSphere administration duties.
- Stop using Raw Device Mappings (RDMs). Seriously, look into VMware Virtual Volumes instead. I really dislike the complexity of RDMs, and how un-virtual it feels today.
- Take a look at VMFS volumes. Do you have some old VMFS5, VMFS4 or even some VMFS3 volumes in place? They should be upgraded to your latest hypervisor build (assuming the array's supported). But look a bit closer: is a VMFS3 or VMFS4 volume on a storage device you want to keep using?
- Use vSphere tags and categories. Have you given much attention to this new organizational construct in vSphere? They were introduced in vSphere 5.5 and fully updated in vSphere 6, and allow you a very flexible way to arrange virtual machines (VMs) in regard to elements not related to infrastructure. Think about tagging VMs "in-scope for PCI," "Off-Site DR," "Production," "Development" and so on. Don't just call everything "Tag1" or "Example Tag"; use self-documenting categories and tags.
- Consider the replicated VM. I can't overstate the versatility of a replicated VM and how it can be used. The first usage that comes to mind may be as a failover mechanism (usually off-site), but think of intentionally using a replication engine as a way to failover to a new cluster. This will leave behind all bad past decisions in a cluster, and can be quite helpful.
- Give thought to non-rotational storage. There are so many options that it can become overwhelming when it comes to using flash, SSDs or memory acceleration to speed up disk systems for vSphere VMs. I'm leaning long term to VMware's Virtual SAN to have the best top-to-bottom integrated approach for vSphere, and it's improving significantly with each update. So maybe it's time to head into the lab, especially if hyperconvergence could be in your future.
- Keep a copy of vCenter Converter handy. In May of this year, vCenter Converter 6 came out. It's a handy way to move VMs around where a replication engine may not do the trick, or if you're dealing with some physical servers.
- Know which VMs take the most IOPs. Do you know? I know plenty of vSphere administrators that give a lot of thought to designing and implementing a cluster; but what about after day three? VMs change and so do their behaviors, so having visibility to address which VMs are taking the most IOPs will help you in so many ways. Get a tool to answer that question.
Do you have any random tips of your own to share? Offer them in the comments below.
Posted by Rick Vanover on 10/16/2015 at 1:58 PM0 comments
Earlier this year, I wrote that I was going to start a next-generation home lab. Alas, I haven't made any significant progress on the topic. But I did have a power outage that made me realize that my older, power-hungry servers are wearing out my battery backup units quicker than they should be. This, and the fact that my wife was not so happy about how long it took me to bring the shared drive back online, has made me revisit the lab to both modernize and simplify the configuration.
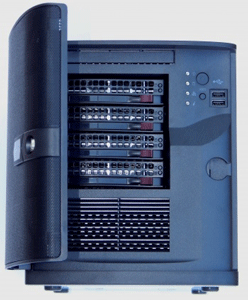
At VMworld 2015, I had the chance to catch up with Paul Braren, who blogs at Tinkertry.com. Paul mentioned how we was now migrating to a new server for his home lab server, and got one from Supermicro (Figure 1). The unit Paul has found as a sweet spot for his home server has a number of key characteristics:
- Capable of running up to 128 GB of DDR4 RAM (DDR4 is newer, very fast memory)
- It's small, only weighing 15 pounds
- 10GB ports (10GBase-T)
- Capability of nesting many ESXi or Hyper-V hosts (especially for VSAN)
 [Click on image for larger view.]
Figure 1. This Supermicro has the power for a home lab, and maybe even a remote office.
[Click on image for larger view.]
Figure 1. This Supermicro has the power for a home lab, and maybe even a remote office.
Additionally, there are 6 SATA drive ports, allowing both solid state drives (SSDs) and larger capacity hard drives for many configuration options.
What probably appeals to me most is its simple device configuration, yet with the ability to run everything I need in a home lab. The only real issue I see is that the 10GB Ethernet interface driver isn't recognized by ESXi. It may have a driver eventually, but the 1GB interface works fine.
I'm also keen to draw less power. One of the current servers I have has two power supplies that each can draw 1000 watts. This device only has one power supply, drawing 250 watts. And yes, there are fewer interfaces, processor capabilities and fans in place; but keep in mind that this is a home lab server.
Do you have a good use case for the home lab server? What's your preferred hardware situation? Share your server preferences below.
Posted by Rick Vanover on 09/25/2015 at 11:28 AM0 comments
There are a lot of features you expect today from a hypervisor; and I'm glad to see that the Hyper-V role coming in Windows Server 2016 will support nested virtualization. This is a feature that's been around on other Type 1 hypervisors for a while, and for Hyper-V this is a bit overdue; still, happy and ready for it.
On a Role In Hyper-V, nested virtualization basically means that a Hyper-V host can run a virtual machine (VM) capable of running the Hyper-V role as well. In the simplest of configurations, one Hyper-V (running Windows Server 2016 or Hyper-V Server 2016) host could have one VM that runs Hyper-V Server 2016 and another virtual machine.
Nested virtualization has been a boon for home lab and workgroup lab practice for years, and one of the most requested features for the lab use case. Personally, I'm ready for this and the timing couldn't be better.
Performance Hits The first thing to note with nested virtualization, regardless of hypervisor platform used, is that it suffers in terms of performance with the bare-metal equivalent. In fact, it's a level of overhead that would in most situations render it "unsupported" for production. This is why it's primarily a lab use case; keep this in mind when it comes to production workloads. It'll be interesting to see Microsoft's official support statement on nested virtualization for use in datacenters and in Azure.
Now that nested virtualization with Hyper-V is an option (after downloading the technical preview of Windows Server 2016), what are the best use cases?
Use CasesThe primary ones for me are to work with the new storage features that apply to Hyper-V. Personally, I don't think the world was ready for the capabilities that SMB 3.0 brought to the table with Windows Server 2012. The first release was a network storage protocol that's agnostic and easy to support, yet ready for a sizeable workload with Hyper-V VMs. Many shops are entrenched in the world of SANs and storage practices of decades past; nested virtualization would be a good place to become confident with SMB 3.0 -- or dismiss it -- based on your experiences.
Another use case is centralized management with System Center Virtual Machine Manager (SCVMM). You need a larger infrastructure for SCVMM make sense; two-host clusters need not apply. If SCVMM is in your future, some lab time enabled by a nested virtual machine manager can give you a look at the intricacies of managing Hyper-V at scale, and using the broader features like migration of VMs.
Nested virtualization for Hyper-V is a big step, and a gateway to lab tasks that provide a closer look at advanced features. I'll be using it to check out the newest Windows Server 2016 features.
Posted by Rick Vanover on 07/30/2015 at 11:19 AM0 comments
There was a time when it was taboo to virtualize critical applications, but that time has long passed. I speak to many people who are 100 percent virtualized, or very near that mark, for their datacenter workloads. When I ask about those aspects not yet virtualized, one of the most common answers is "Active Directory".
I'd encourage you to think a bit about that last mile. For starters, having a consistent platform for Hyper-V or vSphere is a good idea, rather than having just one system that isn't. Additionally, I'm convinced that there are more options with a virtualized workload. Here are some of my tips to consider when you take that scary step to virtualize a domain controller (DC):
- Always have two or more DCs. This goes without saying, but this accommodates the situation when one is offline for maintenance, such as Windows Updates or a hardware failure of the vSphere or Hyper-V host.
- Accommodate separate domains of failure. The reasoning behind having one physical domain controller is often to make it easier to pinpoint whether vSphere or Hyper-V is the problem. Consider, though: By having one DC VM on a different host, on different storage or possibly even a different site, you can address nearly any failure situation. I like to use the local storage on a designated host for one DC VM, and put the other on the SAN or NAS.
- Make sure your "out of band access" works. Related to the previous point, make sure you know how to get into a host without System Center Virtual Machine Manager or vCenter Server. That means having local credentials or local root access documented and available by IP (without DNS as well) is required.
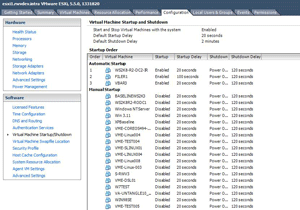
- Set the DCs to auto-start. If this extra VM is on local storage, make sure it's set to auto-start with the local host's configuration. This will be especially helpful in a critical outage situation such as a power outage and subsequent power restoration. Basic authentication and authorization will work.
 [Click on image for larger view.]
Figure 1. Setting auto start on a local host isn't a new trick, but it's important for virtualized domain controllers.
[Click on image for larger view.]
Figure 1. Setting auto start on a local host isn't a new trick, but it's important for virtualized domain controllers.
- Don't P2V that last domain controller -- rebuild it instead. The physical to virtual (P2V) process is great, but not for DCs. Technically, there are ways to do it, especially with the manageable services that allow DC services to be stopped; but it's not recommended.
It's better to build a new DC, promote it and then demote and remove the old one. Besides, this may be the best way to remove older operating systems, such as Windows Server 2003 (less than one year left!) and Windows Server 2008 in favor of newer options such as Windows Server 2012 R2 and soon-to-be Windows Server 2016.
- Today it's easier, with plenty of guidance. The resources available from VMware and Microsoft for virtualizing DCs are very extensive, so there's no real excuse to not make the move. Sure, if it were 2005 we'd be more cautious in our ambitions to virtualize everything, but times have changed for the better.
Do you still hold onto a physical domain controller? If so, why? Share your logic as to why you still have it, and let's see if there's a reason to virtualize the last mile.
Posted by Rick Vanover on 07/01/2015 at 1:14 PM0 comments
VMware vSphere 6.0 has a ton of significant upgrades. I want to touch on one of those -- Linked Mode -- as it's come a long way in vSphere 6.0. I've also been using the vSphere Web Client exclusively now, so bear with me and I'll try not to be too grumpy.
Linked Mode serves an important purpose when there are multiple vCenter Servers, allowing you to view them in one "connection" simultaneously. Additionally, if you create any roles, permissions, licenses, tags or policies (excluding storage policies), they're replicated between the vCenter Server systems. The end result is your administrative view is complete and you can see all items quite easily. But with vSphere 6.0, getting there is a different story.
Enhanced Linked Mode
Enhanced Linked Mode in vSphere 6.0 is something I've been playing with, to learn one key feature:
Cross vCenter vMotion. This allows two linked vCenter Servers to perform vMotion events on a virtual machine (VM). The initial release requires shared storage between them; this may negate the broadest applicability, but it's still an important feature. As such, I'm getting to know vSphere 6.0 in the lab, and it's been a learning experience.
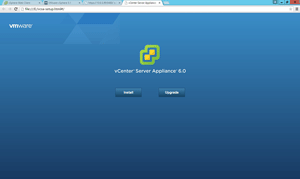
If you download the vCenter Server Appliance now with vSphere 6.0, you'll see that it starts the deployment process a bit differently. An .ISO is downloaded from which you run the installation wizard, as you can see in Figure 1.
 [Click on image for larger view.]
Figure 1. Deploying the vCenter Server Appliance.
[Click on image for larger view.]
Figure 1. Deploying the vCenter Server Appliance.
This new deployment mechanism (browser vs. the historical OVF deploy) makes sense, as many vSphere administrators no longer have access to the vSphere Client for Windows. (A friend pointed out that this may be due to VMware's efforts to move admins away from the Client.)
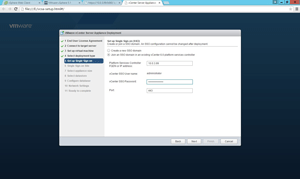
Once you figure out the new deployment model, vSphere Single Sign-on allows you to put a new vCenter Server Appliance into the new Enhanced Linked Mode from its initial deployment. This important step in the deployment wizard is shown in Figure 2.
 [Click on image for larger view.]
Figure 2. Get this right the first time, or you'll surely do it over again.
[Click on image for larger view.]
Figure 2. Get this right the first time, or you'll surely do it over again.
The vCenter Server Appliance deployment wizard then continues with the typical deployment questions; you'll want to plan out these options before putting the Appliance into production. (I've deployed four different times with different options and scenarios, to properly tweak the environment for vSphere 6.0.)
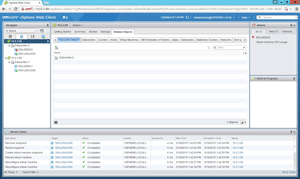
The vSphere Web Client displays your vCenter Servers, their datacenters, their clusters and their VMs. So far so good, but there has been a learning curve. One of my key lessons was that enabling Enhanced Linked Mode and deploying a new vCenter Server Appliance with the vCenter Single Sign-on option is the easiest way to link with vSphere 6.0. Figure 3 shows the Enhanced Linked Mode in action.
 [Click on image for larger view.]
Figure 3. Enhanced Linked Mode makes administration easier.
[Click on image for larger view.]
Figure 3. Enhanced Linked Mode makes administration easier.
Migration/Upgrade Options
I get a lot of questions on how to migrate to or upgrade to vSphere 6.0. One idea I'll throw out is the notion of the replicated VM. It basically involves building one or more new clusters (and, possibly, a new vCenter Server Appliance), then replicating your VMs to it, rather than doing in-place upgrades that might hold on to previous bad decisions in your environment.
In almost any situation, Enhanced Linked Mode and Cross vCenter vMotion give vSphere admins new options. Have you looked into these features yet? What have you learned? Share your comments below.
Posted by Rick Vanover on 05/27/2015 at 10:54 AM0 comments