How To Implement Bandwidth-Efficient Automated User Backups with XenClient
Backups can be resource-savvy if you plug in the right mix of settings in XenClient. Here's how.
Protecting and managing laptops and desktops has been an ongoing challenge for IT professionals. Users want to maximize their productivity and IT departments want to make the devices completely manageable, secure and reliable. To accomplish this last piece -- reliability -- data protection is critical.
XenClient offers a unique approach to desktop virtualization where the virtual machine runs on the end user device itself. One of the benefits is that XenClient enables users to work both online and offline. With hosted virtual desktops, data protection is addressed by backing up the servers, but how does it work for XenClient? If the virtual desktops and the data are on the device, how is data protection handled?
There are really two components to data protection -- ensuring the security of the data, to protect the data from being compromised if the device is lost or stolen, and guaranteeing that the data is continuously backed up. XenClient handles the first through full-disk encryption, time-based lockout, remote kill and other security features. The second is handled through centrally controlled backup policies, which are explained below.
Configuring the Virtual Machine Backup Process
XenClient protects the user by backing up user data on each virtual machine regularly and unobtrusively. Backup serves multiple purposes:
- Providing a copy of user data and profile against the event of an error, failure or loss.
- Maintaining a series of date-specific backups, any of which can be used as a restore point.
- Preserving a copy of user data and profile that can be used for recovery up to the last backup on the same hardware or on a new computer, for rapid migration.
To edit the backup policies, log in to the "Synchronizer" and navigate to "Policies," then go to "All Policies," and then "Virtual Machine Policies." Here you'll see a folder called "Backup Policies," which can be used to set up backup policies (see Fig. 1).
 |
Figure 1. To edit backup policies, login to the Synchronizer and navigate to Virtual Machine Policies. (Click image to view larger version.) |
This section is used to create policies that can be assigned to any virtual machine overall, or by group, or even by specific user. There are just two simple steps to creating a new policy:
- Choose a name for the Backup Policy and, optionally, describe it--
The Policy Name is used to identify the policy and assign it to VMs, groups or users. The description is just plain text that you can use to annotate how this specific policy works or how you plan to use it.
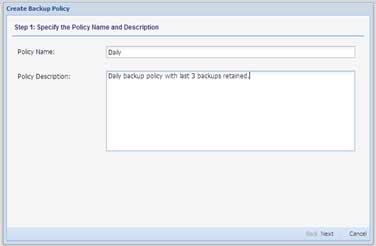 |
Figure 2. Name, describe the policy. (Click image to view larger version.) |
- Define the backup frequency -- Define whether the policy is enabled, how frequently the backups are taken, when to alert the user and admin if backups have not been taken, and how long to retain the backups. The backup frequency can be set in days or hours. In Fig. 1, we've defined 1 day is the backup policy, but it could be as frequent as you want, and some organizations will enable much more frequent backups for select user populations.
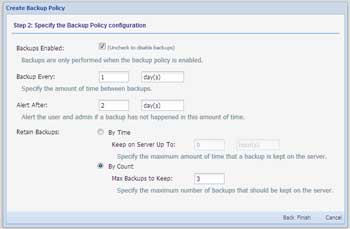 |
Figure 3. Define policy's backup frequency. (Click image to view larger version.) |
Applying Backup Policies by Virtual Machine
Once this policy is set, it can be applied to a specific virtual machine, which means that anyone who is assigned a particular virtual machine will automatically get that backup policy by default. But what if you want the policy for two different users or groups of users to be different, even if they are using the same VM? Not to worry, let's first look at how you setup the default policy for the virtual machine, and then we'll take a look at how to setup different policies for users and groups.
To change the policy for a virtual machine, simply go to the "Virtual Machine" tab and select the virtual machine for which you want to assign a backup policy. Then click on the "Policies" subtab and select one of the backup policies you have created to assign it.
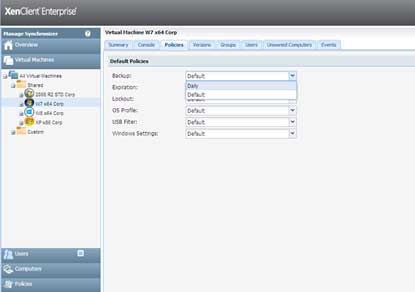 |
Figure 4. Changing policies for a single VM is simple. (Click image to view larger version.) |
User and Group Backup Policies
To assign a backup policy to a specific user or group of users, simply go to the "Users" tab and browser the "Active Directory" tree to select either the group or the specific user. Then click the plus sign to expand the tree to see the VMs assigned to that group or user. Now simply go to the "Policies" subtab and select the policy you created to assign it.
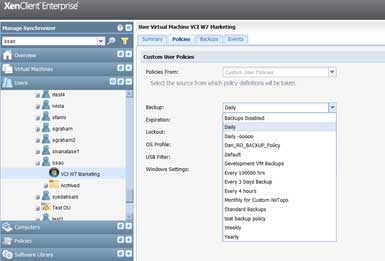 |
Figure 5. Changing policies for a group is just as easy. (Click image to view larger version.) |
Viewing and Restoring Backup Snapshots
The IT administrator can view the specific backups for each user by clicking on the "User" tab and either navigating the active directory tree or using the search box to find the user, and then clicking the "Backups" subtab. When users are migrated from one machine to another their backups come with them automatically, but what if the user accidentally deleted a bunch of files or needs to go back to a previous version? The IT administrator can also choose a previous backup as a restore point from this interface.
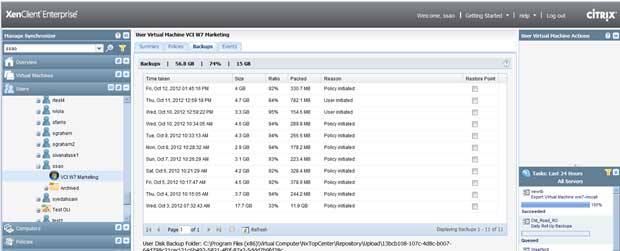 |
Figure 6. Backups are easy; so are restores. (Click image to view larger version.) |
How It Works Behind the Scenes
When a user works on his or her XenClient machine, changes made to user data on the user disk (U:) are tracked in a differencing disk. This includes files that are modified, added or deleted. Note that the user's local disk (L: drive) is not backed up – this is by design, as critical work items are designed to be stored on the U: drive, while the L: drive is used for things like MP3 files or other data that the company does not wish to back up.
If backups are enabled by policy, when a backup is due, the XenClient can automatically upload the differencing disk to the XenClient Synchronizer. Since the upload consists of only the differencing disk, which is much smaller than the full user disk contents, this upload requires little time and is performed as a background task by the XenClient.
A backup set contains the earliest (base) backup and the separate differencing disks between the base and the date of the backup.
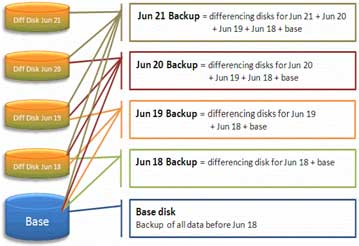 |
Figure 7. Differencing is the difference between sluggish and snappy backups. (Click image to view larger version.) |
These separate backups are listed for each user for each virtual machine. Most business users typically have a single virtual machine assigned to them, but some power users may use one or more virtual machines.
XenClient checks the dates of each backup against the retention period; backups that are older than the retention period are deleted. Backups can also be deleted manually by the administrator. When a backup is deleted, any differencing disks associated with the backup are merged with the backup next dated backup for that user's virtual machine. No data is lost. The backup definition is deleted and the backup for that date (or any previous date) is no longer tracked as a separate entity.
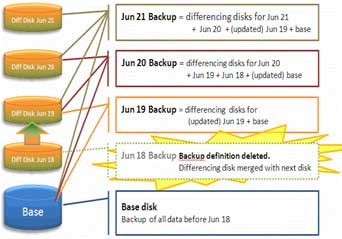 |
Figure 8. Differencing disk merges with next backup when taht backup gets deleted. (Click image to view larger version.) |
Managing Backup & Restore with XenClient
With XenClient and the policies described above, IT organizations can manage the granularly of both user and group backups, enabling them to migrate users to new machines quickly in case of a disaster or to roll back to a previous restore point if the user needs access to files or data that existed at a previous point in time.
Most importantly, all of this is done without disruption to the user. The backups are generated behind the scenes regardless of whether the user is online or offline, and they are unobtrusively uploaded the next time the user's machine is connected to the Internet. And because all of this is handled at the hypervisor level, there's never a risk of the backup agent failing to start or conflicting with another application -- it runs consistently below the operating system layer within the hypervisor.