How-To
Hands-On with WSL: Installing Other Linux Distros
The third article of a five-part series on Microsoft's Windows Subsystem for Linux (WSL).
This article is part three of a five-part series in which I discuss various aspects and functions of the Windows Subsystem for Linux (WSL). In my first article, I demonstrated how WSL can be installed in just five minutes by using Ubuntu. In my second article, I gave an overview of how I use WSL for some of my daily tasks, including connecting to WSL via SSH, installing additional packages on WSL and scheduling future jobs to run at specific times. In this article, I'll go over how other Linux distributions can be installed on Windows 10 and utilize WSL.
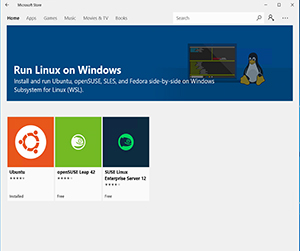
Although Ubuntu was the only official version of Linux that was available with the preproduction version of WSL, the system was named Windows Subsystem for Linux, not Ubuntu. We discovered that this strategic wording had implications for future developments when Microsoft tipped its hand and confirmed that other Linux distros would be available. On May 11, 2017, during Microsoft's Build conference keynote, Terry Myerson, EVP for Windows & Devices Group, made several major announcements about WSL, including that SUSE and Fedora would be included in future versions. SUSE on WSL is now available in the openSUSE community version, as well as the Enterprise server version SUSE Linux Enterprise Server (SLES). As of the time I am writing this article (Jan. 1, 2018), Fedora has yet to appear in the Windows Store (Figure 1).
 [Click on image for larger view.]
Figure 1. Available WSL Linux distros in the Windows Store.
[Click on image for larger view.]
Figure 1. Available WSL Linux distros in the Windows Store.
Both of the SUSE versions are available to download and install from the Windows Store, and I'll share with you my experience downloading and installing them in the following sections. Moreover, because some enterprising individuals became restless with the choices of Linux distros that Microsoft was offering, they developed methods to install other Linux distros on Windows 10, and I'll briefly discuss one of these methods later in this article.
Installing openSUSE 42 Leap
openSUSE is the official community-developed distribution of SUSE. The version that I found on the Microsoft Store was Leap 42. Leap 42 installed on Windows 10 in the same manner as Ubuntu; once installed, I was able to access it by ether clicking the openSUSE42 title in the Windows 10 Start Menu, or by typing openSUSE-42 from the Windows 10 command line. The downloaded openSUSE file was about 225MB and took about five minutes to download and install. Once it was downloaded, I clicked the Pin to Start and Launch buttons. Once I clicked the Launch button, an OpenSUSE Leap 42 console appeared and then it took a few more minutes for it to configure itself.
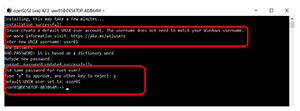
Once I received a message that the configuration was complete, I was presented (just as when I installed Ubuntu) with a prompt to enter a new UNIX username and password; I chose user01, and then I was prompted to indicate whether I wanted to use the same password for the root user (Figure 2).
 [Click on image for larger view.]
Figure 2. Creating a user on openSUSE.
[Click on image for larger view.]
Figure 2. Creating a user on openSUSE.
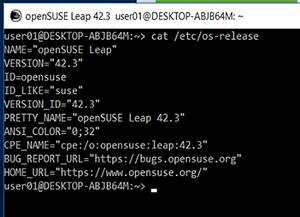
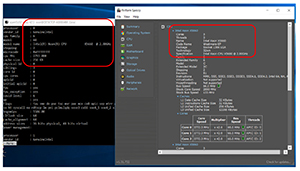
I then looked at the version of openSUSE that was installed by typing in cat /etc/os-release, and it confirmed that I was running openSUSE Leap version 42.3 (Figure 3). I also took a look at the CPU information for openSUSE, and it reported the type and number of CPUs was the same as that reported by the host Windows 10 system (Figure 4).
 [Click on image for larger view.]
Figure 3. Confirming the openSUSE version.
[Click on image for larger view.]
Figure 3. Confirming the openSUSE version.
 [Click on image for larger view.]
Figure 4. The CPU information.
[Click on image for larger view.]
Figure 4. The CPU information.
Where Ubuntu uses dpkg and apt for package management, openSUSE uses the YaST2 Software Management module for graphic package management and Zypper for command-line management of packages. I ran zypper packages --installed-only to see how many packages were installed, and found 415 packages; however, openssh-server was not installed because openSUSE uses the openssh package for both the client and the server.
I tried to get SSH to accept connections, but I was unable to do so. I verified that nothing was listening on port 22 with the Netcat command by typing in nc -v -z 127.0.0.1 22. I then verified that the the SSH server demon (SSHD) wasn't active by typing ps -elf.
I started the SSH server by typing in /usr/sbin/sshd, and verified that it was running using ps and it was active on port 22 with Netcat. When I tried to connect using SSH [email protected], I got a message indicating that the connection was refused. After generating the SSH keys by issuing /user/sbin/ssh-gen-keys-start, I was able to connect to the server using SSH, both from the server itself and from external systems.
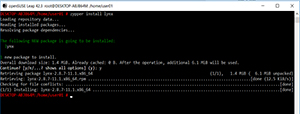
I tested the Zypper package manager by installing Lynx (a console-based Web browser), which I successfully accomplished by typing in sudo zypper install lynx (Figure 5).
 [Click on image for larger view.]
Figure 5. Installing Lynx.
[Click on image for larger view.]
Figure 5. Installing Lynx.
Overall, I found that openSUSE installed as easily as Ubuntu and would be a good choice for those who are already familiar with openSUSE.
SUSE Linux Enterprise Server 12
Whereas openSUSE is the community-driven version of SUSE, SUSE Linux Enterprise Server (SLES) is designed for servers, mainframes and workstations with major versions being released approximately every three to four years.
When I went to get SLES from the Windows Store, I got a notice that I could also sign up for a free one-year developer subscription for SLES. I installed and configured SLES in the same manner as Ubuntu and openSUSE, and was able to launch it by typing sles-12 into the command line, or by clicking the SUSE Linux Enterprise Server 12 tile in the Windows 10 Start Menu.
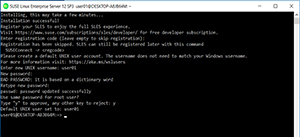
Once SLES was installed, I was presented with a prompt to enter my SLES developer registration code (which I declined to do), and create a UNIX username and set its password, as well as the root password (Figure 6).
 [Click on image for larger view.]
Figure 6. Initial configuration of SLES.
[Click on image for larger view.]
Figure 6. Initial configuration of SLES.
By using Zypper, I found that SLES had 317 packages installed on it. When I tried to install Lynx on it using Zypper, I was met with a message indicating that the repository wasn't configured; I confirmed this by running zypper repos –url. It appears that the official SLES repository is only available to registered users.
I tried to get SSH to accept connections, but I was unable to do so until I went through the same steps I did to configure openSSH with openSUSE.
Other Linux Distros
Because WSL is a subsystem for running Linux, some folks have figured out how to make other versions of Linux run under it. The most popular of these projects seems to be the Windows Subsystem for Linux Distribution Switcher, whose stated purpose is "… to let you easily download and install new Linux distributions under Windows Subsystem for Linux and seamlessly switch between them."
I won't walk you through the steps to install and use the Windows Subsystem for Linux Distribution Switcher, as the Web site does a good job of this; moreover, I also have a hunch that the instructions may change in the future as WSL matures and changes with time. By following the instructions listed on the Web site, I was able to get centOS to run under WSL. I'm a little leery about this type of project, however, as I suspect that Ubuntu and SUSE did a little bit of twiddling to make their systems run on WSL, and this method of installation doesn't seem to address any of those issues.
Wrapping Up
In this article, I took you through the steps to install two supported distributions of Linux on WSL, openSUSE and SLES. I also showed that other, unsupported, versions of Linux can run on WSL. In my next article in this series, I'll show you how to carry out unsupported tasks on WSL and, finally, in my last article, I'll talk about some of the interesting programs and extensions folks have come up with for WSL.
About the Author
Tom Fenton has a wealth of hands-on IT experience gained over the past 30 years in a variety of technologies, with the past 20 years focusing on virtualization and storage. He previously worked as a Technical Marketing Manager for ControlUp. He also previously worked at VMware in Staff and Senior level positions. He has also worked as a Senior Validation Engineer with The Taneja Group, where he headed the Validation Service Lab and was instrumental in starting up its vSphere Virtual Volumes practice. He's on X @vDoppler.