How-To
How To Use AWS To Convert Video Files
Performing cloud-based conversion will help offload the workload from your systems and complete them more quickly.
Like many organizations, I find myself creating more video projects than ever before. As anyone who has ever done any video editing will tell you, working with video is a time-consuming process. And one of the slowest parts of the process is converting your finished video into various formats that are suitable for viewing on a variety of devices and platforms. Thankfully, Amazon Web Services (AWS) can help with this process. There's a way to upload your video to the AWS cloud, and then have AWS convert the video into the required formats. The nice thing about doing cloud-based conversions is that you're able to offload the workload from your own systems, and you may be able to complete the conversions more quickly.
Uploading Your Video
To get started you'll need to upload your video footage to AWS S3. First, open an S3 bucket and click on the option to upload data. When prompted, click on the Add Files button, and then select the video file that you wish to upload, as shown in Figure 1.
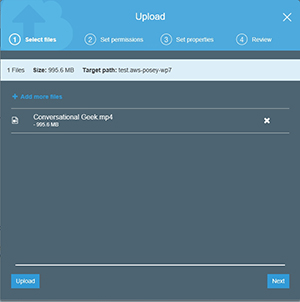 [Click on image for larger view.]
Figure 1. You'll need to upload a video file to an S3 bucket to get started.
[Click on image for larger view.]
Figure 1. You'll need to upload a video file to an S3 bucket to get started.
Click Next, and you'll be taken to a screen similar to the one shown in Figure 2. Here you'll need to set the permissions for the file that you're uploading. After assigning any necessary permissions, click Next.
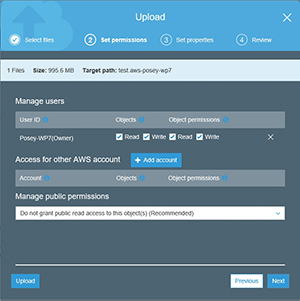 [Click on image for larger view.]
Figure 2. You'll need to grant yourself permission for the file that you're uploading.
[Click on image for larger view.]
Figure 2. You'll need to grant yourself permission for the file that you're uploading.
Follow the remaining prompts to select your storage class and to choose your preferred encryption method (if you want to use encryption), and then proceed with the upload.
Converting the Video
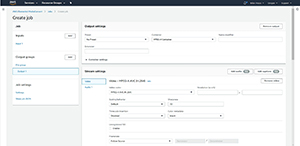
Once you've uploaded a video file to be converted to another format, go to the list of AWS services, and then click on MediaConvert, it's listed in the Media Services section. When the MediaConvert service opens, click on the big, orange Get Started button, located near the top of the screen. You'll now be taken to the Create Job screen, which you can see in Figure 3.
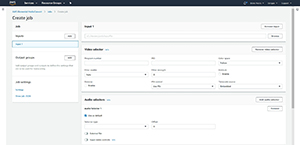 [Click on image for larger view.]
Figure 3. This is the screen that you'll use to create a video conversion job.
[Click on image for larger view.]
Figure 3. This is the screen that you'll use to create a video conversion job.
The first thing that you'll need to do on the Create Job screen is to select the video that you want to convert. To do so, locate the Input 1 section, click Browse and then navigate to and select your video. Selecting your video simply involves selecting the S3 bucket containing the video, and then selecting the video file.
One thing that's worth paying attention to is the Job section on the left side of the screen. You'll notice that Input 1 is listed as a job, but there's also an Add button that you can use to create additional jobs. Hence, it's possible to que multiple videos for conversion.
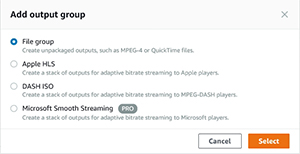
Although the screen shown in the previous figure contains numerous audio and video options, almost all of these options are optional. They exist as tools for professional video editors who need to create broadcast-quality video. If your goal is to perform a basic video conversion, then click on the Add button found in the Output Groups section. Upon doing so, you'll be asked what type of output group you want to create. Choices include File Group (which includes basic formats like MP4 or MOV), Apple HLS, DASH ISO and Microsoft Smooth Streaming. Make your selection, as shown in Figure 4, and click Select.
 [Click on image for larger view.]
Figure 4. Choose the type of output group that you want to create.
[Click on image for larger view.]
Figure 4. Choose the type of output group that you want to create.
Incidentally, you'll notice in Figure 4 that the Microsoft Smooth Streaming group type is listed as Pro. The pro designation shown here, and on some of the output codecs that you'll see later on, indicates that the resulting video will be of professional quality (at least within the limits of the source video), but will also be billed at a higher rate. AWS bases the cost of conversions on the video length, resolution (HD, 4K and so on), and on whether you use a basic or a pro conversion option.
At this point, you'll be taken back to the Create Job screen, and the output group will be added to the screen. At first glance, you don't appear to be able to do anything other than to create a name modifier and specify an extension. However, if you click on the output group name (Output 1 in this case), you'll be taken to a screen that allows you to specify the video codec and resolution that you want to use, along with many other audio and video options. You can see what this looks like in Figure 5.
 [Click on image for larger view.]
Figure 5. Choose your video codec and resolution.
[Click on image for larger view.]
Figure 5. Choose your video codec and resolution.
When you're all done, click the Create button to run your video conversion job and then you're set!
About the Author
Brien Posey is a 22-time Microsoft MVP with decades of IT experience. As a freelance writer, Posey has written thousands of articles and contributed to several dozen books on a wide variety of IT topics. Prior to going freelance, Posey was a CIO for a national chain of hospitals and health care facilities. He has also served as a network administrator for some of the country's largest insurance companies and for the Department of Defense at Fort Knox. In addition to his continued work in IT, Posey has spent the last several years actively training as a commercial scientist-astronaut candidate in preparation to fly on a mission to study polar mesospheric clouds from space. You can follow his spaceflight training on his Web site.