How-To
Sync Files from NFS to EFS in AWS
Amazon Web Services (AWS) lets you make the contents of a file-based server available to resources in a different AWS region.
Amazon Web Services (AWS) makes it possible to synchronize the contents of an NFS-based file server to an Elastic File System (EFS). By doing so, you can make the contents of the file system available to resources in a different AWS region.
The synchronization process is based on the use of a sync agent. This sync agent will need to be created in the region where your NFS file system resides.
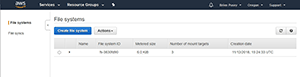
To create the required agent, open the Elastic File System Manager (which you can do by selecting EFS from the list of AWS services). Now, select the region where your source file system resides, and then click on the File Syncs option, which you can see in Figure 1.
 [Click on image for larger view.]
Figure 1. Choose the File Syncs option.
[Click on image for larger view.]
Figure 1. Choose the File Syncs option.
At this point, you'll see an introductory screen that displays a bit of information about what EFS File Sync is, and what it does. Click on the Get Started button to move forward with the agent creation process.
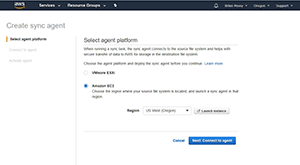
The next screen you'll see asks you to choose an agent platform. You can opt to host the agent on either VMware ESXi or Amazon Elastic Compute Cloud (EC2), as shown in Figure 2.
 [Click on image for larger view.]
Figure 2. Choose the agent platform that you wish to use.
[Click on image for larger view.]
Figure 2. Choose the agent platform that you wish to use.
The options that are shown on this screen vary depending on whether you opt to use VMware ESXi or Amazon EC2. In the case of Amazon EC2, however, you'll need to choose the region where the host file system is located, and then click on the Launch Instance button.
Assuming that you went with the Amazon EC2 option, the next screen you'll see asks you to choose an instance type. The instance size that you choose must be set to xlarge or bigger. Additionally, AWS recommends that you create a memory-optimized instance.
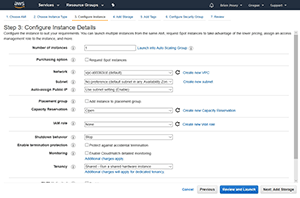
Click Next, and you'll be taken to the Configure Instance Details screen, which you can see in Figure 3. The biggest thing you'll have to pay attention to on this screen is the Auto-Assign Public IP setting. If you want the instance to be accessible to the outside world, then the public IP will need to be set to enable. Otherwise, you should disable this setting for security reasons.
 [Click on image for larger view.]
Figure 3. You'll need to configure the details for the instance you're creating.
[Click on image for larger view.]
Figure 3. You'll need to configure the details for the instance you're creating.
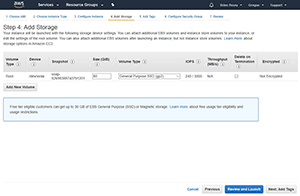
Click Next, and you'll be taken to the Add Storage screen, which you can see in Figure 4. There's no requirement to add additional volumes to the instance you're creating, so you can simply click Next.
 [Click on image for larger view.]
Figure 4. There's no requirement to create additional volumes.
[Click on image for larger view.]
Figure 4. There's no requirement to create additional volumes.
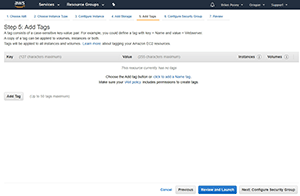
The next screen you'll be taken to is the Add Tags screen, which you can see in Figure 5. AWS doesn't require you to tag EC2 instances. Even so, most organizations that use AWS eventually discover that having a good tagging eco system in place is critical to keeping track of AWS resources. As such, you should tag the new instance according to your own organization's policies and standards.
 [Click on image for larger view.]
Figure 5. Be sure to add any applicable tags to the new instance.
[Click on image for larger view.]
Figure 5. Be sure to add any applicable tags to the new instance.
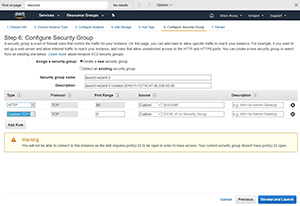
Click Next, and you'll be taken to the Configure Security Group screen, which you can see in Figure 6. In AWS, security groups are essentially just software firewalls. Make sure that the security group settings for the new instance allow HTTP traffic to flow across TCP Port 80. You'll also need to open Port 22, as shown in the warning message in the screen capture.
 [Click on image for larger view.]
Figure 6. You'll need to open ports 80 and 22.
[Click on image for larger view.]
Figure 6. You'll need to open ports 80 and 22.
Now, go ahead and launch the instance. Once the instance is up and running, you'll need to make note of its IP address.
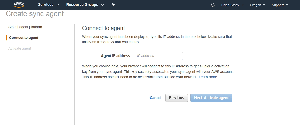
Now, go back to the Create Sync Agent interface, and click on the Next button. This will take you to the Connect to Agent screen, where you need to enter the IP address of the instance you just created. You can see what this looks like in Figure 7.
 [Click on image for larger view.]
Figure 7. Enter the instance's IP address.
[Click on image for larger view.]
Figure 7. Enter the instance's IP address.
Click Next, and you'll be taken to the Activate Agent screen. Simply type a name for your new agent and click on Activate Agent to complete the process.
Now that the agent is active, the next step in the process is to create a sync task. I'll show you how to do that in my next article.
About the Author
Brien Posey is a 22-time Microsoft MVP with decades of IT experience. As a freelance writer, Posey has written thousands of articles and contributed to several dozen books on a wide variety of IT topics. Prior to going freelance, Posey was a CIO for a national chain of hospitals and health care facilities. He has also served as a network administrator for some of the country's largest insurance companies and for the Department of Defense at Fort Knox. In addition to his continued work in IT, Posey has spent the last several years actively training as a commercial scientist-astronaut candidate in preparation to fly on a mission to study polar mesospheric clouds from space. You can follow his spaceflight training on his Web site.