How-To
How To Install and Use the VMware Horizon Performance Tracker
HPT monitors the the performance of the display protocol and virtual desktop usage, which is useful when troubleshooting issues and planning for deployments.
I decided to try Horizon Performance Tracker (HPT), one of the newer features in VMware's virtual desktop infrastructure offering, which was first included with Horizon 7.5.
It runs in a Horizon virtual desktop and monitors the performance of the display protocol and virtual desktop resource usage; this information can be useful when troubleshooting virtual desktop issues, monitoring a virtual desktop's performance and planning for virtual desktop deployments. HPT gathers information from both Horizon Agent and Horizon Client, and is supported on all OSes that support Horizon Agent. All Horizon Clients will work with HPT except for the Horizon Linux Client and the Horizon Client for Windows 10.
In this article, I'll walk you through how I installed HPT, discuss my experience using it and then provide some final thoughts on this new feature.
Installing HPT
When installing Horizon Agent, you need to install the HPT feature (Figure 1). For my example, I installed HPT on a Windows 10 system to be used as the parent virtual machine (VM) for linked-clone desktops. If you install Horizon Agent from the command line, you'll need to pass the Horizon agent, the PerfTracker switch when installing the agent.
 [Click on image for larger view.]
Figure 1. The Horizon Agent.
[Click on image for larger view.]
Figure 1. The Horizon Agent.
After installing the agent, I connected to my virtual desktop and noticed that it now had a VMware Horizon Performance Tracker icon on it (Figure 2).
 Figure 2. The HPT icon on my virtual desktop.
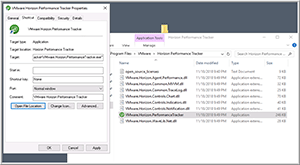
When I right-clicked the HPT icon and selected Properties, it showed a link to a file in the VMware Programs folder (Figure 3).
 [Click on image for larger view.]
Figure 3. The HPT Properties.
[Click on image for larger view.]
Figure 3. The HPT Properties.
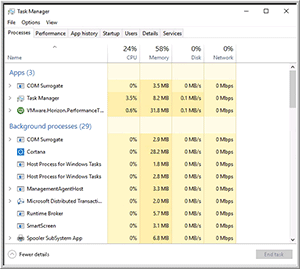
When I brought up Task Manager on the virtual desktop, I noticed that HPT was running as an app rather than a background process and was consuming very few resources (Figure 4).
 [Click on image for larger view.]
Figure 4. The HPT resources.
[Click on image for larger view.]
Figure 4. The HPT resources.
Usage
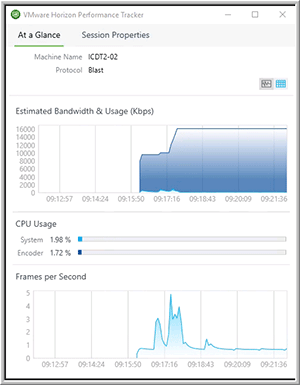
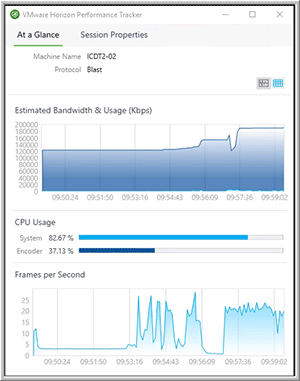
When I double-clicked the HPT icon, it brought up a window with two tabs: At a Glance and Session Properties. When I selected the At a Glance tab, I found the name of the virtual desktop, the protocol it was using, its bandwidth and CPU usage, and frames per second (Figure 5).
 [Click on image for larger view.]
Figure 5. The HPT At a Glance graph.
[Click on image for larger view.]
Figure 5. The HPT At a Glance graph.
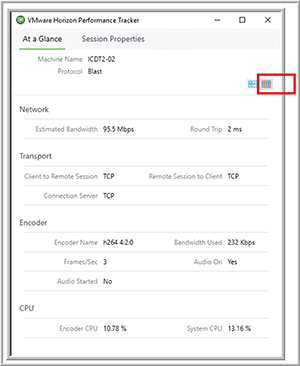
When I clicked the table icon in the upper-right corner, I found detailed information about the session, including the protocol that it was using (TCP), encoder information, as well as the CPU and network utilization (Figure 6).
 [Click on image for larger view.]
Figure 6. The HPT At a Glance table.
[Click on image for larger view.]
Figure 6. The HPT At a Glance table.
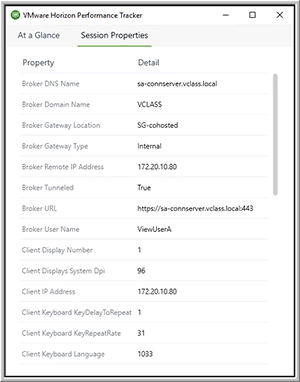
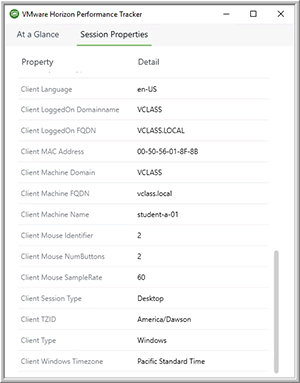
When I clicked Session Properties, I was able to review detailed information about the session, including the broker that I was using, the name of the user, and information about the client that I was using to attach to the virtual desktop (Figure 7 and Figure 8).
 [Click on image for larger view.]
Figure 7. The HPT Session Properties 1.
[Click on image for larger view.]
Figure 7. The HPT Session Properties 1.
 [Click on image for larger view.]
Figure 8. The HPT Session Properties 2.
[Click on image for larger view.]
Figure 8. The HPT Session Properties 2.
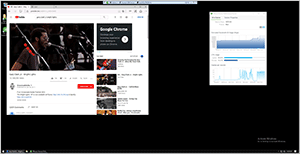
I wanted to see how well HPT tracked the performance of the virtual desktop under load, so I brought up a 4K YouTube video (Figure 9) and monitored the session. In HPT I saw a big upturn in resource usage while the video was playing (Figure 10).
 [Click on image for larger view.]
Figure 9. Opening up a 4K YouTube video.
[Click on image for larger view.]
Figure 9. Opening up a 4K YouTube video.
 [Click on image for larger view.]
Figure 10. The HPT with video playing.
[Click on image for larger view.]
Figure 10. The HPT with video playing.
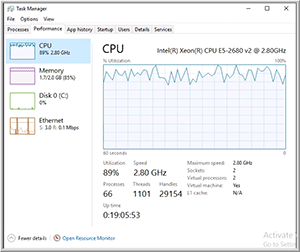
While working with HPT, I brought up Task Manager on the virtual desktop and noticed that it closely mimicked the information I had found in HPT (Figure 11).
 [Click on image for larger view.]
Figure 11. The Task Manager with video playing.
[Click on image for larger view.]
Figure 11. The Task Manager with video playing.
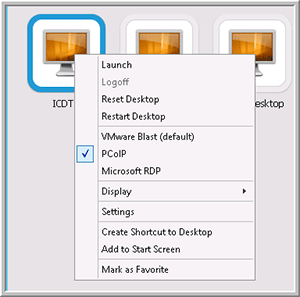
Until this point, I had carried out all my testing by using the Blast protocol. To test HPT with PCoIP, I disconnected and logged off the virtual desktop, and then reconnected to it using PCoIP (Figure 12).
 [Click on image for larger view.]
Figure 12. The PCoIP virtual desktop.
[Click on image for larger view.]
Figure 12. The PCoIP virtual desktop.
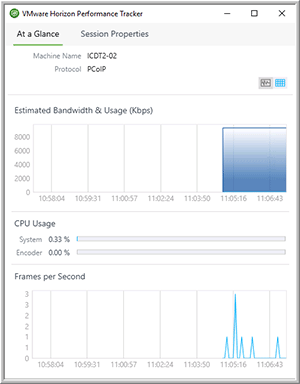
Once I had attached to the virtual desktop, I brought up HPT and noticed that it correctly identified the protocol as PCoIP (Figure 13), and the information it displayed was similar to the information shown when I used the Blast protocol.
 [Click on image for larger view.]
Figure 13. PCoIP with HPT.
[Click on image for larger view.]
Figure 13. PCoIP with HPT.
Wrapping Up
I found HPT to be quick to install with a single click, and overall HPT serves as a way to get a general feeling of the CPU resource usage of a virtual desktop and an easy means to identify the specifics about the virtual desktop and Horizon Client. Although you can obtain this same information in other ways (such as by combing through the registry), I found that having it readily available in a central and easily accessible location helpful; this would especially be a big help when trying to diagnose issues with a Horizon virtual desktop or for monitoring the relative performance of multiple virtual desktops that are using different protocols and VDI clients.
About the Author
Tom Fenton has a wealth of hands-on IT experience gained over the past 30 years in a variety of technologies, with the past 20 years focusing on virtualization and storage. He previously worked as a Technical Marketing Manager for ControlUp. He also previously worked at VMware in Staff and Senior level positions. He has also worked as a Senior Validation Engineer with The Taneja Group, where he headed the Validation Service Lab and was instrumental in starting up its vSphere Virtual Volumes practice. He's on X @vDoppler.