How-To
Create Serverless Containers in AWS
With AWS Fargate, you can run containers without having to manage servers or clusters.
When an organization decides to start using containers, there's usually quite a bit of work that has to happen before the first production container is ever brought online. An organization might, for instance, need to provision some container host servers, and then join those hosts to a failover cluster. For those who prefer not to get involved with the underlying infrastructure, Amazon Web Services (AWS) offers a serverless container solution called AWS Fargate. AWS Fargate allows you to create containers within the AWS cloud, but without the hassle of setting up hosts or clusters.
At the time that I wrote this blog post, AWS Fargate was missing from the list of AWS services, and was somewhat difficult to find. I was eventually able to access AWS Fargate using this URL: https://console.aws.amazon.com/ecs/home?region=us-east-1#/firstRun. My guess is that AWS will eventually add an AWS Fargate link to its list of services, but the link here should suffice for now.
Setting up a container with AWS Fargate involves a simple, four-step process. I'll show you what these steps look like.
Step 1: Container and Task
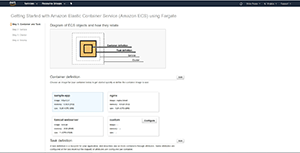
The first and arguably most important step in setting up containers using AWS Fargate is to establish a container definition and a task definition, as shown in Figure 1.
 [Click on image for larger view.]
Figure 1. You'll need to select a container definition and a task definition.
[Click on image for larger view.]
Figure 1. You'll need to select a container definition and a task definition.
As you can see in Figure 1, choosing a container definition involves choosing the container image that you want to use. Amazon provides a few "out of the box" container images such as a sample app and a Tomcat Web Server image.
You can of course also define your own container image. If you look back at Figure 1, you can see that there's an option to provide a custom container image. Simply click on the Configure button within the Custom box, and you'll be prompted to enter all of the pertinent information. This includes things such as the container name, the image that you want to use, memory limits for the container, port mappings and that sort of thing.
The task definition is essentially a blueprint for your containerized application. It includes things such as the network mode, the amount of memory used for the task, and the CPU usage. Although you can accept the default values, Amazon allows you to customize the task definition on an as-needed basis. To do so, just click on the Edit button. This will take you to a screen that will allow you to choose a different task definition name, and to specify a different amount of memory and CPU resources.
Step 2: Service
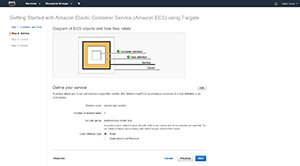
The second step in the process is to create a service definition. You can see the Service screen in Figure 2.
 [Click on image for larger view.]
Figure 2. This is what the Service screen looks like.
[Click on image for larger view.]
Figure 2. This is what the Service screen looks like.
The Service screen lets you specify the number of simultaneous of a task definition within your cluster. As you can see in the figure for example, the Service screen is currently configured to run a single task. By clicking the Edit button, however, you can specify a different task count. The Edit button also gives you the ability to choose a different AWS security group to be used by the service, and it gives you the option of using a load balancer.
Step 3: Cluster
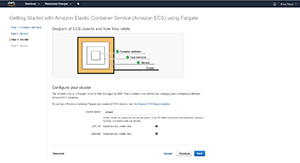
The third step in the process is to create a cluster. Remember, though, that AWS Fargate is a serverless container platform. Even though your containers run on a cluster, the cluster is created and managed by AWS. The only thing that you have to do is provide a name for the cluster, as shown in Figure 3.
 [Click on image for larger view.]
Figure 3. You'll need to provide a name for the cluster on which the container will run.
[Click on image for larger view.]
Figure 3. You'll need to provide a name for the cluster on which the container will run.
Step 4: Review
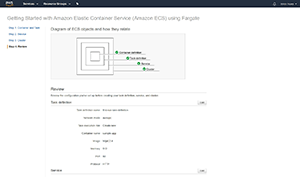
The final step in the process is to review your configuration. As you can see in Figure 4, the Review screen gives you the chance to review all of the settings related to your task definition, service definition and cluster. It's a good idea to take a moment to review all of the configuration options and make sure that they're correct. If you find any settings that need to be changed, you can do so by clicking on the Edit button.
 [Click on image for larger view.]
Figure 4. The Review screen lets you review all of the settings related to your task definition, service definition and cluster.
[Click on image for larger view.]
Figure 4. The Review screen lets you review all of the settings related to your task definition, service definition and cluster.
When you're done, simply click on the Create button at the bottom of the screen and your container will be created.
About the Author
Brien Posey is a 22-time Microsoft MVP with decades of IT experience. As a freelance writer, Posey has written thousands of articles and contributed to several dozen books on a wide variety of IT topics. Prior to going freelance, Posey was a CIO for a national chain of hospitals and health care facilities. He has also served as a network administrator for some of the country's largest insurance companies and for the Department of Defense at Fort Knox. In addition to his continued work in IT, Posey has spent the last several years actively training as a commercial scientist-astronaut candidate in preparation to fly on a mission to study polar mesospheric clouds from space. You can follow his spaceflight training on his Web site.