In-Depth
The Dell UltraSharp U3219Q Monitor with Built-in KVM Switch
With enough real estate to work with multiple documents, you can attach multiple different computers and VDI clients, as well as wireless and wired keyboards and mice with no issues.
I had the chance earlier this year to spend three months using a Dell U3818DW 4K monitor. Not only did the monitor have a very large, beautiful 38-inch curved display, but it also had a unique feature: a built-in KVM (keyboard, video and mouse) switch, allowing the screen to be shared between two computers. After I finished reviewing the monitor, and I shipped the U3818DW back to Dell, I noticed how much I missed the large amount of real estate the monitor provided me, and I missed the KVM switch even more.
I tried to replace the Dell monitor's KVM functionality with a stand-alone KVM switch, but that switch didn't support 4K monitors. I thought that I could work around this by using an HDMI switch, but this proved to be cumbersome -- not only did I have to press the KVM switch to toggle between the keyboard and mouse, I also needed to press the HDMI switch to toggle between the monitors. I soon found out that the HDMI switch doesn't keep the signal to the computer alive when it's switched to the other system; when this happens, the computer basically thinks that the monitor has been disconnected, which causes all sorts of issues. Also, all the cables scattered over my desk were driving me crazy. To say the least, I really missed having a monitor with a built-in KVM switch, so I reached out to Dell and the company provided me with another monitor with a built-in KVM, the Dell UltraSharp U3219Q.
In this article, I'll take a look at the Dell U3219Q by outlining its specs, discussing my usage of the monitor, and then give you my final thoughts about it.
Specs
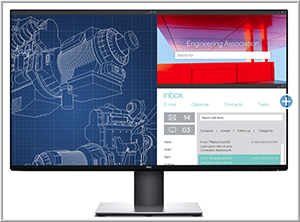
The Dell U3219Q is mid-priced for an office monitor -- Dell lists it at USD $880; however, you can find it for less at other retailers. Its wide flat display measures out at 28 x 16.3 inches, has a 16:9 aspect ratio, a very thin border around the screen, a pixel pitch of 0.182 mm, a contrast ratio of 1300:1, and a native resolution of 4K (3840 x 1600 at 60 Hz). It weighs in at 12.8 pounds, comes with an adjustable stand, and has the look of a professional monitor (Figure 1). You can find the monitor's full technical specs and its compliance standards here.
 [Click on image for larger view.]
Figure 1. The Dell U3219Q monitor.
[Click on image for larger view.]
Figure 1. The Dell U3219Q monitor.
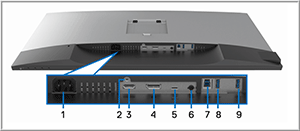
As I noted earlier, the main reason I went with the U3219Q is its built-in KVM switch. This monitor has a USB-C upstream/DisplayPort with Power Delivery, 1 x HDMI (HDCP), 1 x DisplayPort, 2 x USB 3.0 downstream with Battery Charging 1.2, 2 x USB 3.0 downstream, and USB 3.0 upstream ports -- overall, a minimal amount of ports when compared to the U3818DW. The downstream ports are used to connect the device to your computers, and the upstream ports are used to connect your keyboard, mouse, and other USB devices to the monitor (Figure 2), which will then pass them along to the different systems connected to it. All of the ports are located on the bottom of the stand and the stand base has a hole in it designed to pass cables through. The monitor consumes 46 W (typical), 230 W (maximum) and 0.5 W (standby/sleep).
 [Click on image for larger view.]
Figure 2. Connectivity options.
[Click on image for larger view.]
Figure 2. Connectivity options.
Usage
I just about sent back the U3818DW soon after I received it, thinking that I had ordered the wrong monitor. When I went to plug the HDMI cables into it, I was surprised to see that it only had a single HDMI and DP port, and was missing the upstream USB ports used to connect it to my computers. I looked at the Quick Start guide and I didn't see any information about setting it up with two computers. Confused, I double checked Dell's Web site for the monitor, which said that the monitor did, in fact, have a built-in KVM switch. Strange.
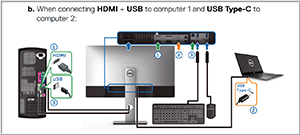
I then did something that I seldom do, check the manual, and found the answer hidden on pages 57 and 58: You connect the USB 3.0 upstream port (cable supplied) and USB Type-C port (cable supplied) to the appropriate USB ports on the computers you want to use it with rather than using the more traditional method of using an HDMI or DP connection (Figure 3) to connect both the computers to it. Doing so eliminates the need to connect a separate USB cable for the keyboard and mouse to each system; this makes for an extremely clean setup, but it does require you to have a USB-C port on your computers, which most current computers do.
 [Click on image for larger view.]
Figure 3. Connecting two computers.
[Click on image for larger view.]
Figure 3. Connecting two computers.
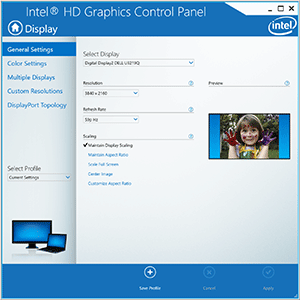
I plugged the USB 3.0 cable into the docking station for my laptop and then inserted the dongle for my Dell Wireless Keyboard and Mouse Combo (KM717) in one of the monitor's upstream ports. After I powered on the monitor, my laptop discovered it, set the resolution to 4K (Figure 4), and found my keyboard and mouse without any issues. I was impressed with the quality of its display -- the colors really popped out.
 [Click on image for larger view.]
Figure 4. The 4K display settings.
[Click on image for larger view.]
Figure 4. The 4K display settings.
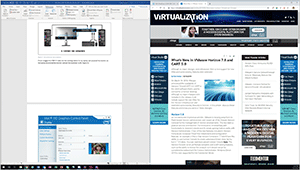
The U3818DW is a large monitor that can easily display two applications side-by-side (Figure 5), but it takes up less space than the two 24-inch monitors that it replaced.
 [Click on image for larger view.]
Figure 5. Displaying two applications.
[Click on image for larger view.]
Figure 5. Displaying two applications.
After working with the monitor for a few days, I switched the Dell wireless keyboard and mouse to a Lenovo wireless keyboard and mouse (4X30M39458). After plugging in the Lenovo dongle, the system found the keyboard and mouse without any issues.
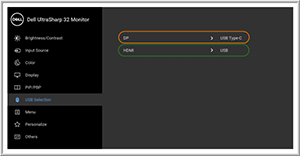
I connected a USB and an HDMI cable to another computer that I was working with, an Intel NUC 8i7BEH, and was able to switch to the second computer by using the buttons on the lower-right corner of the monitor. The NUC displayed correctly at 4K, and I was able to use the keyboard and mouse without any issues. I also found that I could use the monitor's menu to preassign a button on the monitor to instantly go to either of the devices that I had attached to it (Figure 6).
 [Click on image for larger view.]
Figure 6. Assigning keys to instantly go to the devices attached.
[Click on image for larger view.]
Figure 6. Assigning keys to instantly go to the devices attached.
I then removed the NUC computer and attached an Intel Atom Quad-Core Compute Stick (STCK1A8LFC) to the monitor, which it connected to without any issues; the system automatically matched the monitor's resolution to the Compute Stick's native resolution of 1920 x 1080 @ 60Hz.
For the final test, I hooked up a Wyse 5070 VDI client (a beast of a VDI client) to the monitor; it also connected without any issues, and automatically matched the monitor's resolution to the VDI client's maximum resolution of 4K @ 60Hz.
Wrapping Up
After working with the Dell U3219Q for three months, I can report that I haven't had any issues. Its embedded KVM switch has worked flawlessly with a number of different computers and VDI clients, as well as wireless and wired keyboards and mice that I have tried with it. If you work with multiple computers, I highly recommend you investigate using a monitor with a built-in KVM switch.
So, of the two monitors I reviewed—the U3219Q and the U3818DW—which one would I recommend? It really depends on what you'll use it for. For me, as I usually work with multiple office documents at the same time and do a fair amount of system administration work, I found, much to my surprise, that I preferred the U3219Q as it has enough real estate to work with multiple documents, and display system management consoles without any issues. Also, having just a single USB cable to each of the two computers attached to it significantly declutters my desk. But if I used my system for gaming, or did video work, the U3818DW with its curved 38-inch display would probably make more sense.
About the Author
Tom Fenton has a wealth of hands-on IT experience gained over the past 30 years in a variety of technologies, with the past 20 years focusing on virtualization and storage. He previously worked as a Technical Marketing Manager for ControlUp. He also previously worked at VMware in Staff and Senior level positions. He has also worked as a Senior Validation Engineer with The Taneja Group, where he headed the Validation Service Lab and was instrumental in starting up its vSphere Virtual Volumes practice. He's on X @vDoppler.