How-To
How To Use Linux for an ESXi NFS Server
Tom Fenton explains which Linux distribution to use, how to set up a Network File Share (NFS) server on Linux and connect ESXi to NFS.
In a previous article, "How To Set Up an NFS Server on Windows Server 2012," I explained how it took me only five minutes to set up a Network File System (NFS) server to act as an archive repository for vRealize Log Insight's (vRLI) built-in archiving utility. I recently had the opportunity to set up a vSphere environment, but, due to the cost of Windows Server, it didn't make sense to use Windows as an NFS server for this project. I don't have a problem paying for software -- in fact, I see great value in Windows Server -- but for this project I only needed NFS services, and the cost of purchasing and using Windows Server just for an NFS server didn't make sense. In this article, I'll discuss how I chose which Linux distribution to use, how I set up NFS on Linux and connected ESXi to NFS.
Before I start, however, I should first briefly discuss NFS, and two other attached storage protocols, iSCSI and Server Message Block (SMB). Both SMB and NFS share files rather than block devices as iSCSI does. Although SMB and NFS can both work with various OSes (Windows, Linux, macOS and so on) the reality is that SMB is most often used by Windows and macOS systems, and NFS is most often used by Linux and Unix systems.
ESXi originally only supported NFS v3, but it recently also gained support for NFS v4.1 with the release of vSphere. The biggest difference between NFS v3 and v4.1 is that v4.1 supports multipathing. VMware did a very good job documenting the difference between v3 and v4.1 (Figure 1); most (but not all) vSphere features and products support v4.1, so you should still check the documentation to make sure your version of NFS supports the vSphere features that you're using.
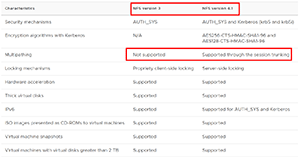 [Click on image for larger view.] Figure 1. NFS v3 vs. v4.1.
Selecting the Distribution
Although I was tempted to use purpose-built storage software, such as FreeNAS or OpenFiler, for this project, I decided instead to go with a general-purpose OS as I may want to have the system deliver other services later on. After looking at OpenSUSE, Photon OS, CentOS, and Fedora Server, I chose Ubuntu 18.04.2 LTS due to its wide range of packages available, very good documentation, and most importantly—it will be supported until April 2023. I chose to use desktop rather than server as it comes with a GUI, and all of the packages that I need to install are available for it.
Installing and Configuring Ubuntu
I installed Ubuntu on a virtual machine in my ESXi server, and I created a 2 vCPU, 8GB RAM system. When I installed Ubuntu Desktop, I chose to go with a minimal installation as I didn't need any office software, games or media players.
After the installation was complete, I opened a terminal and entered the following commands to become a root user and install NFS (Figure 2):
sudo bash
apt install nfs-kernel-server
 [Click on image for larger view.] Figure 2. Installing the NFS server.
I verified that NFS v4.1 was supported by entering (Figure 3):
/proc/fs/nfsd/version
 [Click on image for larger view.] Figure 3. Verifying the supported NFS versions.
Next, I created a directory to share titled TestNFSDir, and then changed the ownership and permissions on it. I completed these steps by entering:
mkdir -p /mnt/TestNFSDir
chown nobody:nogroup /mnt/TestNFSDir
chmod 777 /mnt/TestNFSDir
I then entered the following in /etc/exports files:
/mnt/TestNFSDir *(rw,sync)
The "*" allows any IP address to access the share, and rw allows read and write operations. There are many other operations that can be used with NFS, so be sure to consult the NFS documentation to see which are applicable to your environment.
I exported the files, started the NFS server and opened up the firewall by entering the following commands:
exportfs -a
systemctl restart nfs-kernel-server
ufw allow from 10.0.0.0/24 to any port nfs
ufw status
I then entered showmount -e to see the NFS folders/files that were available (Figure 4).
 [Click on image for larger view.] Figure 4. The NFS folders.
Connecting to NFS Using vSphere
To see if the NFS share was accessible to my ESXi servers, I logged on to my vCenter Client, and then selected Storage from the dropdown menu (Figure 5).
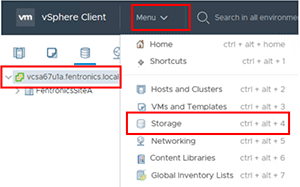 [Click on image for larger view.] Figure 5. The vCenter Client Storage menu.
I right-clicked my cluster, and then selected Storage | New Datastore, which brought up a wizard. I selected NFS | NFS 4.1 (NFS 3 was also available), supplied the information regarding the datastore, and accepted the rest of the defaults.
When I expanded the storage, I saw the NFS datastore. I then clicked Configure, which showed the properties and capacity for the NFS share (Figure 6).
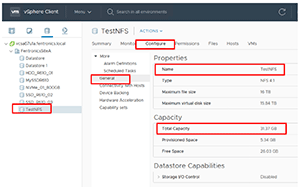 [Click on image for larger view.] Figure 6. The NFS datastore.
Next, I prompted the vSphere Client to create a virtual machine (VM) on the NFS share titled DeleteMe, and then went back over to my Ubuntu system and listed the files in the directory that were being exported; I saw the files needed for a VM (Figure 7).
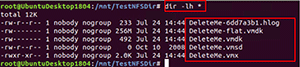 [Click on image for larger view.] Figure 7. The required virtual machine files.
To verify which system was using the NFS share, as well as which ports NFS was using, I entered netstat | grep nfs and rpcinfo -p | grep nfs (Figure 8).
 [Click on image for larger view.] Figure 8. Verifying the NFS ports and the system using NFS.
Wrapping Up
I was pleasantly surprised to discover how easy it was to set up an NFS share on Ubuntu that my ESXi server could access. The ability to serve files using Ubuntu will allow me to replace my Windows Server for my project.
About the Author
Tom Fenton has a wealth of hands-on IT experience gained over the past 30 years in a variety of technologies, with the past 20 years focusing on virtualization and storage. He previously worked as a Technical Marketing Manager for ControlUp. He also previously worked at VMware in Staff and Senior level positions. He has also worked as a Senior Validation Engineer with The Taneja Group, where he headed the Validation Service Lab and was instrumental in starting up its vSphere Virtual Volumes practice. He's on X @vDoppler.