How-To
Configuring and Using Intel AMT for Remote Out-of-Band Server Management
Tom Fenton walks you through how to enable and configure AMT and describes his experience using it for remotely accessing servers via the network at the BIOS level, an ability commonly referred to as out-of-band management (OOB).
For the past 20 or so years, various server manufacturers have enabled system administrators (SAs) to remotely access their server via the network at the BIOS level, an ability commonly referred to as out-of-band management (OOB). In the past, I have worked with OOB products including IBM (RSA), Dell (DRAC), and HP (iLO), but I have never had the chance to work with Intel Active Management Technology (AMT). In this article, I will first walk you through how to enable and configure AMT, and then I will describe my experience using it with an Intel system that I recently had in my lab.
The system I used was an Atrust s101C server with American Megatrend BIOS. Although most Intel servers, workstations, and upper-end desktops and laptops have AMT, not all Intel-branded computers and motherboards do. You can reference the Intel spec sheet to determine whether or not a particular system has AMT.
The first widely available version of Intel AMT was released in 2007. Over the years, Intel has added a wide range of features to AMT, including remote KVM, remote media mounting, time-based wake up, and event log viewing. AMT works by using a small secondary processor located on the motherboard, and you can connect to a system running AMT by using a variety of tools.
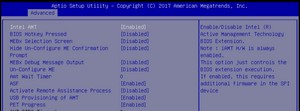
To enable AMT, press Esc while the system is booting up, and navigate to Advanced > AMT Configuration.
 [Click on image for larger view.]
From this screen, enable Intel AMT, save the settings, and then exit the BIOS setup.
 [Click on image for larger view.]
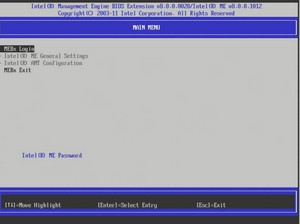
Initiate a reboot of the system, and while the system is booting up, again press the Ctrl and P keys. Doing so will bring you to the Management Engine BIOS Extension (MEBx) Login screen, which will ask you for the default admin password (admin). It will then prompt you to set a new password (must be at least eight characters long, contain at least one upper case character, one number, and one special character; it cannot contain any Unicode character). Once you have set the password, you can then reboot the system by pressing Ctrl and P keys once more. Afterward, select MEBx Login and log in as admin with the password that you just set.
 [Click on image for larger view.]
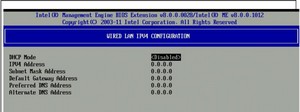
AMT can use either a static or DHCP IP address. To use a static IP address, select Intel AMT Configuration > Manageability Feature Selection, then select Enabled. Next, select SOL/Storage Redirection/KVM and enable Storage Redirection and KVM Feature Selection. Select Network Setup > Intel ME Network Name Settings and enter your host name in the Host Name text box. After doing so, go to Network Setup > TCP/IP Settings > Wired LAN IPV4 Configuration, disable DHCP Mode, and fill out the information for your static IP address. Finally, exit the MEBx configuration menu and allow your system to boot up to your OS.
 [Click on image for larger view.]
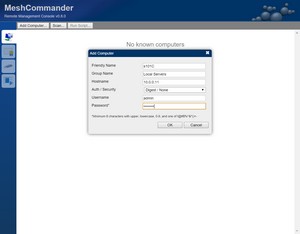
There are few different tools that you can use to access AMT, but the one that I found most useful is MeshCommander (located here), an open source web-based remote management tool that supports many OOB features, including remote desktop, remote terminal, and remote access to files. It runs on all of the common platforms, including Windows, Linux, and macOS.
After installing and launching MeshCommander, I selected Add Computer and entered the information for my AMT.
 [Click on image for larger view.]
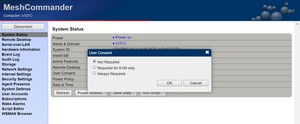
I clicked Connect, and was shown the status of my system. The left-hand menu also listed the other tasks that I could accomplish using MeshCommander.
 [Click on image for larger view.]
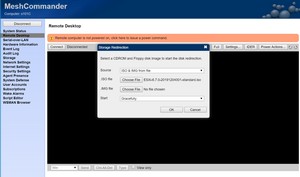
I clicked the User Consent row and selected Not Required. I then clicked Remote Desktop from the left-hand menu, and then Connect. This displayed my Windows login screen, and I was able to log in to the system without any issues. I wanted to connect an ISO file on the system that I was using to my remote system, so I clicked IDER. This brought up a panel that allowed me to choose the ISO image I wanted to mount to the remote system.
 [Click on image for larger view.]
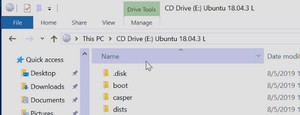
When I opened File Explorer on the remote system, I saw that the ISO image was indeed mounted.
 [Click on image for larger view.]
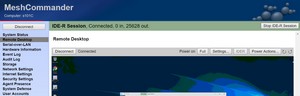
I then clicked Stop IDE-R Session to unmount the ISO image from the remote session.
 [Click on image for larger view.]
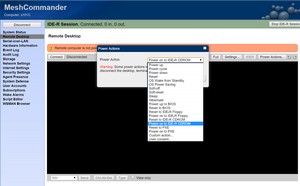
From the
Power Actions drop-down, I selected
Power up and then clicked
OK. After a few minutes, the system was shown in the remote desktop of MeshCommander in the BIOS screen.
 [Click on image for larger view.]
OOB is needed in today's modern datacenter, and I was pleasantly surprised at how easy it was to set up and configure AMT. I had never used MeshCommander before, but I found it equally easy to use. I only scratched the surface of the capabilities that both of these products offer in this article. In my next article, I will show you how I installed ESXi on a system using AMT.
About the Author
Tom Fenton has a wealth of hands-on IT experience gained over the past 30 years in a variety of technologies, with the past 20 years focusing on virtualization and storage. He previously worked as a Technical Marketing Manager for ControlUp. He also previously worked at VMware in Staff and Senior level positions. He has also worked as a Senior Validation Engineer with The Taneja Group, where he headed the Validation Service Lab and was instrumental in starting up its vSphere Virtual Volumes practice. He's on X @vDoppler.