How-To
Repairing a Failed AWS EC2 Windows Instance, Part 2
Although EC2 usually does a good job of hosting virtual machine instances, things can and sometimes do go wrong, and here Brien Posey continues his explanation of how to fix problems with an instance's boot volume.
In my previous blog post, I began showing you how to repair a corrupt EBS volume that is associated with an EC2 instance that is running Windows. In this blog post, I want to wrap up the discussion by showing you the rest of the procedure.
The next step in the process is to log into the healthy instance to which you attached the corrupt EBS volume. Once you are logged in, right-click on the Windows Start button and then choose the Run command from the resulting menu. Now, enter the DISKMGMT.MSC command at the Run prompt. This will cause Windows to open the Disk Management Console. You can see what this looks like in Figure 1.
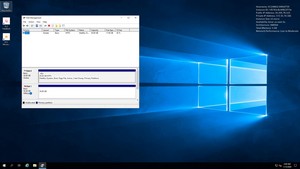 [Click on image for larger view.] Figure 1: This is the Windows Disk Management Console.
As you look at the Disk Management Console in the figure above, you will see two disks. Disk 0 is the disk that is native to this virtual machine instance. This is the disk that contains the instance's operating system. Disk 1 is the corrupt disk that was previously attached to another instance. As you can see, Windows recognizes the disk, but it is presently offline.
To bring the disk online, right-click on the disk (right-click on the area that says Disk 1, not in the area that says 30 GB) and choose the Online option from the shortcut menu, as shown in
Figure 2. Upon doing so, Windows will bring the disk online, and may even assign a drive letter, as shown in
Figure 3. If no drive letter is assigned, right-click on the disk's volume (the portion that says 30 GB) and choose the Change Drive Letter and Paths command from the shortcut menu.
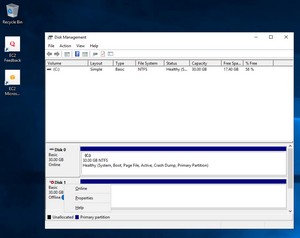 [Click on image for larger view.] Figure 2: Right-click on the disk and choose the Online command from the shortcut menu.
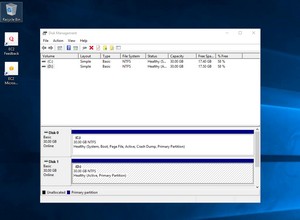 [Click on image for larger view.] Figure 3: The disk is now online and ready for use.
Now you can begin repairing the volume. One option is to open a Command Prompt window and use the CHKDSK command. You will need to specify the drive letter and one or more switches. Typically for example, you would use the /Scan switch to scan the volume for errors. You can see the available options in Figure 4.
 [Click on image for larger view.] Figure 4: The CHKDSK command provides a number of switches that can be used to fix a corrupt volume.
If you aren't a big fan of command-line utilities, then you can use File Explorer instead. From within File Explorer, right-click on the disk and choose the Properties command from the resulting shortcut menu. This will cause Windows to open the disk's properties sheet. Now, select the properties sheet's Tools tab and then click on the Check button, shown in Figure 5.
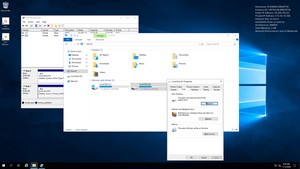 [Click on image for larger view.] Figure 5: You can use the Check button to check the disk for errors.
When you finish scanning the disk and correcting any errors, go back to the Disk Management Console. Right-click on the disk, and then choose the Offline command from the shortcut menu to take the disk offline. It is now safe to log out of the instance.
The next thing that you will need to do is to go back into the EC2 Dashboard and select the Elastic Block Store Volumes tab. Right-click on the recently repaired volume and choose the Detach Volume command, just as you did before. This will disassociate the volume from the EC2 instance that you used to fix it.
Once the volume is detached, you will need to reattach it to its original EC2 instance. Simply right-click on the volume, and then choose the Attach Volume command from the shortcut menu. When prompted, click on the Instance field, and then choose the instance that was originally using the volume. Next, click in the Device field, and enter the name of the device that the volume was originally mapped to. In my case, the volume was originally mapped to \dev\sda1. Click the Attach button to complete the attachment.
Now, go back to the Instances tab. You should be able to start and then log into the instance. When you log in, there is a chance that Windows may not initially recognize your recently repaired volume. If that happens, open the Disk Management console and make sure that the disk is online and that it is mapped to the same drive letter as before.
About the Author
Brien Posey is a 22-time Microsoft MVP with decades of IT experience. As a freelance writer, Posey has written thousands of articles and contributed to several dozen books on a wide variety of IT topics. Prior to going freelance, Posey was a CIO for a national chain of hospitals and health care facilities. He has also served as a network administrator for some of the country's largest insurance companies and for the Department of Defense at Fort Knox. In addition to his continued work in IT, Posey has spent the last several years actively training as a commercial scientist-astronaut candidate in preparation to fly on a mission to study polar mesospheric clouds from space. You can follow his spaceflight training on his Web site.