How-To
How to Install and Use NetropyVE 4
Tom Fenton does a step-by-step review of the installation and use of NetropyVE 4, a software version of the well-regarded Netropy hardware appliance for WAN emulation and testing.
Last year, I had the opportunity to install and use the first iteration of NetropyVE, Apposite's WAN simulation for virtual environments. NetropyVE is a software version of Netropy, a well-regarded WAN emulator hardware appliance. Like Netropy, NetropyVE can inject jitter, latency, and packet loss into a network stream; unlike Netropy, however, NetropyVE is installed as a virtual appliance on vSphere rather than as a hardware appliance. I was able to get the first version of NetropyVE up and running in less than a half an hour, and was impressed with its ease of use and functionality.
Apposite just released NetropyVE 4, and I was excited to try it out as it has an HTML5 rather than Flash-based GUI, supports API, and comes with predefined network conditions.
There are many reasons why you would want to slow down your network and degrade its performance; for instance, I do so when testing virtual desktop infrastructure (VDI) clients in order to observe how they would behave under the wide range of network conditions that a VDI user may encounter. In order to simulate these conditions in the past, I would set up a FreeBSD virtual machine (VM) to inject jitter and latency into the network stream between a VDI client and a virtual desktop. The downside to this method, I found, was that it was both time consuming to set up the FreeBSD machine, and it did not behave as reliably as would be ideal for a controlled test environment.
Installing NetropyVE 4
I installed NetropyVE 4 on a Dell R610 server that I have in my vSphere lab environment which is managed by vCenter Server Appliance (VCSA) 6.7. The ESXi server that I used was a Dell R610 that had two Xeon CPU X5660s running at 2.80GHz (12 physical/24 logical processors), 96 GB of RAM, and the capability to run ESXi 6.7 u1. All the VMs used in this article were stored on a KIOXIA (formally known as Toshiba) KHK61RSE1T92 1.75 TB SSD drive.
NetropyVE 4 comes with a 10-page installation guide that provided me with everything I needed to install it in my vSphere environment. I found the instructions in general straightforward, but the only gotcha I came across was the need to log in to the ESXi host GUI rather than the vCenter Server using the vSphere Client.
To test the device, I used the same configuration as I did with the earlier version of NetropyVE. The NetropyVE appliance sits between two Windows 10 systems (Figure 1).
 [Click on image for larger view.]Figure 1: Test Configuration
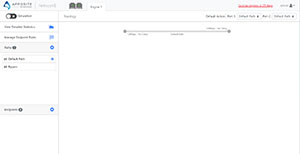
On the Dell R610 server, I created two vSwitches: EastCoast_Switch and WestCoast_Switch. These vSwitches did not have any uplinks and allowed promiscuous mode, MAC address changes, and forged transmits.
I then added a port group to each of the vSwitches called EastCoast_PG and WestCoast_PG (Figure 2).
 [Click on image for larger view.]Figure 2: Port Groups
Next, I downloaded NetropyVE 4.0.6 installation package from here, which was 64 MB and came as an ova package. I used my vSphere Client to install the product, and when I got to the deployment options, I specified the port groups that I had created earlier (Figure 3).
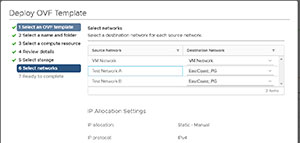 [Click on image for larger view.]Figure 3: Deploying NetropyVE
It took less than one minute for NetropyVE to install, and was deployed as a 2 vCPU, 8GB RAM virtual machine. I opened a VMware Remote Console to the VM (Figure 4) to look at the network configuration.
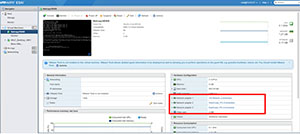 [Click on image for larger view.]Figure 4: NetropyVE VM
The IP address for the NetropyVE GUI needed to be changed and installation guide walked me how to do this by logging on to the console.
I used a Chrome web browser to connect to the NetropyVE GUI, using the IP address for the appliance. I noticed that the new GUI (Figure 5) looked far different than the old Flash-based GUI (Figure 6).
 [Click on image for larger view.]Figure 5: New GUI
 [Click on image for larger view.]Figure 6: Old GUI
After logging in to the GUI, I was presented with a dialog to enter the trial license, which I had received earlier from Apposite. Then, after acknowledging a warning about the performance of the emulator being dependent on underlying hardware, I was able to begin using the NetropyVE GUI.
Using NetropyVE
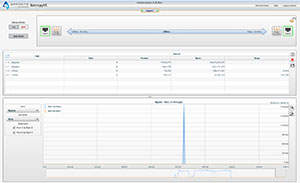
To test NetropyVE, I configured a Windows 10 virtual desktop to connect through NetropyVE to a VDI client. I ran ping and iperf to get a baseline of the performance between the VDI client and the virtual desktop. Iperf is an opensource and freely available tool that is used to measure the bandwidth between two computers. The ping came back with a time of <1 ms, and iperf had a bandwidth of 1.35 Gbps. I then monitored the traffic between the VDI desktop and client as I ran through various NetropyVE settings via the Path Name drop-down menu:
- When I selected Wi-Fi > Bad (Figure 7), the ping took 5 ms, and iperf reported a bandwidth of 91 Kbps.
- When I selected Cable > T1, the ping took 41 ms, and iperf reported a bandwidth of 1.5 Mbps.
- When I selected Satellite > GEO, the ping took 228 ms, and iperf reported a bandwidth of 774 Kbps.
- When I selected Cellular > 3G, the ping took 60 ms, and iperf reported a bandwidth of 1.5 Mbps.
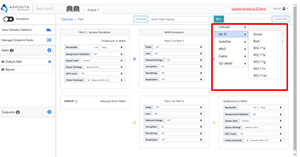 [Click on image for larger view.]Figure 7: Wi-Fi Bad
Conclusion
My first encounter with NetropyVE was positive, and I am glad to see that they have improved upon the GUI by replacing the Flash-based GUI with an HTML5-based GUI. The predefined paths will be useful to me as I will no longer need to look up what parameters to use to replicate different network environments, which will also allow consistency when testing VDI clients. I am also very excited to dig into the API as this will also simplify my job being that I should be able to programmatically automate my workflow.
NetropyVE is priced for either a one- or three-year license with customer support, and it supports up to a 1Gbs connection.
About the Author
Tom Fenton has a wealth of hands-on IT experience gained over the past 30 years in a variety of technologies, with the past 20 years focusing on virtualization and storage. He previously worked as a Technical Marketing Manager for ControlUp. He also previously worked at VMware in Staff and Senior level positions. He has also worked as a Senior Validation Engineer with The Taneja Group, where he headed the Validation Service Lab and was instrumental in starting up its vSphere Virtual Volumes practice. He's on X @vDoppler.