Publishing Applications From the AWS Serverless Application Repository
Brien Posey takes you through the steps for deploying serverless applications on the AWS cloud, explaining how users can choose from hundreds of preconfigured applications ready for use in the Serverless Application Repository, or publish their own private applications.
While AWS makes it relatively easy to deploy applications within EC2 virtual machines, Amazon also provides an option for serverless application deployment. There are hundreds of preconfigured applications ready for use in the Serverless Application Repository, or you can publish your own private application. Let's take a look at how serverless application publishing works.
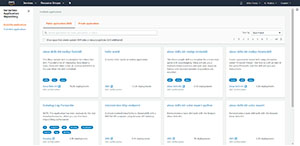
You can access the Serverless Application Repository by selecting the Serverless Application Repository option from the list of AWS services. It's located in the Compute section. You can see what the Serverless Application Repository looks like in Figure 1.
 [Click on image for larger view.]
Figure 1: This is what the Serverless Application Repository looks like.
[Click on image for larger view.]
Figure 1: This is what the Serverless Application Repository looks like.
As you look at the screen capture above, the first thing that you will probably notice is the collection of available applications. There are currently an estimated 528 applications available. These are mostly independent applications that differ from those in the Marketplace.
If you look at the top of the screen, you can see that there are separate tabs for public and private applications. There is also a search interface to help you cut through the clutter, and a checkbox that you can use to expose additional apps (those that create custom IAM roles). The tabs along the left side of the screen allow you to view available applications and published applications.
So with that said, let's take a look at how to publish an application. For the purposes of this blog post, I will be publishing the Hello World application, which you can see in the previous screen capture.
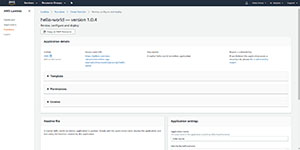
Click on the application that you want to publish, and you will be taken into AWS Lambda. In case you are not familiar with Lambda, it is Amazon's serverless computing platform. The Lambda screen lists a few pertinent details about the application, such as its author, a description of the application, and the URL for the application's source code. You can see what this screen looks like in Figure 2.
 [Click on image for larger view.]
Figure 2: The application that you select will be displayed in AWS Lambda.
[Click on image for larger view.]
Figure 2: The application that you select will be displayed in AWS Lambda.
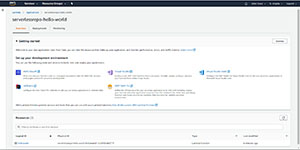
The next steps are going to vary somewhat based on the application that you have chosen. Some applications are more complex than others. If you look at the bottom left portion of the figure above, you will notice that there is a section labeled Readme file. This section will typically provide guidance for deploying the application. In this case, the readme file states that all we have to do is add the application name and deploy the application. If you look at the Application Settings portion of the figure, you will notice that the application name has already been pre-populated. However, you do have to provide an Identity Name Parameter. This is simply a value that can help to identify the application. In this case, I am using HelloWorld as the Identity Name Parameter.
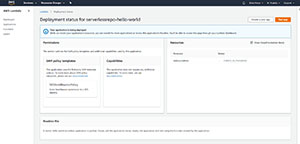
To deploy the application, scroll to the bottom of the screen and click the Deploy button. At this point, you will be taken to the screen shown in Figure 3. Notice that the Status section indicates that the application is currently being created. In the case of the Hello World app, the deployment process takes less than a minute. For other applications, the deployment can take significantly longer. Eventually though, you should see a message like the one shown in Figure 4 indicating that the application has been deployed.
 [Click on image for larger view.]
Figure 3: The application is being deployed.
[Click on image for larger view.]
Figure 3: The application is being deployed.
 [Click on image for larger view.]
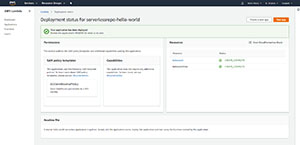
Figure 4: The deployment process has completed.
[Click on image for larger view.]
Figure 4: The deployment process has completed.
As you look at the figure above, you will notice that there is a Test App button located in the upper, right corner of the screen. Clicking this button takes you to the screen shown in Figure 5. Your application is listed at the bottom of the screen.
 [Click on image for larger view.]
Figure 5: This is where you go to test the application.
[Click on image for larger view.]
Figure 5: This is where you go to test the application.
Now that I have shown you how to deploy a serverless application in AWS Lambda, I want to show you how to create a test event, run a test, and then remove the application (so that you are no longer being billed for something that you aren't using). I will show you how to do all of that in Part 2.
Update: See Part 2 here.
About the Author
Brien Posey is a 22-time Microsoft MVP with decades of IT experience. As a freelance writer, Posey has written thousands of articles and contributed to several dozen books on a wide variety of IT topics. Prior to going freelance, Posey was a CIO for a national chain of hospitals and health care facilities. He has also served as a network administrator for some of the country's largest insurance companies and for the Department of Defense at Fort Knox. In addition to his continued work in IT, Posey has spent the last several years actively training as a commercial scientist-astronaut candidate in preparation to fly on a mission to study polar mesospheric clouds from space. You can follow his spaceflight training on his Web site.