How-To
Performing Weighted Routing in AWS Route 53
Although Amazon's AWS Route 53 can be used to enable run-of-the-mill, static DNS routing, it can also be used to bring some intelligence to the routing process. For example, Route 53 makes it easy to perform weighted routing, useful in situations where you need to distribute traffic unevenly.
Although Amazon's AWS Route 53 can be used to enable run-of-the-mill, static DNS routing, it can also be used to bring some intelligence to the routing process. For example, Route 53 makes it easy to perform weighted routing.
Weighted routing is useful in situations where you need to distribute traffic unevenly. Suppose for a moment that you have a web server that is running on an Extra Large EC2 instance. Let's also pretend that you are anticipating a seasonal increase in traffic to your web application, and you know that you are going to need to add an additional web front end to handle some of the load. Just to make things interesting though, let's pretend that the anticipated increase in traffic won't be enough to justify the cost of adding another Extra Large instance. That being the case, you decide to create a medium sized instance instead.
The situation that I just described (even if it's a bit far fetched) illustrates one of the shortcomings with DNS round robin routing. If you were to use round robin DNS routing in this situation, then both the Extra Large instance and the Medium sized instance would receive equal amounts of traffic. This would leave the Extra Large instance with additional capacity, and would result in the Medium instance being overwhelmed. The solution to this problem is to use weighted routing. In doing so for instance, we might distribute 70 percent of the inbound web requests to the Extra Large server instance, and send the other 30 percent to the Medium sized web server instance.
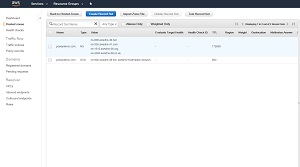
To get started with implementing weighted routing, log into AWS and then open the Route 53 service. Next, click the Get Started Now button found in the Traffic Management section, and click on Hosted Zones, followed by your domain name. If you do not currently have a hosted zone in place, then you will need to create one by clicking the Create Hosted Zone button, and then following the prompts to enter your domain name. Once you are in the hosted zone, click on the Create Record Set button, shown in Figure 1.
 [Click on image for larger view.]
Figure 1: Click the Create Record Set button.
[Click on image for larger view.]
Figure 1: Click the Create Record Set button.
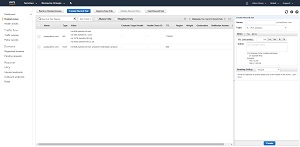
At this point, a pane will open on the right side of the screen. The upper portion of this pane is used to create a DNS record. You can use the Name field to specify the fully qualified domain name that is to be associated with the DNS record. Just beneath that, you can specify the type of record that you are creating, and you can enter an IPv4 address into the Value field.
If you look at Figure 2, you can see that the Create Record Set pane contains an option to define a routing policy. By default, the routing policy is set to Simple. When you use a simple routing policy, you are essentially just creating a normal DNS record. If your goal is to perform weighted routing, then you will need to change the routing policy to Weighted.
 [Click on image for larger view.]
Figure 2: The routing policy is set to Simple by default.
[Click on image for larger view.]
Figure 2: The routing policy is set to Simple by default.
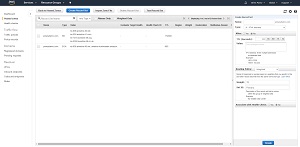
To create a weighted routing policy, you will need to specify a weight and a set ID. The weight is simply the percentage of traffic that you want to send to the IP address that is associated with the policy. Earlier, I mentioned an imaginary situation in which 70 percent of the traffic needed to go to an organization's primary web server and 30 percent needed to go to a secondary web server. If we were to actually implement this architecture, then we would need to enter 70 in the Weight field.
The Set ID is just a description of where the traffic is going. If we were to continue with the example in which 70 percent of the traffic needs to go to the primary datacenter, then we could enter Primary as the Set ID. You can see what this looks like in Figure 3.
 [Click on image for larger view.]
Figure 3: Enter a weight and a set ID.
[Click on image for larger view.]
Figure 3: Enter a weight and a set ID.
Click the Create button to create the record set.
The last step in the process is to repeat what you have already done and create another record set. Following along with the earlier example, this record set would be assigned the IP address of the secondary web server, the weight would be set to 30 (to indicate that 30 percent of the traffic needs to be directed to the specified IP address), and the Set ID would need to be set to Secondary.
Once created, the two records collectively route traffic between the two web servers in a way that allows the primary server to handle 70 percent of the traffic, while 30 percent of the traffic is handled by the secondary server.
About the Author
Brien Posey is a 22-time Microsoft MVP with decades of IT experience. As a freelance writer, Posey has written thousands of articles and contributed to several dozen books on a wide variety of IT topics. Prior to going freelance, Posey was a CIO for a national chain of hospitals and health care facilities. He has also served as a network administrator for some of the country's largest insurance companies and for the Department of Defense at Fort Knox. In addition to his continued work in IT, Posey has spent the last several years actively training as a commercial scientist-astronaut candidate in preparation to fly on a mission to study polar mesospheric clouds from space. You can follow his spaceflight training on his Web site.