How-To
Remote Work: Providing Access to Internal Web Content via Amazon WorkLink
Amid the COVID-19 remote work surge, Amazon WorkLink can provide a better alternative to VPNs for enabling remote workers to access internal web content. Brien Posey explains how with illustrated, step-by-step instructions.
The onset of the COVID-19 pandemic of 2020 left organizations of all sizes scrambling to find ways of enabling employees to work remotely. For many organizations, a VPN ended up being the remote-access mechanism of choice. However, although VPNs do have their place, VPNs are not without issues. VPNs can, for instance, become congested by excess traffic. One possible way of getting around VPN congestion problems and other potential issues is to use Amazon WorkLink as a VPN alternative.
Although WorkLink can sometimes be a compelling VPN alternative, it is not suitable for use in every situation. A VPN generally provides remote users with access to the same network resources they would have access to if they were logged on to a device directly attached to the corporate network. WorkLink, on the other hand, functions more like a web proxy. It gives remote users an easy way to access an organization's internal web applications, but it cannot provide access to non-web content.
It is also worth noting that in some cases WorkLink may need to be used in conjunction with a VPN. WorkLink is primarily designed to provide remote users with access to internal web content hosted by AWS. If an organization has internal web content hosted in its own datacenter or in a competing cloud, you can still provide access to that content through WorkLink. However, doing so requires you to link your AWS Virtual Private Cloud (VPC) to your content by using either an AWS direct connection or by using a VPN. One of the main disadvantages to doing so is that AWS Direct Connect and VPN access is not included in the base WorkLink pricing.
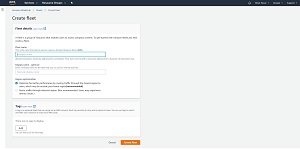
Setting up WorkLink is a relatively intuitive process. To get started, choose the WorkLink option from the list of services (it's in the End User Computing section). Once the WorkLink console loads, the first thing you will need to do is to create a fleet. Amazon defines a fleet as a group of resources that allow users to access corporate resources. Click the Create Fleet button, and you will be taken to the screen shown in Figure 1.
 [Click on image for larger view.]
Figure 1: This is the screen used to create a fleet.
[Click on image for larger view.]
Figure 1: This is the screen used to create a fleet.
As you can see in the figure, the main thing that you will have to do on this screen is to provide a name for the fleet you are creating. The name you come up with will need to be ARN compliant, which means the name has to be 48 characters or less in length, and can only include lowercase alphanumeric characters and dashes. The first and last letter of the name must be lowercase alphanumeric characters. Although the ARN naming convention can be a bit restrictive, AWS does allow you to enter an optional display name to go along with the ARN.
This screen also allows you to choose whether you want to use regional optimization, which routes traffic through the region closest to the user, or if you would prefer to route traffic through the selected region. Regional optimization will generally provide better performance, particularly if an organization has users scattered across multiple regions. However, the use of regional optimization may increase costs.
Once you have picked out a name for your fleet and chosen whether or not you wish to use region optimization, the next step is to apply any desired tags, and then click on the Create Fleet button.
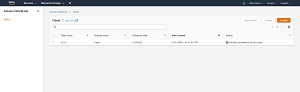
After a brief delay, your newly created fleet will be displayed on the list of fleets. Notice in Figure 2 however, that the Status column indicates that the fleet is pending based on the completion of the next steps.
 [Click on image for larger view.]
Figure 2: The fleet has been partially created.
[Click on image for larger view.]
Figure 2: The fleet has been partially created.
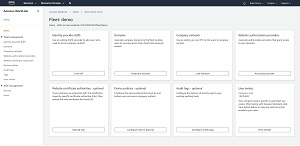
There are several additional configuration steps that you may need to complete in order for users to gain access to your internal web resources through WorkLink. To access the various configuration options, click on the fleet that you just created. Upon doing so, you will be taken to a screen similar to the one shown in Figure 3.
 [Click on image for larger view.]
Figure 3: This is the screen used to access the fleet configuration options.
[Click on image for larger view.]
Figure 3: This is the screen used to access the fleet configuration options.
I will walk you through the remainder of the configuration process in Part 2 of this series. In doing so, I will also explain what your users will need to do in order to connect to the WorkLink fleet that you have created.
Update: Part 2 is now available here.
About the Author
Brien Posey is a 22-time Microsoft MVP with decades of IT experience. As a freelance writer, Posey has written thousands of articles and contributed to several dozen books on a wide variety of IT topics. Prior to going freelance, Posey was a CIO for a national chain of hospitals and health care facilities. He has also served as a network administrator for some of the country's largest insurance companies and for the Department of Defense at Fort Knox. In addition to his continued work in IT, Posey has spent the last several years actively training as a commercial scientist-astronaut candidate in preparation to fly on a mission to study polar mesospheric clouds from space. You can follow his spaceflight training on his Web site.