How-To
Remote Work: Providing Access to Internal Web Content via Amazon WorkLink, Part 2
After using step-by-step instructions and screenshots to detail how to create a WorkLink fleet amid the COVID-19 remote work surge, Brien Posey wraps up the discussion by showing you the remainder of the configuration process.
In the first blog post in this series, I showed you how to create a WorkLink fleet. Now, I want to wrap up the discussion by showing you the remainder of the configuration process.
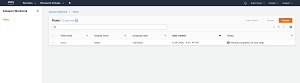
As it stands right now, the Fleets screen displays the previously created fleet, but has a status of "pending completion of next steps," as shown in Figure 1. To begin the configuration process, click on the fleet. Doing so will take you to the screen shown in Figure 2.
 [Click on image for larger view.]
Figure 1: The fleet has been created, but still needs to be configured.
[Click on image for larger view.]
Figure 1: The fleet has been created, but still needs to be configured.
 [Click on image for larger view.]
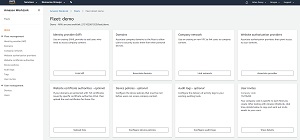
Figure 2: This is the screen used to complete the configuration process.
[Click on image for larger view.]
Figure 2: This is the screen used to complete the configuration process.
As you look at the screen capture shown above, you will notice that several of the configuration tasks are optional. In the interest of getting things up and running quickly, I am going to focus on the required tasks. With that said, begin by clicking on the Link IdP button. This takes you to the Link Identity Provider screen, shown in Figure 3.
 [Click on image for larger view.]
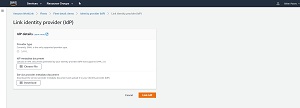
Figure 3: This is the screen used to link an identity provider.
[Click on image for larger view.]
Figure 3: This is the screen used to link an identity provider.
This screen requires you to upload an XML identity provider document that supports SAML 2.0. If you don't have an identity provider document handy, then the easiest thing to do is to use AWS SSO to create one. You can find the instructions for doing so here. Incidentally, AWS SSO is not your only identity provider option. You can also use Okta, G Suite or Ping Identity. Amazon provides platform specific documentation here.
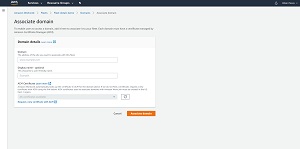
Once you have associated an identity provider with the fleet, the next thing you will need to do is to associate a domain. To do so, click the Associate Domain button shown in Figure 2, to go to the Domains screen. From here, click on the Associate Domains button. At this point, you will be asked to provide your domain name, as well as an optional display name. You will also need to provide an ACM certificate for the domain. Assuming that you have previously associated the domain with AWS, this certificate should automatically be made available. Otherwise, you can use the Request a New Certificate with ACM link, shown in Figure 4.
 [Click on image for larger view.]
Figure 4: This is the screen used to associate a domain.
[Click on image for larger view.]
Figure 4: This is the screen used to associate a domain.
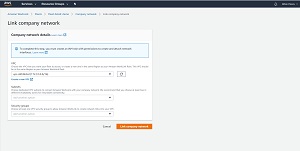
The next step in the configuration process is to link WorkLink to your company network. From the main configuration screen, shown in
Figure 2, click on the Link Network button. This will take you to the screen shown in
Figure 5.
 [Click on image for larger view.]
Figure 5: This is the screen used to link a company network to WorkLink.
[Click on image for larger view.]
Figure 5: This is the screen used to link a company network to WorkLink.
As you can see in the figure, this process consists of choosing a VPC (or creating a new one), and then selecting an associated subnet and security group.
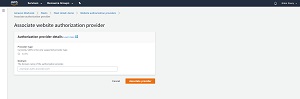
Once you have linked your network, the next step is to associate a website authorization provider. Click the Associate Provider button found on the main configuration screen, and you will be taken to the screen shown in Figure 6.
 [Click on image for larger view.]
Figure 6: You will need to associate an authorization provider.
[Click on image for larger view.]
Figure 6: You will need to associate an authorization provider.
Earlier in the configuration process, you linked an identity provider and associated a domain. The Associate Website Authorization Provider screen assumes that you have already completed those steps. On this screen, you will simply need to provide the fully qualified domain name of your authorization provider.
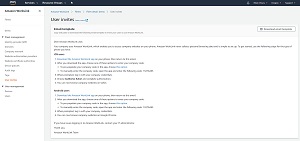
The last step in the process is to generate user invites. To do so, click the View Details button found in the User Invites section of the main configuration screen. The resulting screen, which you can see in Figure 7, is an email template. It provides text (which you can customize) instructing users as to how they can download and configure the WorkLink app on their iOS or Android device. It is worth noting that users will need a code in order to access the WorkLink environment, and the code is provided within the email template. While you can copy and paste the template into an email message to be sent to your users, Amazon also provides an option to download the template. Although not always necessary, downloading the template can make life easier for those who want to customize the template by adding extra text or corporate branding.
 [Click on image for larger view.]
Figure 7: This is the email template provided by Amazon.
[Click on image for larger view.]
Figure 7: This is the email template provided by Amazon.
So as you can see, the configuration WorkLink configuration process involves some work, but isn't overly difficult. Once WorkLink is fully configured, you can use the console's User Management section to monitor the users and devices that are accessing your organization's web resources. You can also use these monitoring tools to perform basic administrative tasks if necessary, such as disconnecting a user's session.
About the Author
Brien Posey is a 22-time Microsoft MVP with decades of IT experience. As a freelance writer, Posey has written thousands of articles and contributed to several dozen books on a wide variety of IT topics. Prior to going freelance, Posey was a CIO for a national chain of hospitals and health care facilities. He has also served as a network administrator for some of the country's largest insurance companies and for the Department of Defense at Fort Knox. In addition to his continued work in IT, Posey has spent the last several years actively training as a commercial scientist-astronaut candidate in preparation to fly on a mission to study polar mesospheric clouds from space. You can follow his spaceflight training on his Web site.