How-To
Using AWS Honeycode to Create Codeless Apps, Part 2
After previously explaining how to create a workbook that could be used as the basis for creating a custom application, Brien Posey now shows you what the actual application development process looks like.
In my previous blog post, I explained how to create a workbook that could be used as the basis for creating a custom application. Now I want to show you what the actual application development process looks like.
Previously, I explained that you can click on the Builder icon to reveal a list of existing applications, and that if you create a workbook from a template, a sample application is provided for you. Clicking on this sample application (I'm using the Survey application) takes you to the screen shown in Figure 1.
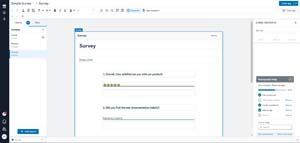
 [Click on image for larger view.]Figure 1: This is what the builder interface looks like.
The area in the center of the screen is a visual representation of the custom application. You can modify the application by adding and positioning objects in this area.
One of the things that I'm guessing you probably noticed right away is that the visual representation of the application is shaped like a smartphone screen. Honeycode defaults to helping you to develop a mobile app, but you can also do web development. If you look at the left portion of the screen, you will notice the words Mobile and Web. Clicking on Web causes the interface to change shape so that you can see what the application will look like in a web browser, while clicking on Mobile causes the interface to display the mobile experience.
Another thing that I want to point out in the figure above is the Screens section, located on the left side of the screen. As previously mentioned, this is a survey application. When the application is launched, it displays the interface shown in the figure above. When the user clicks the Begin button however, they are taken to the Survey page, shown in Figure 2. When the user submits the survey, they are taken to the Thanks screen.
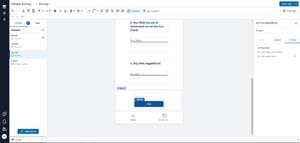
 [Click on image for larger view.]Figure 2: This is what the app's Survey screen looks like.
In case you are wondering, you can create additional screens on an as-needed basis. All you have to do is to click the plus sign located to the right of Screens. At that point, you simply need to provide a name for the screen that you are creating, and then start adding objects. Figure 3 shows what it looks like when you create a new screen.
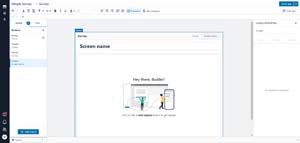 [Click on image for larger view.]Figure 3: You can create as many screens as you need.
Also in case you are wondering, the application's buttons are generally the mechanism that moves the user from one application screen to another. If you look back at Figure 1 for instance, you will notice that there is a Begin button at the bottom of the screen. This button is tied to an automation that takes the user to the Survey screen. Similarly, the Survey screen includes a Done button. When the user clicks this button, it launches an automation that saves the survey results to the worksheet and then takes the user to the Thanks screen.
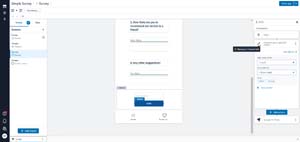
If you look at Figure 4, you can see that I have selected the Survey screen's Done button. The Actions tab on the far right portion of the screen indicates that when the button is clicked, and automation will be started. There is also a link to edit the automation.
 [Click on image for larger view.]Figure 4: Clicking the Done button launches an automation.
In Figure 5, you can see that this automation does two things. First, it writes data to the worksheet. Second, it navigates the user to the Thanks screen.
 [Click on image for larger view.]Figure 5: Automations are used to navigate between pages.
So now that I have shown you how screen navigation works, let's take a look at the process for adding objects to a screen. To add an object, right-click on an empty area and choose the Add Objects command from the shortcut menu (you can delete existing objects in a similar way). Upon doing so, you will see the Add Objects window appear. As you can see in Figure 6, this window contains several different types of objects ranging from data displays to user input fields. Just double click on an object to add it to the screen. Incidentally, if you are adding an object to a screen that already contains other objects, you then choosing the Add Objects command creates a new segment and you will need to place the objects into the segment that you created.
 [Click on image for larger view.]Figure 6: Honeycode lets you add objects to the screen.
Once you have added an object, all you have to do is create an object reference to the worksheet. If you look at Figure 7 for instance, you can see that I created an input field and then set its initial value equal to the Name column in the Survey worksheet. This causes my name to be prepopulated into the field.
[Click on image for larger view.]Figure 7: I mapped this input field to the worksheet's Name column.
As you can see, there is a bit of a learning curve associated with using Honeycode. Even so, it tends to be easier to create simple apps with Honeycode than to write code.
About the Author
Brien Posey is a 22-time Microsoft MVP with decades of IT experience. As a freelance writer, Posey has written thousands of articles and contributed to several dozen books on a wide variety of IT topics. Prior to going freelance, Posey was a CIO for a national chain of hospitals and health care facilities. He has also served as a network administrator for some of the country's largest insurance companies and for the Department of Defense at Fort Knox. In addition to his continued work in IT, Posey has spent the last several years actively training as a commercial scientist-astronaut candidate in preparation to fly on a mission to study polar mesospheric clouds from space. You can follow his spaceflight training on his Web site.