How-To
Enabling Cloud Native Access to Internal Web Apps with Amazon WorkSpaces Web
It allows you to create a secure access portal that will allow authorized users to access your organization's internal web applications, even if users are working remotely.
Most organizations have a collection of web applications that are used internally by employees. Oftentimes, these applications need to be isolated from the outside world. Of course that isolation presents a problem if there are hybrid or remote workers who need access to the application.
Amazon WorkSpaces Web allows you to create a secure access portal that will allow authorized users to access your organization's internal web applications, even if users are working remotely.
To get started, launch the WorkSpaces Web service. It's in the End User Computing section in the list of services. When the WorkSpaces Web Service opens, click the Create Web Portal button.
At this point, you will be taken into a wizard that will walk you through the process of creating a web portal. The first thing that you will need to do is to choose the VPC that you want to associate the new web portal with. While you are at it, you are also going to need to choose at least two subnets and a security group to be used with the web portal.
As you can see in Figure 1, there is also an option at the bottom of the screen to create a trust store. Trust stores are completely optional, but you will need to create a trust store if your internal domain is protected with a TLS certificate. If that's the case, then you need only to click on the Choose File button and upload your certificate.
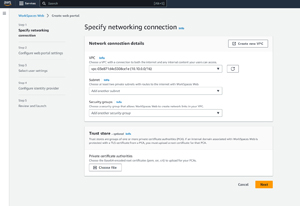 [Click on image for larger view.] Figure 1: Begin the configuration process by specifying your networking details.
Click Next, and you will be taken to the Configure Web Portal Settings page. The main thing that you will need to do on this page is to provide a name for the web portal that you are creating. There is also an option to select a Kinesis data stream to be used for user access logging, but doing so is optional. There are also some toggles at the bottom of the screen that you can use to enable or disable private browsing and history deletion.
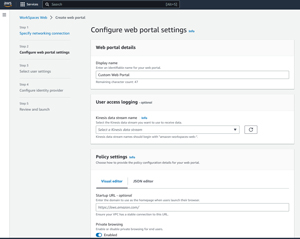 [Click on image for larger view.] Figure 2: At a minimum, you will need to provide a name for the portal that you are creating.
Click Next and you will see the Select User Settings screen. As you can see in Figure 3, this screen is relatively straightforward. It allows you to set some basic permissions for user sessions. For example, you can enable or disable the use of the Windows clipboard in the company portal. You can also enable or disable file transfers and printing.
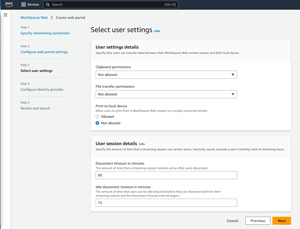 [Click on image for larger view.] Figure 3: The Select User Settings screen lets you configure some basic permissions.
In addition, to controlling basic permissions, the Select User Settings screen also lets you set some disconnection thresholds. You can, for example control how many minutes to wait before disconnecting an idle session or an abandoned session (a session that the user has disconnected from, but that has remained active).
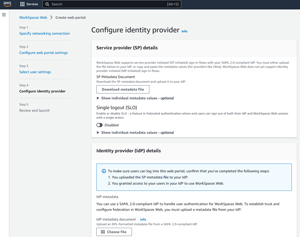
Click Next and AWS will display the Configure Identity Provider screen. This screen is used to control how users will log on to the portal. Unfortunately, you can't just link the Workspace Web to the Microsoft Active Directory.
If you are not using an SAML 2.0-based identity provider such as Okta or Azure AD, then your best option is to set up IAM as your identity provider. To complete this process, open the IAM console and create a new group. The next step will be to define an application. Once you have done so, you will want to associate the new group with the application so that group members have access.
Once you have created a group, choose the Applications tab within the Identity Center and then click Add Application. When prompted, choose the Add Custom SAML 2.0 Application option.
Now, go back to the WorkSpaces Web wizard and click the Download Metadata File button shown in Figure 4.
 [Click on image for larger view.] Figure 4: You will need to download a metadata file and upload it to your identity provider.
Switch back to the IAM Identity Center and scroll to the bottom of the screen, where you will find the Application Metadata section. Choose the option to upload an application SAML metadata file, and follow the prompts to upload the file that you downloaded a moment ago. You will also need to download the IAM Identity Center SAML metadata file and then upload it to the WorkSpaces Web console.
When you are done, click Next and you will be taken to the Review and Launch screen. Take a moment to review the summary and verify that all of the settings that you have entered are correct, and then click the Launch Web Portal button to create the web portal. It takes about 10 to 15 minutes to create the portal, but eventually you should see a message like the one shown in Figure 5 indicating that the portal is ready to use. You can access the portal through the URL shown on the screen.
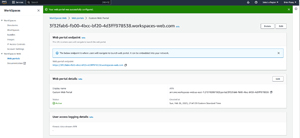 [Click on image for larger view.] Figure 5: The new Workspace Web portal has been created.
About the Author
Brien Posey is a 22-time Microsoft MVP with decades of IT experience. As a freelance writer, Posey has written thousands of articles and contributed to several dozen books on a wide variety of IT topics. Prior to going freelance, Posey was a CIO for a national chain of hospitals and health care facilities. He has also served as a network administrator for some of the country's largest insurance companies and for the Department of Defense at Fort Knox. In addition to his continued work in IT, Posey has spent the last several years actively training as a commercial scientist-astronaut candidate in preparation to fly on a mission to study polar mesospheric clouds from space. You can follow his spaceflight training on his Web site.