Reviews
How Performant Is the NUC 13 Pro Desk Edition?
Tom Fenton pops off the bottom of the device to look at its innards, powers it up and runs some benchmarks.
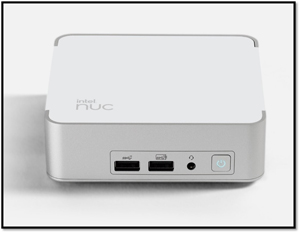
In a previous article I introduced the NUC 13 Pro Desk Edition by outlining its specifications and discussing my initial thoughts. To recap, this family of NUCs is powered by an Intel Gen 13 i5 or i7 processor. The NUC is relatively diminutive, with measurements of only 117 x 112 x 37 mm. However, the Pro Desk edition breaks with previous versions as it has an attractive silver case with a white top; all the other NUCs I have seen have been black. It is an aesthetically pleasing device that photos can't capture.
 [Click on image for larger view.]
In this article, I will pop off the bottom of the NUC, look at the device's innards, power it up and run some benchmarks. One thing I am interested in investigating is the Intel Core i7-1360p processor, as it has both performance (P) and efficiency (E) cores.
Looking Under the White Lid
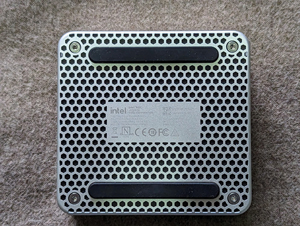
In the past, I have found the build quality of NUCs exemplary, and I hope to find the same quality level in this NUC. The bottom of the device is attached by four hex-head screws.
 [Click on image for larger view.]
The attention to detail with this device is evident even with the choice of captive screws; they cannot be lost when removed. Although this is a small detail, it shows the level of thought and care that went into the design of this device.
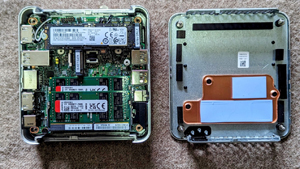
Under the bottom, I found two RAM slots, along with an NVMe and b-Key SATA slot, on the UCFF-sized (4" x 4") motherboard.
 [Click on image for larger view.]
The datasheet for this device shows that it supports a 22x80 NVMe (M) and a 22x42 SATA (B) for persistence storage. The NVMe slot was populated with a Samsung MZ-VL25120 512GB SSD. The RAM slots were populated with two Kingston 8GB KVR32S22DR8 SO-DIMM. The device supports up to 64 GB of DDR4-3200 RAM.
The Intel Core i7-1360P processor was not visible. The quality of the motherboard was readily apparent.
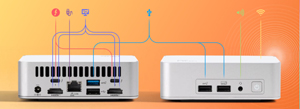
For additional connectivity, it has a USB 3.2 22x42 (pins) internal connector and two USB 3.2 ports on the front; on the back are two USB 4 (type C), a USB 3.2, and a USB 2.0 connector.
 [Click on image for larger view.]
Initial Setup and Powerup
I reattached the bottom of the device and connected it to my network via its 2.5 Gb NIC (it also has wireless). I used the device's HDMI connector to attach it to a 2K monitor. I also connected a Lenovo wireless keyboard to it and powered it up.
Upon powering up, I was presented with an Intel NUC splash screen.
 [Click on image for larger view.]
I then worked my way through the Windows 11 installation process. A few minutes later, I was able to log in to the system and update it with the latest patches and updates.
Installing Third-Party Monitoring Software
To become more familiar with and remotely monitor the system's hardware, I installed Speccy and ControlUp Edge DX. As a disclaimer, I work for ControlUp.
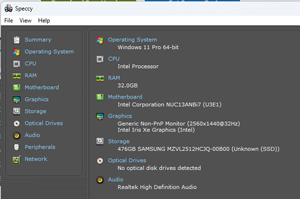
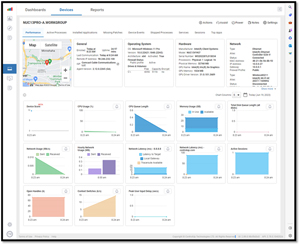
Speccy correctly identified the hardware and operating system on the NUC.
 [Click on image for larger view.]
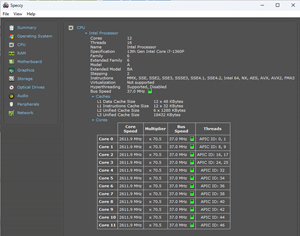
It had a panel that showed the CPU cores and their speed, but it didn't identify whether they were P- or E-cores. It did show that cores 0-3 had two threads, while cores 4-11 only had one.
 [Click on image for larger view.]
I installed ControlUp Edge DX on the device with ease. I will use it for remote monitoring.
 [Click on image for larger view.]
Disabling P or E Cores
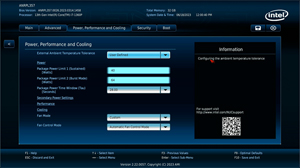
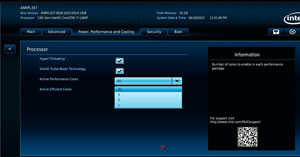
I wanted to see how well the benchmark worked on just P- or E-cores. The BIOS on the system lets you enable or disable the cores as you desire. To do this, boot into the BIOS by hitting the F2 key. Then, navigate to Power, Performance and Cooling and change the default value of the External Ambient Temperature Tolerance to User Defined. This will enable the Performance setting to be configured.
 [Click on image for larger view.]
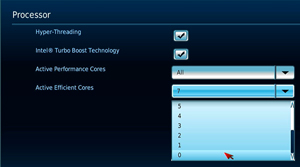
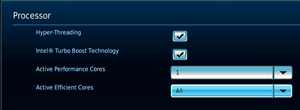
I navigated to Performance > Processor and selected the number of P- and E-cores I wanted the system to use.
 [Click on image for larger view.]
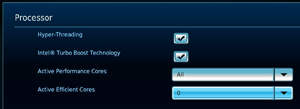
You can disable all the efficient cores, but you must always have at least one performance core enabled (see above).
 [Click on image for larger view.]
Benchmarking All Cores
I will use Cinebench to benchmark the device as it is free and widely used. It can test a single core or multiple cores, and each test only takes 10 minutes to run.
 [Click on image for larger view.]
When I ran Cinebench on all 12 cores, it showed a score of 12189.
 [Click on image for larger view.]
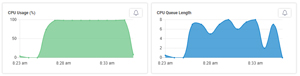
Edge DX showed 100 percent CPU usage while the test was running.
 [Click on image for larger view.]
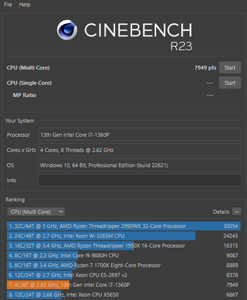
Benchmarking P-Cores
I rebooted the system and disabled all the E-cores.
 [Click on image for larger view.]
When I ran Cinebench on the P-cores, it showed a score of 7949.
 [Click on image for larger view.]
Edge DX showed 100 percent CPU usage while the test was running.
 [Click on image for larger view.]
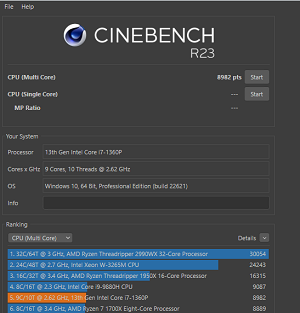
Benchmarking E-Cores
I rebooted the system and disabled all but one of the P-cores and enabled all the E-cores.
 [Click on image for larger view.]
When I ran Cinebench on all the E-cores and one P-core, it showed a score of 8982.
 [Click on image for larger view.]
Edge DX showed 100 percent CPU usage while the test was running.
 [Click on image for larger view.]
Conclusion
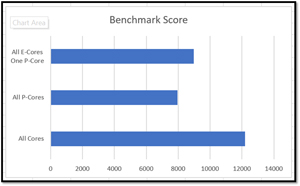
It shouldn't surprise anyone that the best device performance was when both the P- and E-cores were enabled. This was followed by having the eight E-Cores and one P-core enabled, and the lowest score was when only the four P-cores were enabled.
 [Click on image for larger view.]
What did surprise me was that there wasn't more of a lateral correlation when E- and P-cores were enabled and disabled. There could be many reasons for this, such as TDP or heat. Perhaps one day I will investigate it further.
One of the reasons that I ran these benchmarking tests is that VMware ESXi hypervisor does not support big.LITTLE architecture, and to get it installed on systems, you need to disable the E-cores. Doing so would equate to getting just two-thirds of the system's performance.
That said, the NUC 13, with its i7-1360P processor, is a solid performer. Given its small size and good looks, it would work out well on a power user's desktop. As running ESXi would involve disabling either the P or E Cores on this, I will install VMware Workstation to run virtual machines (VMs) on it in my next article.