How-To
Using AWS Comprehend for Document Classification, Part 1
Brien Posey shows how to use the Comprehend natural language processing service to classify documents based on their content, building a custom classifier to identify spam.
A while back, I wrote a blog post in which I described how an organization can use AWS Comprehend to automatically determine customer sentiment based on text analytics. As handy as such capabilities might be, Comprehend can do more than just analyze sentiment. It is possible for example, to use Comprehend to classify documents based on their content.
This raises the question of why an organization might want to classify documents? There are any number of potential use cases. For example, it is possible to use a classifier to sort documents based on type. You can also use a classifier to detect documents that contain objectionable content such as credit-card numbers or Social Security numbers. There are even ways of extracting structured data from documents.
In order to use Comprehend to classify documents, you are going to need to build one or more classifiers. The classifiers are what performs the text classification, but in order to work, they must be trained. This is easily the most tedious part of the process.
There are two options available for training a custom classifier. One option is to build an augmented manifest file. The other option is to create a comma-separated values (CSV) file. Personally, I think that creating a CSV file is the easier of the two options, so that's the option that I will be using here.
There are five main rules governing the creation of a CSV file:
- A CSV must not include any column headers.
- The CSV file's first column must list the classification that you are training the classifier to recognize. For instance, if you are building a classifier that is designed to recognize spam, then this column would contain the word SPAM (all caps).
- The second column must contain the text data that is being used for training. This data should be enclosed in quotation marks.
- The CSV file will need at least 10 rows of data, but if you are building a classifier for production use you will almost always need more training data.
- The CSV file must end with either \n or \r\n.
In addition to these rules, you are going to need to choose a mode. You can choose between a multi-label mode and a multi-class mode. Multi-class mode applies only a single label to each document, while multi-label mode can apply multiple labels to a single document
Amazon provides several examples of things that classifiers can be used to detect. I am going to borrow one of Amazon's examples and build a classifier that can be used to tell whether or not an email message is spam. So with that said, consider the multi-class/multi-label requirement that I mentioned earlier. If your goal is to simply determine whether or not a message is spam, then multi-class mode is the best choice. After all, a message can be spam or it can be legitimate, but it can't be both.
If on the other hand, you are building something a bit more sophisticated that can detect legitimate mail, bulk newsletters, spam and phishing messages then multi-label mode might be the better choice. After all, you could conceivably end up with legitimate newsletters and spam newsletters. In other words, it might be necessary to apply multiple tags to a single message.
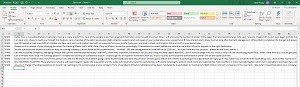
The first step in the process, before even creating the classifier, is to create the CSV file containing the training data. To do so, I created an Excel spreadsheet, which you can see in Figure 1.
 [Click on image for larger view.]
Figure 1: This is the Excel spreadsheet that I am using to create a CSV file.
[Click on image for larger view.]
Figure 1: This is the Excel spreadsheet that I am using to create a CSV file.
As you can see in the figure, this spreadsheet meets the minimum requirement of having 10 rows of data. This is enough to be able to play around with training a classifier, but is inadequate for reliable, real-world spam filtering.
You will also notice that the first column contains the word SPAM (the name of my classifier), and I have pasted the contents of various spam messages into the second column. Although quotation marks are required around the message text, I did not include them in the spreadsheet, as Excel automatically inserts the quotation marks into the saved file, as shown in Figure 2. One more thing that I want to point out in that figure is that I have manually inserted \n at the end of the file, since that marker is required by AWS.
 [Click on image for larger view.]
Figure 2: This is what the modified CSV file looks like.
[Click on image for larger view.]
Figure 2: This is what the modified CSV file looks like.
So now that I have created a CSV file that can be used to train a classifier, it is time to actually build the classifier. I will show you how to do that in Part 2.
About the Author
Brien Posey is a 22-time Microsoft MVP with decades of IT experience. As a freelance writer, Posey has written thousands of articles and contributed to several dozen books on a wide variety of IT topics. Prior to going freelance, Posey was a CIO for a national chain of hospitals and health care facilities. He has also served as a network administrator for some of the country's largest insurance companies and for the Department of Defense at Fort Knox. In addition to his continued work in IT, Posey has spent the last several years actively training as a commercial scientist-astronaut candidate in preparation to fly on a mission to study polar mesospheric clouds from space. You can follow his spaceflight training on his Web site.