How-To
Using a Raspberry Pi as a $21 Edge Environment Monitoring Solution
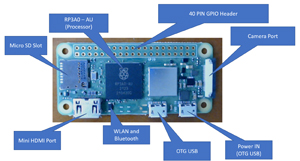
I have written a few other articles about the new Raspberry Pi (RPi) Zero 2 W. In my first, I provided an overview of its construction and cost, as well as some of its use-cases. In another, I installed the Raspberry OS on it, which was dead simple to do. In another, I used it to create an edge device to take time-lapse photos. In this article, I will use it to create another edge device that uses a DHT22 sensor to monitor the humidity and temperature in a remote location.
The Zero 2 W is truly a remarkable piece of engineering -- for just $15, you get a 1GHz quad-core 64-bit ARM Cortex-A53 CPU, GPU, and 512MB RAM, as well as Wi-Fi 4 and Bluetooth 4.2 with BLE support. Because this device was initially designed for educational use, it comes with a row of 40 General-Purpose Input/Output (GPIO) holes that allow it to connect to sensors to monitor things.
 [Click on image for larger view.]
Assembling an Edge Environment Monitoring Solution
To create an edge environment monitoring solution, we will first need to attach a DHT22 sensor to the RPi.
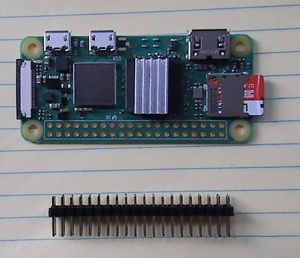
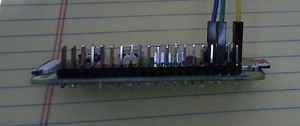
To save on cost, the Zero is a minimalistic device that doesn't even have header pins for the GPIO.
 [Click on image for larger view.]
I was able to buy the header pins for under two dollars and, despite the fact that I have minimal soldering skills, I was able to solder the pins onto the device in under 10 minutes.
 [Click on image for larger view.]
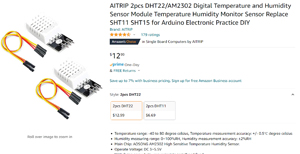
There are many low-cost humidity and temperature sensors that can be used with the RPi. The most popular ones are the DHT22 and the DHT11. Both sensors can be used to transmit their data using only three wires from up to 20m away. The DHT11 is less expensive, and is less accurate than the DHT22, but it can transmit data every 1 second, while the DHT22 can only transmit data every 2 seconds.
Below are the specifications for the DHT22 and DHT11:
| |
Temperature Range |
Humidity Range |
Temperature Accuracy |
Humidity Accuracy |
Speed |
| DHT11 |
0-50 C |
20-90% RH |
+ - 2 C |
+ - 5% RH |
1 S |
| DHT22 |
-40-80 C |
0-100% RH |
+ - 2 C |
+ - 2-5% RH |
2 S |
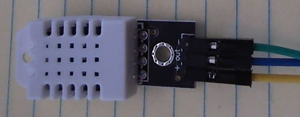
The sensor that I chose to use is the DHT22. I bought a two pack of them for $12 which included cables and the DHT22 mounted on a PCB and had a case surrounding the sensor.
 [Click on image for larger view.]
The pins on the GPIO are numbered 1 to 40, with pin 1 being the pin closest to the SSD card and pin 2 being directly above it.
I connected the yellow wire to GPIO pin 1 (3.3 VDC), the green wire to pin 6 (ground), and the blue wire to pin 7 (GPIO4).
 [Click on image for larger view.]
 [Click on image for larger view.]
I then connected the yellow wire to the first pin (+), the blue to the second (out), and the green to the third pin (-) on the DHT22
 [Click on image for larger view.]
Using the Sensor
RPis have a rich set of programming tools to gather information from the sensors attached to them.
After powering on the RPi, I installed the DHT22 library and then got sample code from Adafruit by entering:
sudo pip3 install adafruit-circuitpython-dht
wget https://raw.githubusercontent.com/adafruit/Adafruit_CircuitPython_DHT/main/examples/dht_simpletest.py
In the dht_simpletest.py file, I commented out lines 6 and 27, uncommented out line 11, and changed D18 to D4. I executed the script by entering:
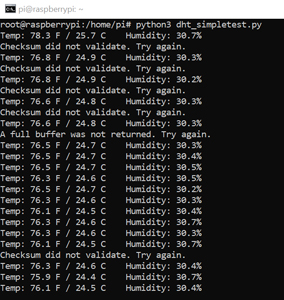
python3 dht_simpletest.py
Every two seconds, I got the temperature and humidity, but I also got an error message every so often.
 [Click on image for larger view.]
To prevent the error message from displaying, I commented out line 29 (print(error.args[0]) in the code. When I reran the code, the errors were not displayed.
 [Click on image for larger view.]
I then modified the code to only take a single reading and write the output to a file every time that the code was executed.
Using Third-Party Monitoring Tool
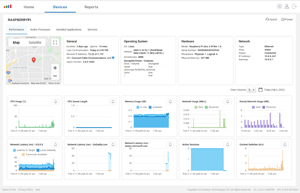
The last thing I wanted to check with the RPi is how easy a third-party monitoring tool could be used with it. There are many bespoken tools that have been created to monitor and manage IoT and edge devices that could have been used. However, as I work for ControlUp, I thought it would be interesting to see if it could monitor this as well. ControlUp is usually used to monitor endpoint devices and VDI implementations, but its SaaS cloud-based Edge DX product has an Arm32 Linux agent and transmits data over the http port. As such, I thought it would be a useful IoT monitoring tool as the device could be located virtually any place in the world with Wi-Fi and monitored from a central location.
After downloading and installing the agent, I was surprised to see the device showing up on my Edge DX dashboard. This showed the OS, hardware information, CPU activity, memory, and networking activity.
 [Click on image for larger view.]
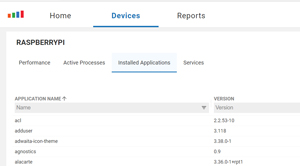
I could see the active processes and applications installed on the device.
 [Click on image for larger view.]
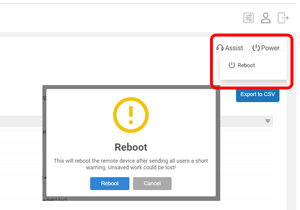
I could run commands on the device and reboot it from the dashboard if needed.
 [Click on image for larger view.]
Conclusion
The Raspberry Pi Zero 2 W continues to impress me. In less than an hour, I was able to set up a remote temperature/humidity monitoring system for less than $22. Not only was the low cost of the device impressive, but the flexibility of such a device is truly remarkable as you have a quad-core Arm processor and 512MB of RAM to work with. As was the case with the remote time lapse system that I previously wrote about, I think that it is unlikely that a large organization would go through the trouble of assembling and deploying these devices on the edge, but individual business units within large organizations, or small businesses, might see the value in using devices such as these.
The DHt22 is just one of the many types of sensors that can be used with a RPi, including barometer, moisture and motion sensors, as well as GPS modules, gyroscope and compasses that can be easily integrated with RPis. I think the biggest takeaway from my work with the Zero is that with the low-cost and flexibility we are seeing in SoC we will continue to see more and more edge devices to monitor remote locations.
About the Author
Tom Fenton has a wealth of hands-on IT experience gained over the past 30 years in a variety of technologies, with the past 20 years focusing on virtualization and storage. He previously worked as a Technical Marketing Manager for ControlUp. He also previously worked at VMware in Staff and Senior level positions. He has also worked as a Senior Validation Engineer with The Taneja Group, where he headed the Validation Service Lab and was instrumental in starting up its vSphere Virtual Volumes practice. He's on X @vDoppler.