In-Depth
Installing and Running VMware Workstation 17 on a Mini-PC
I looked at the SimplyNUC Ryzen 9-7940HS processor mini-PC in a previous article and found its eight-core/16-thread Ryzen 9-7940HS processor very performant. This led me to believe that VMware Workstation would perform very well on it. If you are coming into this series of articles midway through, Workstation is an application that lets you run virtual machines (VMs) on a PC running Windows or Linux.
In this article, I will install Workstation on the device and run and benchmark the performance of a small and large Windows 10 VM. If you are still getting familiar with the installation and usage of Workstation, I recommend reading about how I used it with an Intel NUC 13 Pro PC.
I will only be running Cinebench on the system as I am only interested in the CPU/GPU performance of the device. I will use ControlUp Edge DX to monitor the host machine and the VM. As a disclaimer, I work for ControlUp.
Resource Overcommitment
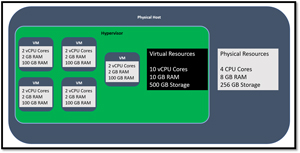
Workstation can overcommit physical resources such as CPU, RAM and storage. This means that the VMs running on the system can be configured to use more resources than physically exist on the physical device.
For instance, if a physical system with 8GB of RAM, four CPU cores and 256GB of storage is running five VMs with 2GB of RAM, two vCPUs and 100GB of storage, then these VMs are overcommitted as the total number of VMs. However, this usually works fine as the physical resources are not used simultaneously in the rare event that all VMs attempt to access their maximum allocated resources at the same time, as the hypervisor has several means to handle the situation gracefully.
 [Click on image for larger view.]
Memory Overcommitment
Looking over the documentation for Workstation 17, I couldn't find in-depth details about best practices for memory overcommitment, but I did find this blurb: "Allocating more than the maximum memory to a VM might cause memory swapping. It can also negatively affect host system performance, including the ability to run Workstation Pro."
I did find some old documents about performance best practices for Workstation 7.0, which states that it has three memory management mechanisms, page sharing, ballooning and swapping, to dynamically reduce the amount of machine physical memory required for each VM:
- Page Sharing. Workstation uses a proprietary technique to transparently and securely share memory pages between VMs, thus eliminating redundant copies of memory pages. Page sharing is used by default regardless of the memory demands on the host system.
- Ballooning. If the VM's memory usage approaches its memory target, Workstation uses ballooning to reduce that VM's memory demands. Using a VMware-supplied module installed in the guest OS as part of the VMware Tools suite, Workstation can cause the guest to relinquish the memory pages it considers least valuable. Ballooning provides performance closely matching that of a native system under similar memory constraints. The guest OS must be configured with sufficient swap space to use ballooning.
- Swapping. If ballooning fails to limit a VM's memory usage sufficiently, Workstation makes memory pages available for the host OS to swap. Because the pages Workstation releases are likely to be active, this can cause VM performance to degrade significantly. While Workstation allows significant memory overcommitment, usually with little or no impact on performance, you should avoid overcommitting memory to the point that it results in heavy memory reclamation.
To get a better idea of how this works, suppose the memory savings provided by transparent page sharing reach their limit, and the total memory demands exceed the amount of machine memory in the system. In that case, Workstation must use additional memory reclamation techniques. As described above, Workstation next uses ballooning to make memory available to VMs that need it, typically with little performance impact. If still more reclamation is required, Workstation uses host-level swapping, which can result in noticeable performance degradation.
CPU Overcommitment
I tried to find information about CPU overcommitment in the documentation for Workstation 17, but again, I couldn't find any detailed explanation. However, the aforementioned performance best practices for Workstation 7.0 stated that the CPU resources should not be overcommitted on the host system, as virtualization has its CPU overhead. It also advised that the total CPU resources needed by the VMs running on the system should not exceed the CPU capacity of the host. Overloading the host CPU capacity could cause the performance of individual VMs to degrade.
From this, I learned that you can provision more vCPUs than logical CPUs on the machine you are running Workstation on, but you need to monitor the CPU usage on the physical host.
Virtual Networking with Workstation
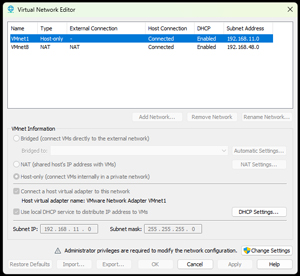
Workstation Pro offers various networking options to enable VMs to connect to the network. These include bridged networking, NAT and host-only networking. Workstation Pro also supports creating custom virtual networks using virtual networking components. Workstation provides a virtual network editor under the Edit tab.
 [Click on image for larger view.]
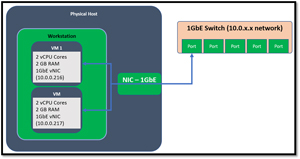
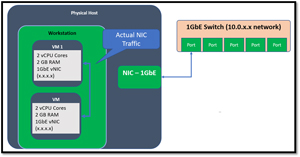
Bridged networking connects a VM to a network by using the network adapter on the host system. It is the easiest way to give the VM access to the network if the host system is on a network. When you install Workstation Pro, a bridged network (VMnet0) is set up for you.
 [Click on image for larger view.]
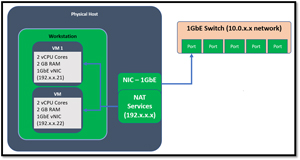
On the other hand, NAT networking does not provide a VM with its IP address on the external network. Instead, a separate private network is set up on the host system, and the VM gets an address on this private network from the virtual DHCP server. The VM and the host system share a single network identity that is not visible on the external network. Workstation Pro sets up a NAT network (VMnet8) for you during installation, and the New VM wizard configures the VM to use the default NAT network.
Host-only networking creates a network that is entirely contained within the host computer. It provides a network connection between the VM and the host system using a virtual network adapter visible on the host OS. Workstation Pro sets up a host-only network (VMnet1) for you during installation.
 [Click on image for larger view.]
With the Workstation Pro virtual networking components, you can create sophisticated Custom Virtual Networks connected to one or more external networks or run entirely on the host system. You can use the virtual network editor to configure multiple network cards in the host system and create multiple virtual networks.
I will be using Bridged Networking for the VMs I will create.
Storage on Workstation
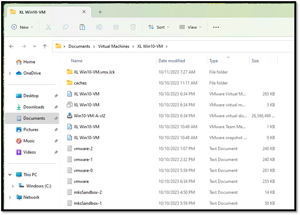
A VM is a collection of storage and configuration files that are, by default, in the user Documents folder.
 [Click on image for larger view.]
Snapshots
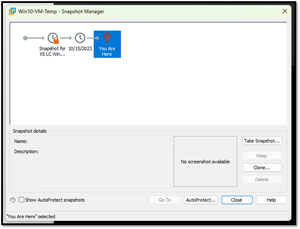
Workstation supports taking a snapshot of a VM, saves its current state and enables you to repeatedly return to the same state. When you take a snapshot, Workstation Pro captures the entire state of the VM. Snapshot Manager is used to review and act on the snapshots for VMs. It is located by right-clicking the VM.
 [Click on image for larger view.]
A snapshot includes the contents of the VM memory, settings and the virtual disks. When you revert to a snapshot, you return the VM's memory, settings and virtual disks to their state when you took the snapshot.
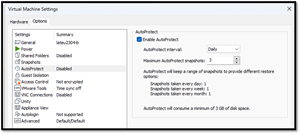
Snapshots are a powerful tool with several features. You can take snapshots of a VM and restore it to a previous state by reverting to a snapshot. You can also revert to a snapshot or take a new one when you power off the VM, which is helpful if you need to discard changes made during that session. The AutoProtect feature allows you to specify regular intervals for taking snapshots to preserve the VM's state. Additionally, you can take manual snapshots at any time. Workstation Pro also allows you to take background snapshots, which means you can continue working while the VM's state is preserved. Finally, you can configure snapshots to preserve states only for certain virtual disks.
 [Click on image for larger view.]
Passing Hardware to VMs
You can add various physical devices to VMs using Workstation Pro, such as DVD and CD-ROM drives, floppy drives, USB controllers, virtual and physical hard disks, parallel and serial ports, generic SCSI devices and processors. To pass a physical device to a VM, go to Settings and click Add Hardware.
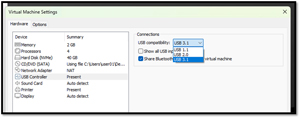
Workstation supports virtual controllers for USB 1.1, 2.0, and 3.1 USB controllers.
 [Click on image for larger view.]
Workstation can be configured to connect the USB to a VM in several ways. I used it to connect a USB device to a VM running in the foreground.
 [Click on image for larger view.]
I followed the VMware Workstation documentation instructions to test hardware passthrough using a USB thumb drive when I started the VM and plugged in the thumb drive, which it did without any issues.
VMware Workstation
I was glad I got to spend some time reacquainting myself with VMware Workstation, as I forgot what a helpful tool it is. I installed it on a SimplyNUC Ryzen 9-7940HS mini-PC, and I expect it to perform exceptionally due to its powerful Ryzen processor.
In this article, I discussed resource overcommitment, which allows VMs to use more CPU, RAM and storage than is physically available on the host. I also touched on potential issues with excessive memory allocation and explained the various memory management mechanisms Workstation uses to deal with these. I also discussed other features in Workstation, like virtual networking options, storage location, snapshots and passing hardware devices to VMs in Workstation Pro.
In my next article, I will do some performance testing of the VMs under Workstation to see what kind of overhead Workstation has.