One of the hardest aspects of vSphere administration is resuming operations after a major outage, such as a power outage or network outage. Whether or not outages are planned, it can be incredibly inconvenient to stop everything (the easy part) and then resume everything (the hard part).
Restarts can be especially difficult if your entire infrastructure is virtualized. In my vSphere environments, I have a number of network services that are also virtualized, and this includes DNS and Active Directory through an Active Directory domain controller VM and Internet firewall and DHCP with the Untangle appliance. These two VMs are critical to the operation of my environments (I have multiple labs with this configuration), and nothing else really works without these two.
One way to make the automatic resumption of your core infrastructure is to have the VMs automatically start up. What I don't like is that this setting is only available for a single host. Consider shared storage and multiple hosts, where the setting can be rendered useless for large scale configurations. What I do to get around this is, pin these two VMs on one critical host and ensure that they startup automatically with the host. These can be pinned by using direct attached storage, PowerCLI, a CD-ROM .ISO mapping to a local resource or DRS manual settings.
The setting in vSphere is a property of the ESX(i) host, found within the configuration tab in the Virtual Machine Startup/Shutdown options section. Fig. 1 shows how to set automatic startup for VMs on a host.
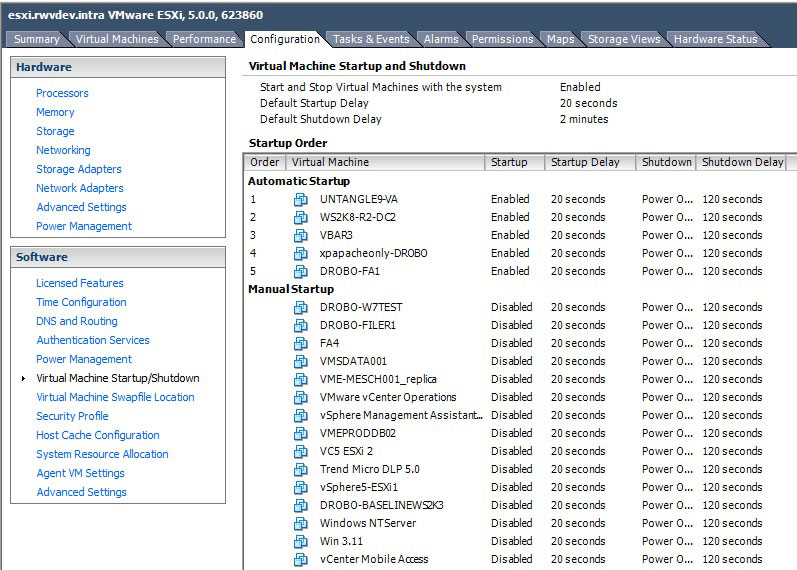 |
Figure 1. A VM startup sequence can be set with timing for each host. (Click image to view larger version.) |
The properties section will allow the startup options to be configured. It is a good idea to shorten their startup time if the hosts power up and are ready to go. This may not be the case with SAN or NAS systems in use, which may take more time to start up. Fig. 2 shows the timing configuration options.
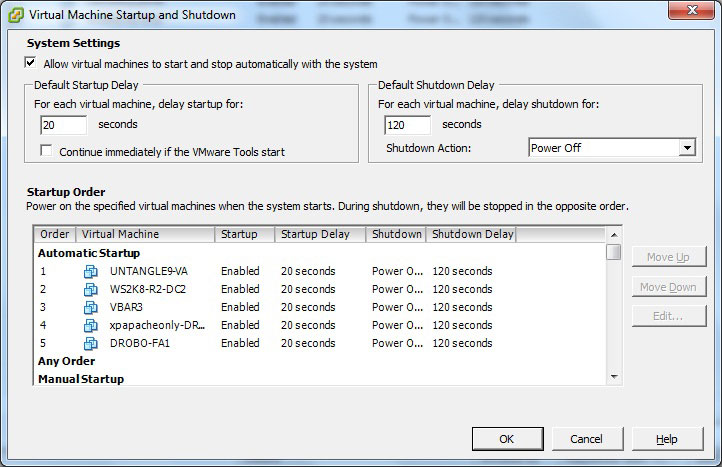 |
Figure 2. Startup timing can be configured for the VMs. (Click image to view larger version.) |
My recommendation is to use the startup and shutdown for critical VMs, and then have in-guest scripts on one other system to start up related VMs, which may make sense as the cluster is brought online. But it is tough to make generic recommendations for an entire cluster, as all VMs and environments are not created equal.
What tricks have you employed to do automatic startup for vSphere VMs? Share your comments here.
Posted by Rick Vanover on 05/09/2012 at 12:48 PM2 comments
I will admit first of all that I am no scripter. But I find that when I go about the task of doing repetitive tasks, PowerCLI (vSphere's PowerShell extension) is the way to go. I usually also gravitate to Alan Renouf's site for a great selection of starter scripts, so cheers to you Alan!
In preparation for an upgrade to vSphere 5 for one environment, I needed to determine where each host was at. Sure, we can look in the vSphere cient and get the build number and something like ESXi 4.1. But without knowing the build numbers by memory, it may not be enough to tell us the entire story.
So, I whipped up the simplest one-liner PowerCLI script to tell me what release an ESX or ESXi host is at, as well as its install date. This is helpful to reconcile what we are expecting for the state of a host, as well as the supported configuration and options available for the host for the upgrade. Here's the script:
Get-VMHostPatch * | Select ID, InstallDate, VMHostID
Get-VMHost | Select ID, name
The script is simple and dirty and returns the selected information in two views. The VMHostPatch cmdlet returns only the real information I want coupled with a VMHostID. That is correlated in the Get-VMHost cmdlet, which returns the DNS name of the hosts in question. What is also cool about this is that it can report against multiple vCenter connections simultaneously (as can most cmdlets, for that matter).
The first step is to run the Connect-VIServer Cmdlet to enable the connection to the vCenter Server. Fig. 1 shows the report, which gives a quick and easy view to see what hosts are at what major version (such as Update 1, Update 2, etc.) before implementing the vSphere 5 upgrade for these environments.
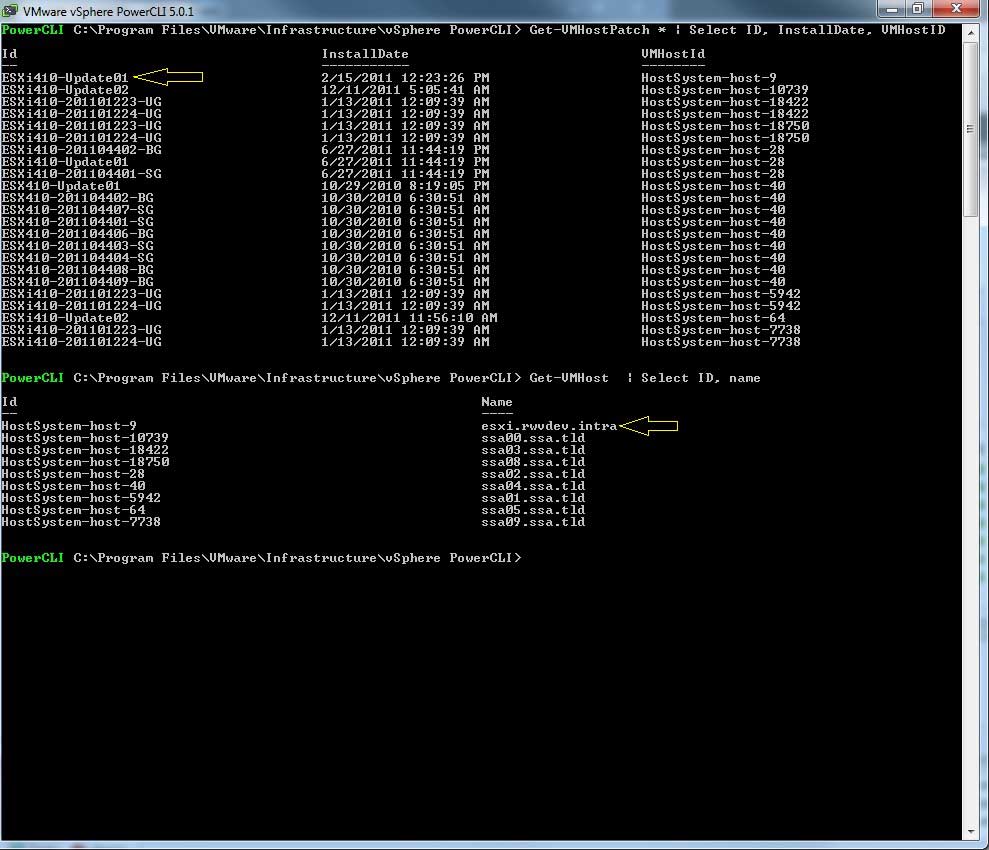 |
Figure 1. This report shows the major versions as well as the host names for all hosts on the connected vCenter systems. (Click image to view larger version.) |
Have you written any PowerCLI scripts that you've used as part of your vSphere 5 upgrade procedures? If so, share your scripts or links to any relevant blog posts here.
Posted by Rick Vanover on 03/28/2012 at 12:48 PM76 comments
If you use any test environments with your vSphere environment, you are likely very familiar with sending the Ctrl+Alt+Insert keystroke to a system when viewing the console. In my lab, I have done a few tests using PXE boot services. I like PXE boot options because they are great for stateless VMs and you can easily test it on scale by booting up a number of sessions at once.
In testing these types of configurations I find, of course, something isn't right. In those situations, the default vSphere boot sequence will show that the VM can't boot. Fig. 1 shows a VM booting with no usable image.
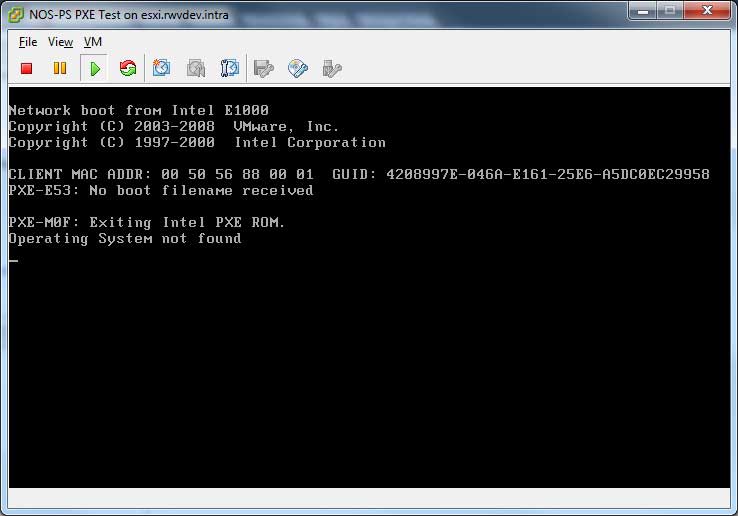 |
Figure 1. This virtual machine didn't find any bootable drive locally or service on the network. (Click image to view larger version.) |
When this happens, we have to jump back into the virtual machine and send the Ctrl+Alt+Insert to reboot the VM to retry its connection. I've found a new trick for a vSphere VM option that can save a step in this situation: failed boot recovery.
The VM has to be powered off to make a change, but the failed boot recovery advanced boot option can configure the VM to reboot after a specified timeout if the normal boot sequence fails. This option has a default value of 10 seconds, which is just enough time if you are looking at the console to interact and stop the sequence or interrupt it. For me, I'll change it to 20 seconds to allow me more time to respond. Besides, this extra 10 seconds is effectively insignificant for most scenarios. Fig. 2 shows the failed boot recovery option configured on the VM.
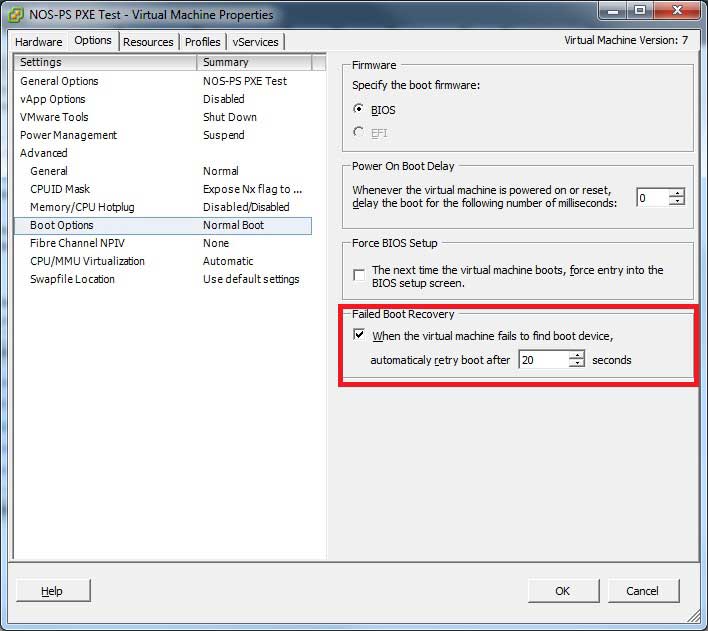 |
Figure 2. The failed boot recovery option will make the VM reboot after a specified timeout if no boot device was found on disk or on the network. (Click image to view larger version.) |
Once this is configured, the boot sequence has a new entry that displays the countdown of the reboot due to this option (see Fig. 3).
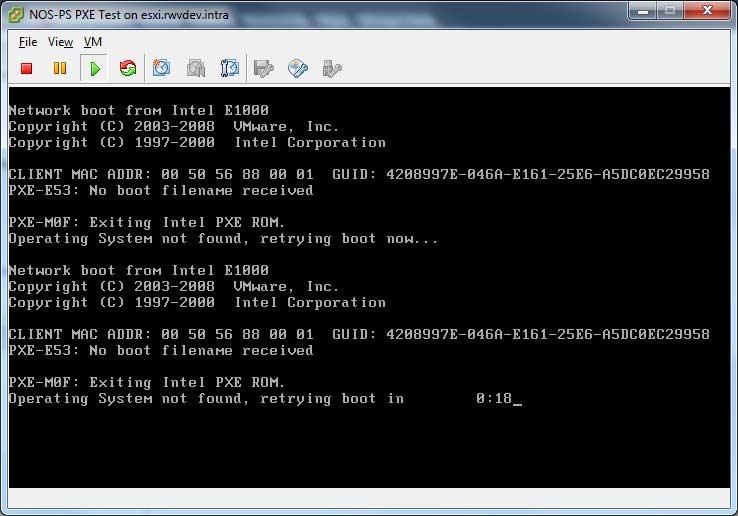 |
Figure 3. With the failed boot recovery option, a countdown is displayed to the next time the VM will reboot. (Click image to view larger version.) |
I see this option valuable where PXE systems are in use or if there are deployment test environments in use. I don't see this necessary for all VMs or part of my standard template build, but handy in one-off situations.
Do you see a use for the failed boot recovery option? If so, share your comments here on how you would use it.
Posted by Rick Vanover on 03/14/2012 at 12:48 PM2 comments
One of the main sticking points with learning Hyper-V is getting your head around the Clustered Shared Volumes technique to provide .VHD files on a SAN to multiple Hyper-V hosts. The CSV technique is an extension of Microsoft Failover Clustering. Failover Clustering is the "new" name for the technologies formerly known as Microsoft Clustering Services. Setting up a quorum-ready cluster comes with a few prerequisites. Let's enumerate them:
- A private network: This can be an uplink cable from host A to host B or it can be an isolated VLAN with a private IP address space.
- A quorum LUN: This small block storage resource (5 GB, for example) is used to coordinate notes.
- A CSV LUN: This (larger) block storage resource will house the VHD files.
- Two or more Hyper-V hosts: These hosts need to be Windows Server 2008 Enterprise or higher. The free version of Hyper-V can be used, but I'd recommend waiting until Windows Server 8 and Hyper-V R3.
- Server configuration: Each of the hosts need the Hyper-V role and the Failover Clustering feature added. It's also a good idea to have the hosts up to date in terms of updates service packs.
The quorum drive is a finicky thing if you've not worked with it before. I picked 5 GB, which is probably ample. You'll want to bring it online on the first host and format as NFTS, use the drive label "Quorum" and assign it the letter Q. I've done that in other clustering applications (such as Exchange and SQL) and it is easy to support that way. Fig. 1 shows the quorum drive formatted on a sample host, HV-CSV101.
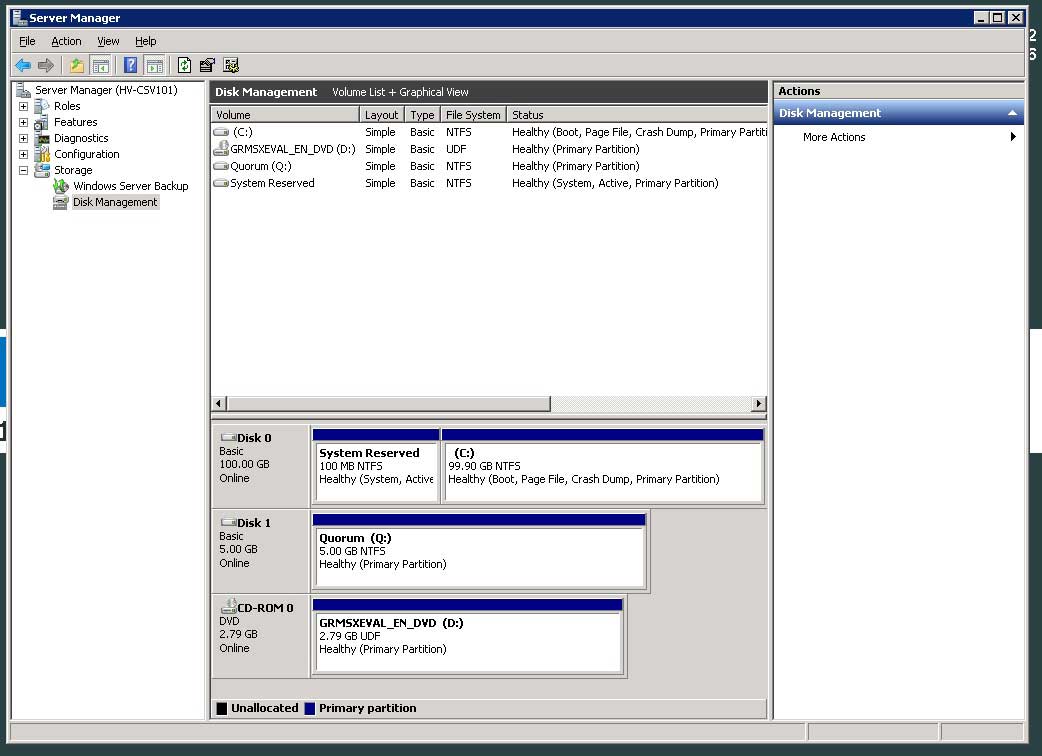 |
Figure 1. The Quorum LUN is formatted on one host, then sent offline for Failover Clustering configuration. (Click image to view larger version.) |
The next step is to send that Quorum LUN offline. Simply click on the disk and select "Offline". Repeat this process with the LUN designated as holding the CSV volumes. In the example I'm using, I'll format that volume as the drive letter V, and assign the label of "VHDs". This step is shown in Fig. 2, with the quorum LUN offline.
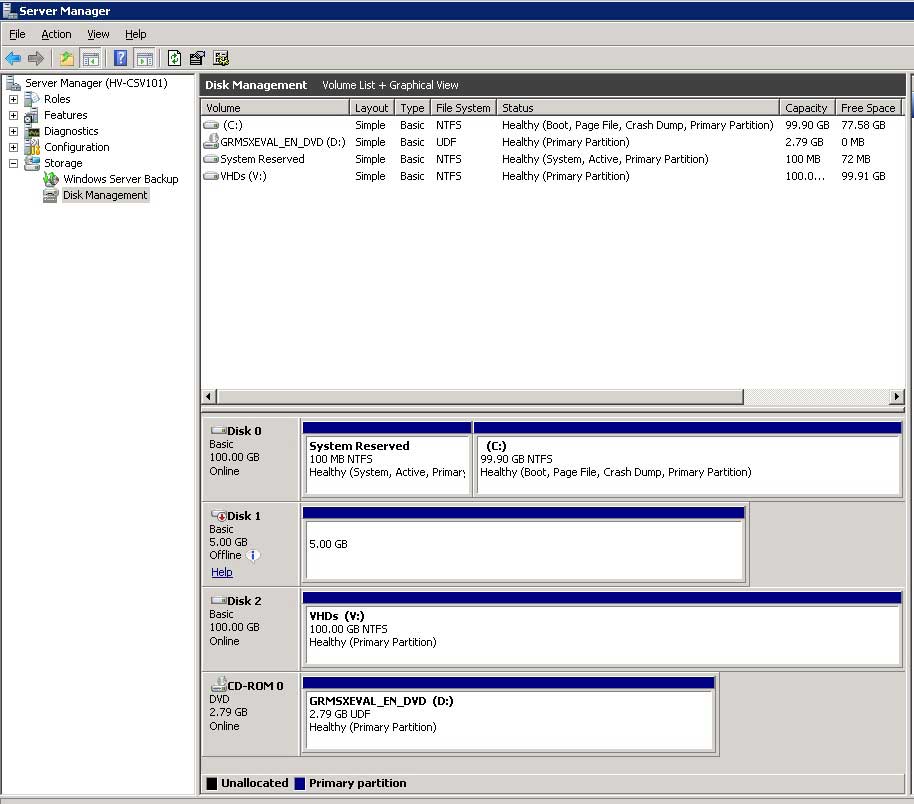 |
Figure 2. The Quorum LUN is offline and the new VHDs volume is formatted.(Click image to view larger version.) |
Then set the VHDs volume offline to prepare the cluster configuration. If you have not used Failover Clustering before, it is pretty straightforward. The first step is to create a cluster, which is an action link on the right of the window. This is an area where you want to make sure your server nomenclature is pretty clear. The ideal situation is that each server in the cluster's name is self-documenting. In my example, hosts HV-CSV101 and HV-CSV102 are the clustered Hyper-V servers (see Fig. 3).
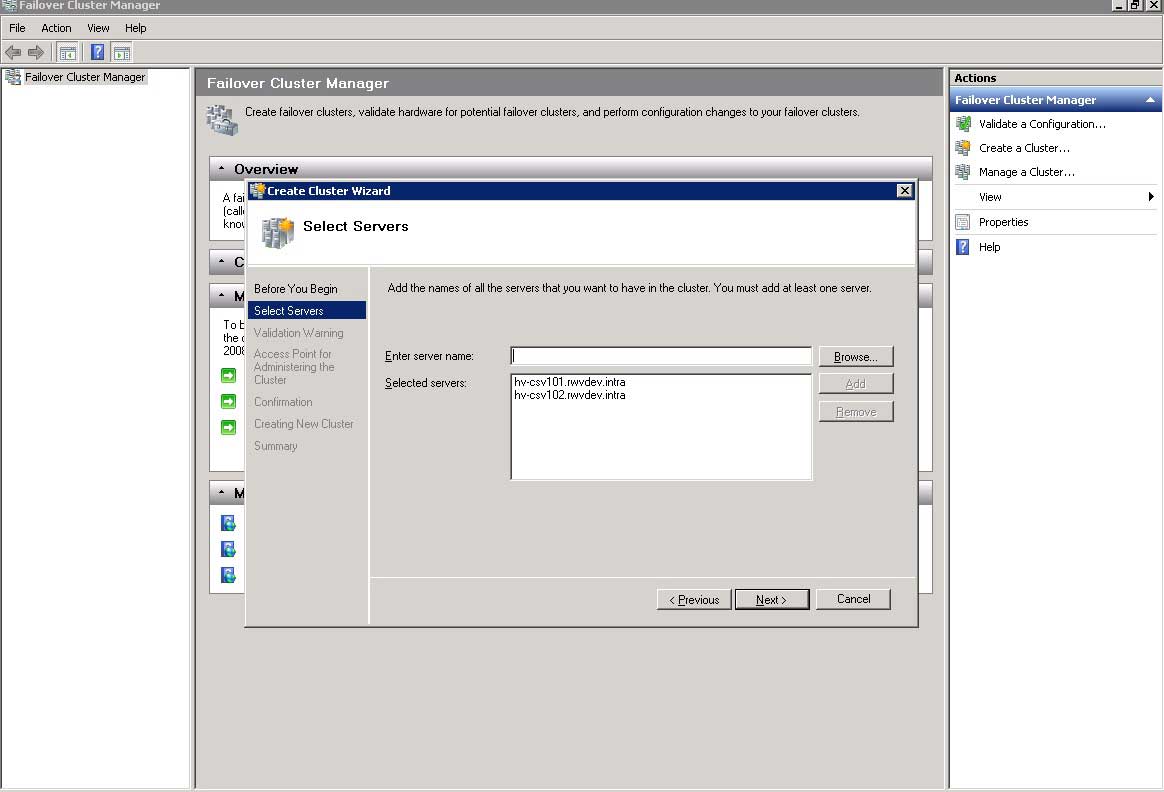 |
Figure 3. The Create Cluster wizard assigns specific servers to the new cluster. (Click image to view larger version.) |
The next step is to run a validation report (optional, but recommended) and to assign the cluster a name. Again, sticking with a consistent nomenclature; I've named this CSV cluster: HV-CSV201. Once the wizard completes a summary is shown similar to Fig. 4.
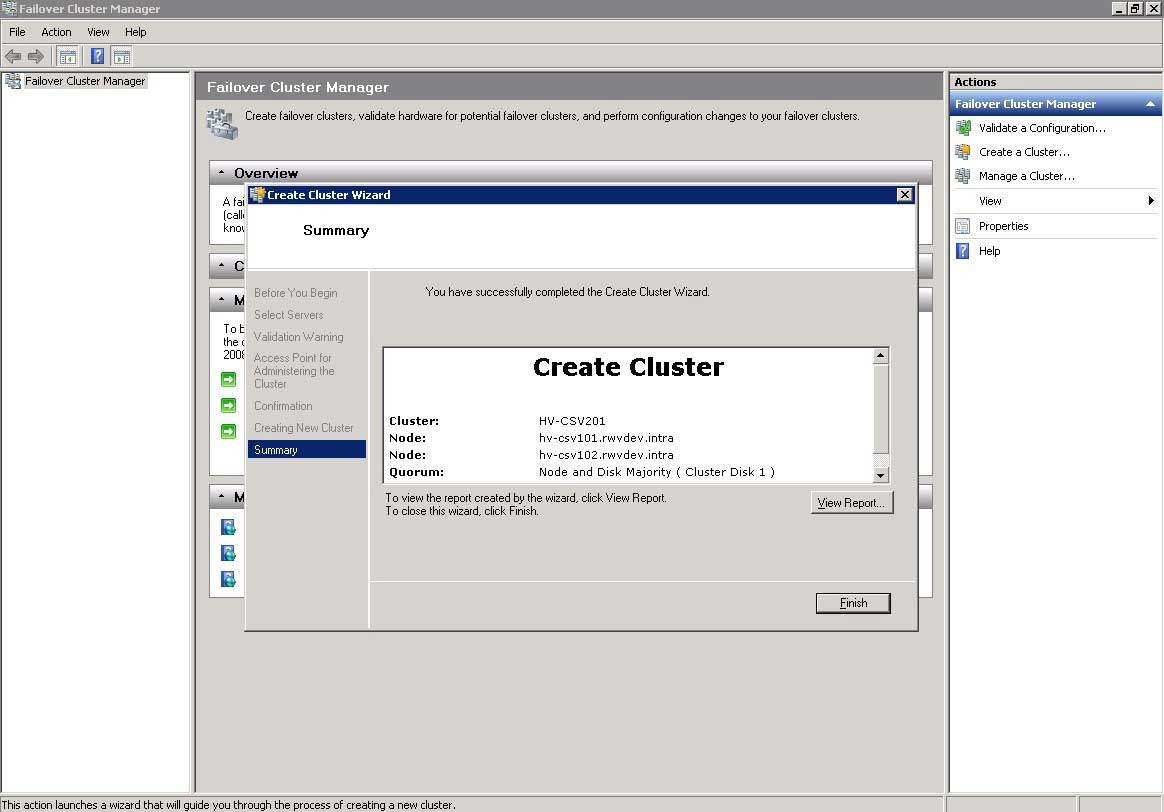 |
Figure 4. A CSV cluster will need a name, ideally something that tells which servers are members of the cluster. (Click image to view larger version.) |
As the wizard will complete, it should denote that it detected a quorum node and its disk number. The final series of steps revolves around setting up the actual CSV. Within the Failover Cluster Manager lingo, the VHDs are a clustered service, and after the cluster is created; it really doesn't do anything substantive. To see if the server has successfully achieved quorum, look into the drive inventory; and you'll see the special drive identification of the Q: and V: drives formatted in the earlier step (Fig. 5).
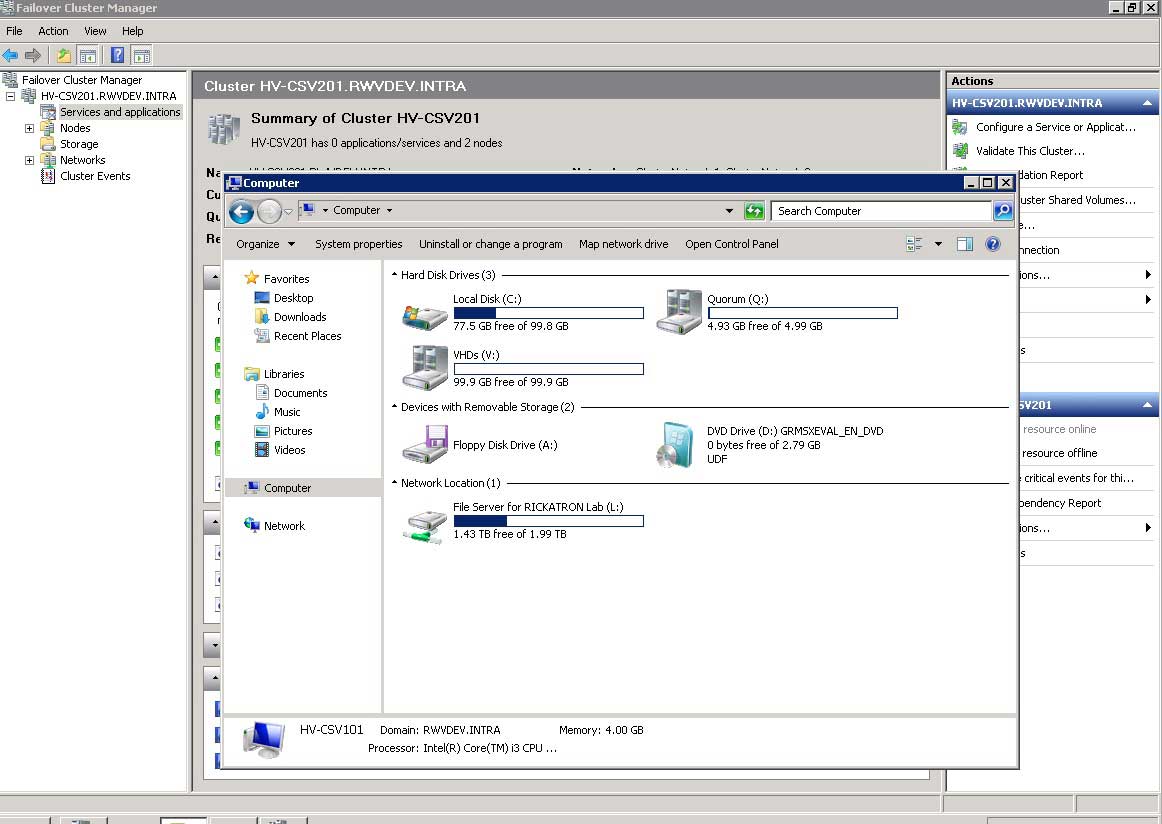 |
Figure 5. The quorum drive and VHD drive are now displayed on the clustered host. (Click image to view larger version.) |
The final step is to enable the Clustered Shared Volumes feature, which is a technique of Failover Clustering to share the actual VHDs rather than an entire LUN. This step is a simple right-click on the cluster, and answering the prompt to enable CSV (Fig. 6).
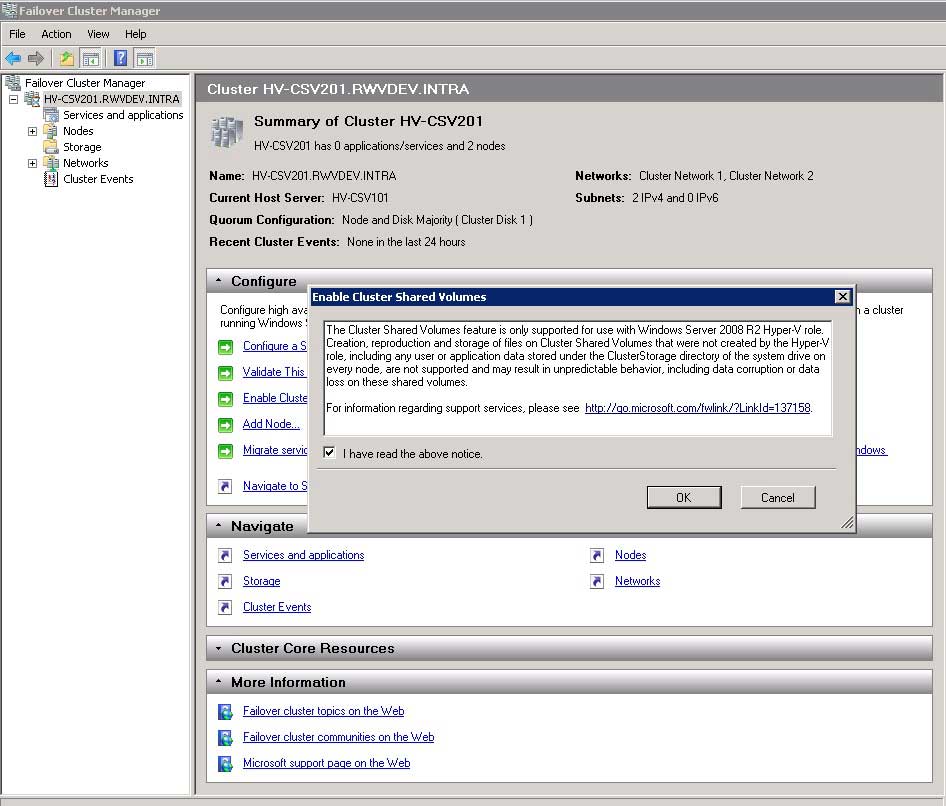 |
Figure 6. Enabling CSV is a simple option within Failover Cluster Manager. (Click image to view larger version.) |
The final step (Fig. 7) is to assign a specific LUN for the role of the CSV. In our example it will be the V: drive created earlier. This step simply designates that volume as the CSV volume.
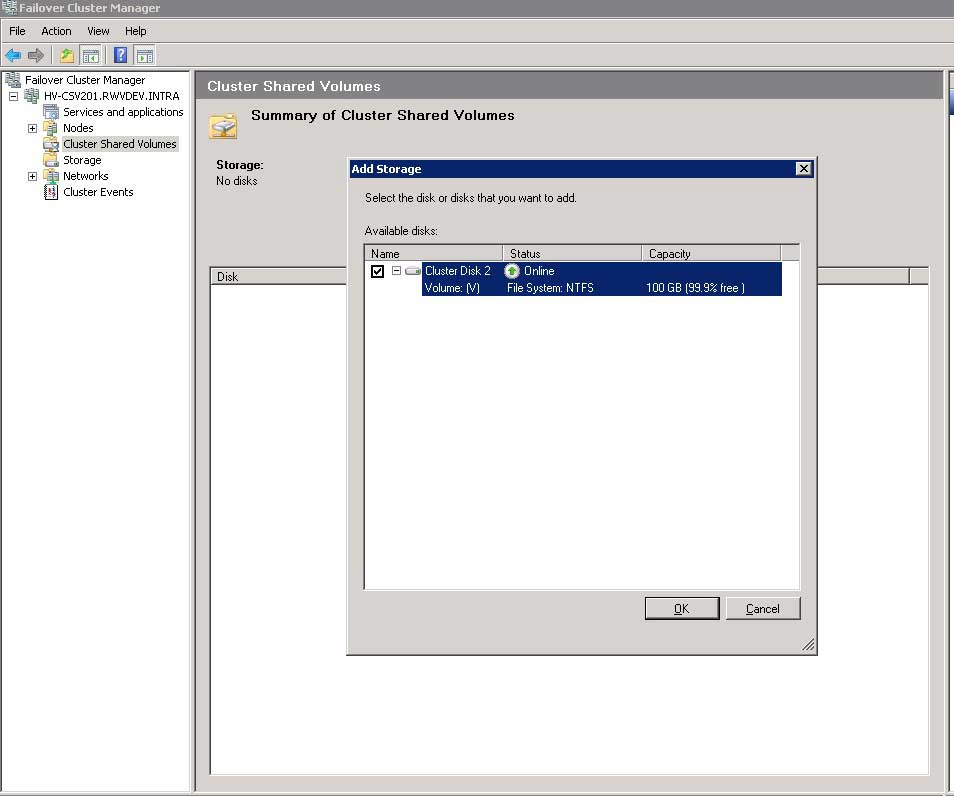 |
Figure 7. Selecting the VHDs drive example here will make it the CSV volume. (Click image to view larger version.) |
At this final point, the V: drive will vanish from the Windows Explorer view (but the Q: drive will remain) as the CSV volume is represented as C:\ClusterStorage\Volume1 by default with CSV implemented by Failover Cluster Manger.
Have you had issues configuring quorum with CSV and Failover Cluster Manager? How have you configured it for your Hyper-V VMs? Share your comments here.
Posted by Rick Vanover on 01/11/2012 at 12:48 PM4 comments
Many of the vSphere 5 features seem to gravitate around storage, but there are scores of other features that can help you as you work daily in the the vSphere environment. One of those features, multi-NIC vMotion, allows multiple Ethernet interfaces for both standard vSwitches and vNetwork Distributed Switches (vDS) to perform vMotion traffic on multiple interfaces.
By default on a standard vSwitch with two network interfaces and one vmkernel interface, that traffic will only use one port on the vSwitch. With vSphere 5, we can add a second vmkernel interface to that vSwitch and configure adapter preferences to ensure that multiple NICs are leveraged. The first step to making this happen is to have two or more interfaces assigned to one vSwitch. From there, we can add the first and second vmkernel interfaces to that same vSwitch. The IP configuration has to be unique for each vmkernel interface, even though it will reside on the same vSwitch.
Once those steps are configured, we can set a switch failover over that has each vmkernel interface having one interface set as active; with the other interface set as standby. Reverse the configuration for the other vmkernel interface and there we have Multi-NIC vMotion. Fig. 1 show how this looks in vSphere for both interfaces, starting with the properties of the vSwitch (simplified in this example to only have vmkernel).
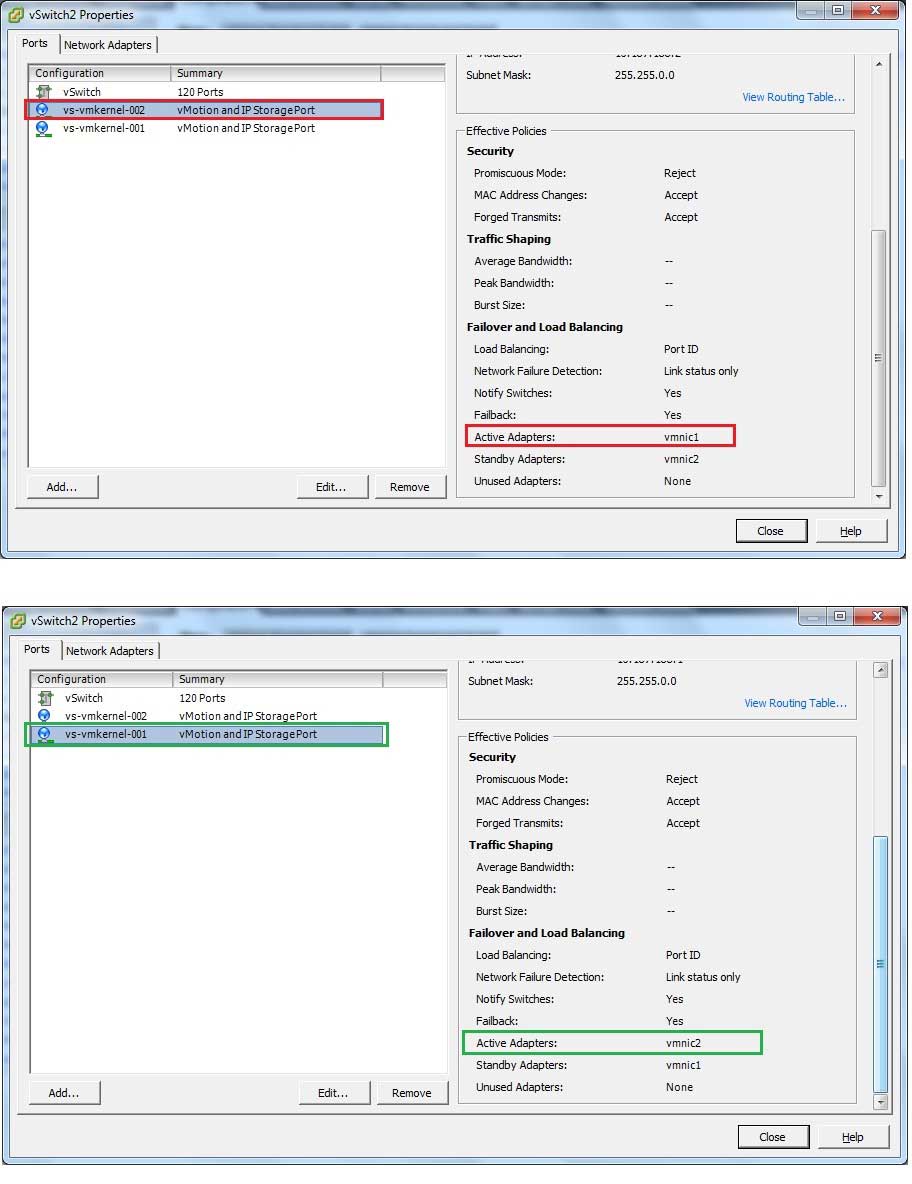 |
Figure 1. Note that each vmkernel interface on the same vSwitch has different standby and active adapters. (Click image to view larger version.) |
Inside the configuration of the vSwitch we can look at the failover for each vmkernel interface. There we can see how this is configured by putting an explicit failover configuration for each interface. These failover configurations are opposite of each other (see Fig. 2).
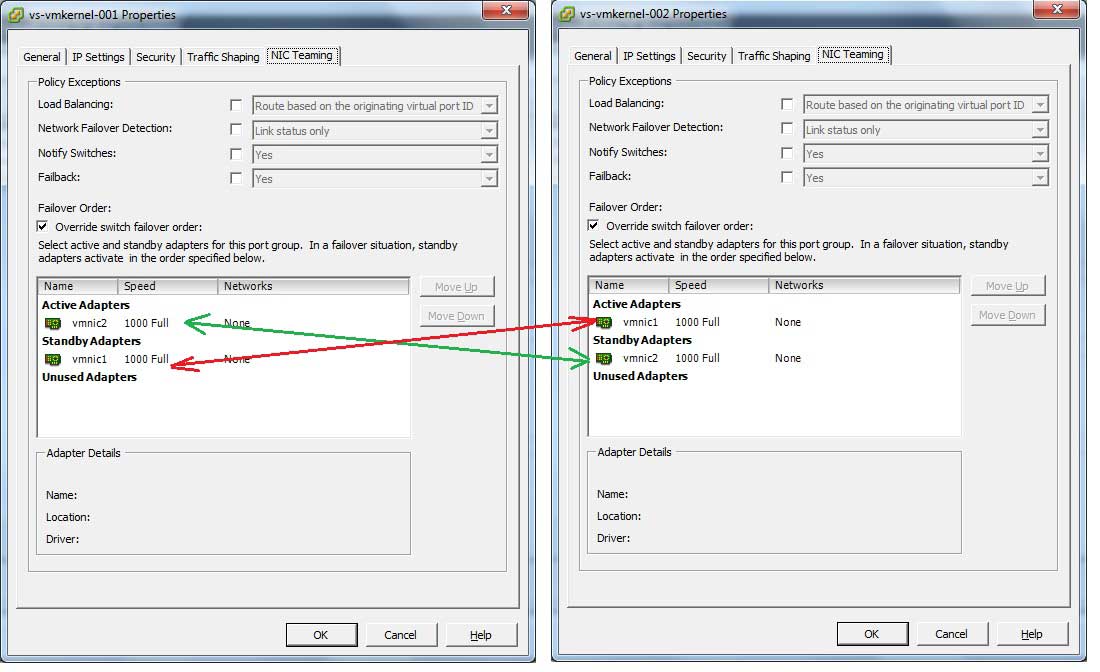 |
Figure 2. Each failover configuration points to opposite vmnic interfaces for each specific vmkernel interface. (Click image to view larger version.) |
If you are interested in seeing the step-by-step process to create this feature, check out VMware KB TV for a recent post on configuring this for vSphere 5 environments as well as KB article 2007467.
From a practical standpoint, this is an opportunity to get very granular with your separation to improve both separation and performance. It may make sense to leverage separate switching infrastructures, VLANs or IP address spaces to put in the best mix of separation and performance. It's tough to make a blanket recommendation on the "right" thing to do, but it is clear that this can help in both situations. From an availability standpoint, the vmkernel will be fine as there are multiple vmkernel interfaces; and the failover order (albeit manual) is still defined.
Does multi-NIC vMotion feel like a necessity for your environment? If so, how would you use and configure this feature? Share your comments here.
Posted by Rick Vanover on 12/08/2011 at 12:48 PM2 comments
VMware vSphere 5 ushers in a number of critical features which are very dependent on storage. So much so, that it has been dubbed the "storage release." One of the critical things to make the storage features come alive is VMFS-5.
VMFS-3 volumes are very much in play in today's vSphere environments. So much so, that the upgrade process may seem quite daunting to some. While we can simply right-click on a VMFS-3 datastore and update it to VMFS-5, we may be doing ourselves a disservice and missing out on this opportunity to perform some important housekeeping on our most critical resource: vSphere storage. The easy upgrade is shown in Fig. 1.
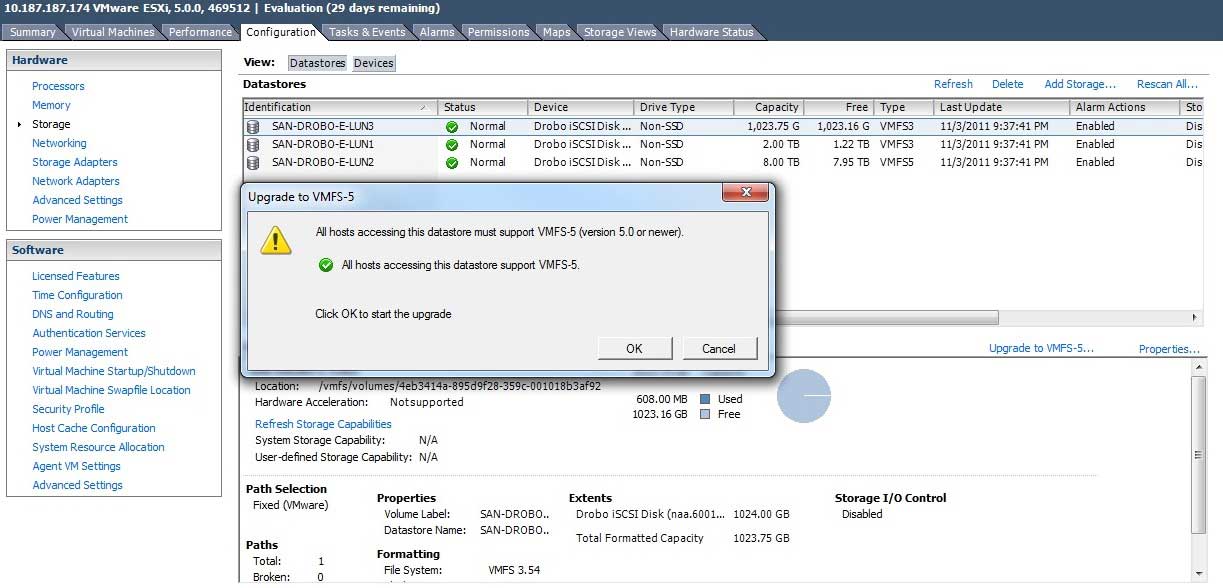 |
Figure 1. A datastore can be upgraded, even with running VMs in place within the vSphere Client. (Click image to view larger version.) |
The migration to VMFS-5 offers a wonderful opportunity to knock out any configuration issues and inconsistencies with our storage that have been passed along thus far in our vSphere experience. So, I've collected some tips (and why they are important) to help make our transition to vSphere 5 a bit easier. I'm further making two assumptions that can make these tips easy to implement. The first of which is that we have some amount of transient vSphere storage. Secondly, we'll need some sort of storage migration technique. This is most commonly done through Storage vMotion or scheduled downtime and the migration task within the vSphere Client.
Now that those ground rules are out to set the assumptions, the next step is to identify the steps to make the upgrade to VMFS-5 volumes the cleanest.
The single biggest recommendation is to re-format each LUN to VMFS-5 rather than upgrade it. This will fix a number of issues, including:
- Mismatched block size: VMFS-5 introduces the 1 MB unified block size. We would be wise to avoid VMFS-5 LUNs with 2, 4 or 8 MB block sizes looking forward.
- Adjust geometry: We now won't be constrained to previous size provisioning. Further, we can resize LUNs on the storage processor to usher in new features such as storage pools.
- Correct zoning: This also is the right time to ensure that all WWPN or IQN access that's in place is still correct. Chances are that for old LUNs there may have been hosts removed from the cluster, yet they may still be zoned in the storage processor or switch fabric to the LUNs.
Reformatting each LUN to VMFS-5 with the correct zoning, a consistent 1 MB block size and "the right size decision right now" for each LUN will set the tone for a clean infrastructure from the storage perspective that can go along with the upgrade. This of course means that VMs will have to be evacuated from existing VMFS-3 volumes via a technology such as Storage vMotion to a (possibly) temporary LUN.
Outside of the storage provisioning metrics above, this is also a great way to clean up miscellaneous unused data on the VMFS-3 datastore. This can be VMs out of inventory, a forgotten ISO library or use of the VMFS filesystem for something other than holding a virtual machine.
It will definitely take some work to clean up VMFS-3 volumes in preparation for the best experience with the vSphere 5 features (such as Storage DRS). But, I believe it is worth it for any sizable SAN environment.
Do you see the upgrades worth the effort? Share your comments here.
Posted by Rick Vanover on 12/01/2011 at 12:48 PM1 comments
Upgrading from ESXi 4 to ESXi 5 can be challenging, especially if you're using the free version of the hypervisor. That's because for the free hypervisor, we don't have the access to the more robust vSphere Update Manager (which makes upgrading very easy).
There are a few options to upgrade a free ESXi 4 hypervisor to ESXi 5. These options are spelled out in the vSphere Upgrade Guide. In this post, I'll show one method and I'll mention the other mechanisms. Basically, the options include using vSphere Update Manager (which is available only with vSphere Essentials and higher), performing a scripted upgrade, using vSphere Auto Deploy, using esxicli or using the ESXi 5 CD.
For those who use the free hypervisor, by far the easiest option is the CD one. This is not very scalable, but it is very simple.
What happens is that the install media for ESXi is used to perform an upgrade of the installation and preserve VMFS volumes. While I like the option to preserve the datastores during an installation, I still think it would be a good idea to remove access to any volumes during an upgrade. In the case of a fibre channel SAN, simply disconnect the HBAs. If the storage is iSCSI or NFS, maybe remove the network path during the installation.
Direct Attached Storage can be a bit trickier, especially if the VMFS volume is on the same disk as the ESXi partition scheme.
It goes without saying (but I'm gonna say it anyways) that a good backup of the virtual machines is a good idea, especially if those VMs are on local storage!
Now, the first step is to download ESXi5 and write it to a CD-ROM disk. When booting from the media, the ESXi installation screen will appear. You may have to change the boot options on the system to start with the optical drive, since the local disk may already have a partition on it. The installation wizard for ESXi starts as shown in Fig. 1.
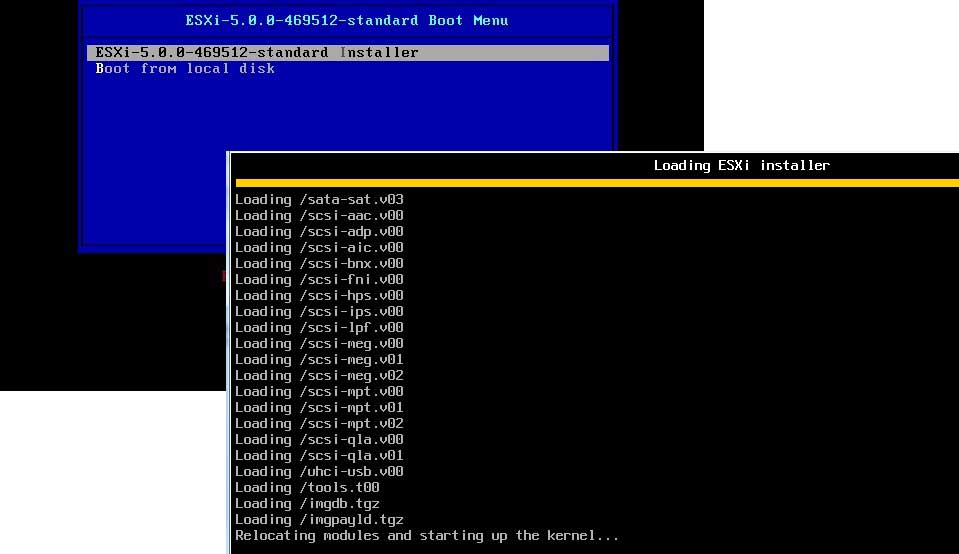 |
Figure 1. The ESXi 5 installation wizard will start from the boot media. (Click image to view larger version.) |
The installation proceeds much like a normal installation, except you'll encounter questions about an existing ESXi installation and VMFS volume. You have the option to migrate the ESXi installation to version 5 and preserve the VMFS datastore (the default), which I recommend.
If you have fully evacuated the host, a clean install just becomes a better idea at that point anyways and the datastore will be rebuilt as VMFS-5. The critical options for upgrading the ESXi host are shown in Fig. 2.
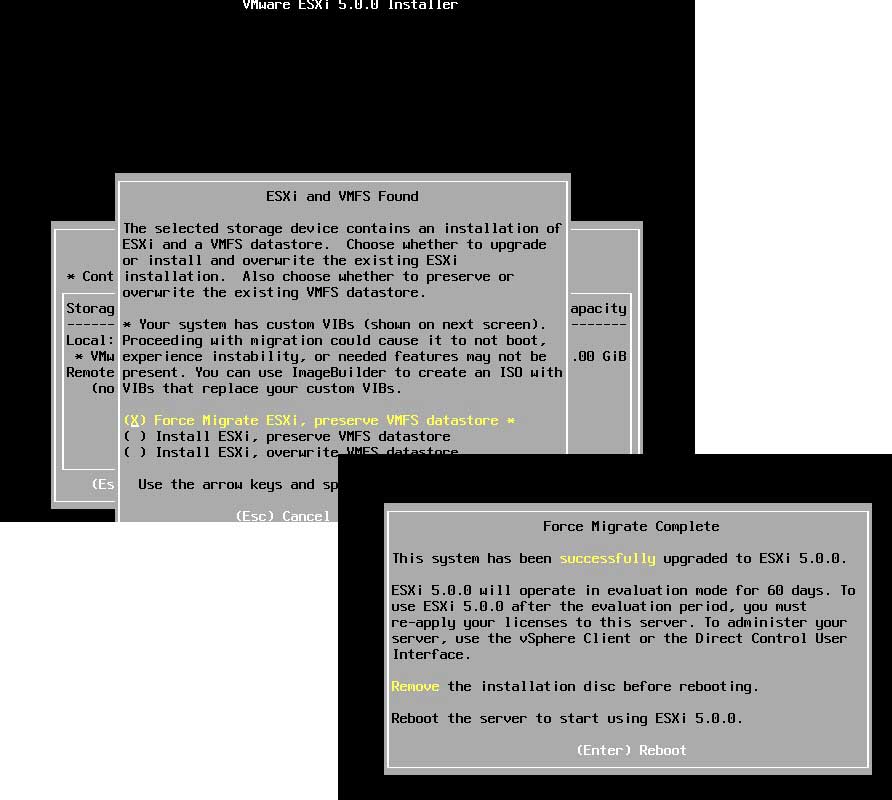 |
Figure 2. Upgrade-specific options are presented during the upgrade process. (Click image to view larger version.) |
It is important to note that rolling back via this method is not supported. This warning is presented during the upgrade process, so make sure that upgrading is the desired action. The upgrade will then proceed on the ESXi 4 host, and make it an ESXi 5 host. You may want to download the vSphere 5 client ahead of time for easy connectivity once the upgrade is completed.
With ESXi 4.1, we lost the ability to do the upgrades via the Windows Host Update Utility, but this process is pretty straightforward for the major updates from ESXi 4 to ESXi 5.
For the free ESXi hypervisor, what tricks have you employed in upgrading? Share your comments here.
Posted by Rick Vanover on 11/07/2011 at 12:48 PM1 comments
Like many other virtualization professionals, I have done most of my work in the type 1 hypervisor space. This has been a reflection of my professional responsibilities as well as whom I try to blog for. To that end, I had up until this time preferred Oracle VM VirtualBox for all of my Type 2 hypervisor usage. In fact, nearly one year ago today, I wrote a column as to why I like VirtualBox.
Enter VMware Workstation 8. Have you seen this thing? WOW! This is a serious type 2 hypervisor, and it plays right into the hands of the everyday IT professional who works with vSphere environments. All kinds of killer features, like integrating into vSphere or ESXi servers, native support for nested ESXi virtual machines, linked clones, unity, and the ability to run Hyper-V guest VMs on Workstation 8 (see Fig. 1).
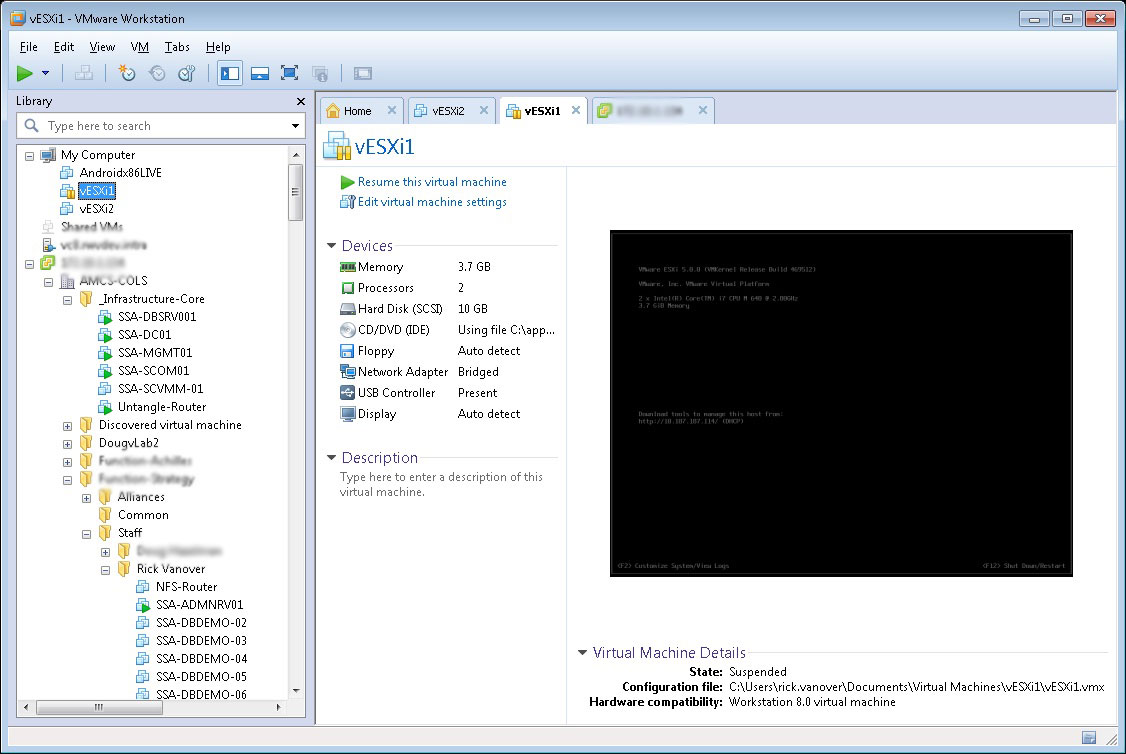 |
Figure 1. The VMware Workstation 8 interface allows a number of new features to be brought into one console. (Click image to view larger version.) |
While all of these features are not new, it surely rounds out VMware's solutions. Probably the best use case is the enhanced support for ESXi as a guest VM. While it's not supported for production, we all have used it at some point for a test environment (I'm sure). In fact, if anyone has ever had to take a mobile vSphere lab with them for a demo or such, this surely is a practice we all have leveraged. Take a look at this post on the VCritical blog to learn more about the enhanced virtual lab setup possible with ESXi 5 and VMware Workstation 8.
While VirtualBox hasn't abandoned VirtualBox since the acquisition from Sun, the features don't match up. Furthermore, one of my biggest sticking points has been price. I'm pretty cheap, and even though VirtualBox is free, I'm no longer using it. It didn't take much for me to do a virtual 180 degree turn on my preference for type 2 hypervisors, but hat's off to VMware on this one. Workstation 8 is bringing it.
Are you still averting Workstation 8? If so, why? Share your comments here.
Posted by Rick Vanover on 10/05/2011 at 12:48 PM7 comments
VMworld is right around the corner! I don't know if I'm excited or scared. This will be the first time that I've attended the show as a vendor, but I still look forward to the VMware technologies and the convergence of the virtualization community to this big event.
Over the last week or so, I've been conspiring with David Davis and Elias Khnaser on a few things; and one thing we felt interesting would be to share our session schedules. My schedule will be slightly tougher to meet this year, as I've a number of duties with Veeam. But I will still find time to attend a number of sessions.
Before VMworld even gets started, I'll be attending the sold-out VMunderground party on Sunday night.
Here are the sessions I'll be hoping to attend:
- BC03420: Avoiding the 16 biggest HA and DRS configuration mistakes
- SPO3995: Storage Selection Techniques for Building a VMware Based Private Clouds
- CIM2561: Stuck Between Stations: From Traditional Datacenter to Internal Cloud
- SPO3981: Veeam Backup & Replication: A Look Under the Hood
- BCO1946: Making vCenter Server Highly Available
- BCA1995: Design, Deploy, Optimized SQL Server on VMware ESXi 5
- VSP1926: Getting Started with VMware vSphere Design
- PAR3269: Zimbra: The New SMB Game Changer
- VSP2227: VMware vCenter Database Architecture, Performance and Troubleshooting
I would be remiss if I didn't mention my own presentation: Solutions Exchange Theatre on Thursday at 10:10 a.m., on practical tips to build a test lab for vSphere's new Storage DRS features. Of course, I'll also be attending the Veeam Party and the VMworld Party to round out the social side of the experience.
Also: Have you registered yet? If not, you'd better! Advance registration is strictly enforced this year.
What sessions are you going to attend? Do you just plan on taking advantage of the replay capabilities? Share your comments here.
Posted by Rick Vanover on 08/23/2011 at 12:48 PM0 comments
Provisioning virtual machine with System Center Virtual Machine Manager (SCVMM) is slightly different than leveraging the local tool, Hyper-V Manager. While both work, the smoother way to deploy VMs for a Hyper-V cluster is to use a SCVMM library.
By default, SCVMM installs a library share called MSSCVMMLibrary in a subfolder in C:\ProgramData. But I find that I want to tweak that default configuration and put CD-ROM .ISO files in a different path. The steps are pretty easy, and we'll walk through them in this blog post.
The first step is to create a new file share on the SCVMM server. In my virtualization practice, I'd put something like this on a dedicated drive; and in this example it will be a D:\ drive path. The D:\ drive is a separate disk resource that is dedicated to the library functions of SCVMM and won't interfere with the C:\ drive in terms of disk resources and free space. Once the new Windows file share is created, we can use the SCVMM Add Library Shares wizard and see this new library available for selection (see Fig. 1).
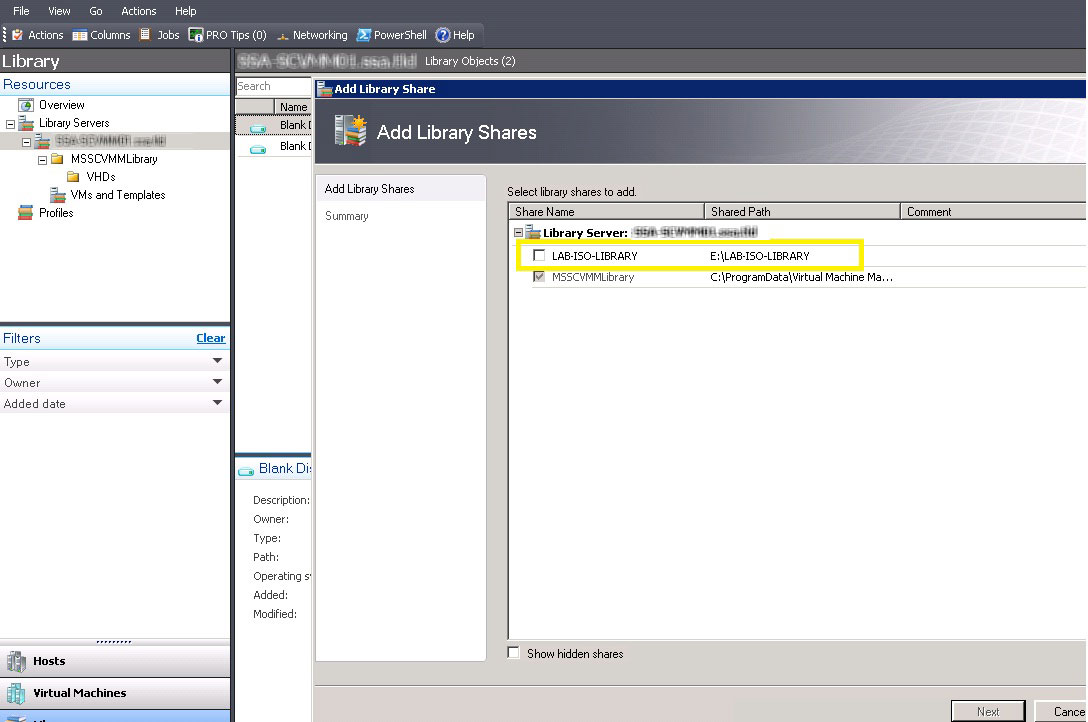 |
Figure 1. Creating a dedicated file share will allow SCVMM to place a library for virtual media files. (Click image to view larger version.) |
Once the new share is created, copy over CD-ROM .ISO files to the new library. You may need to induce a refresh of the contents by clicking the library settings button to turn off the refresh, and turn it back on. Once that is completed, the .ISO files are now visible in the library (see Fig. 2).
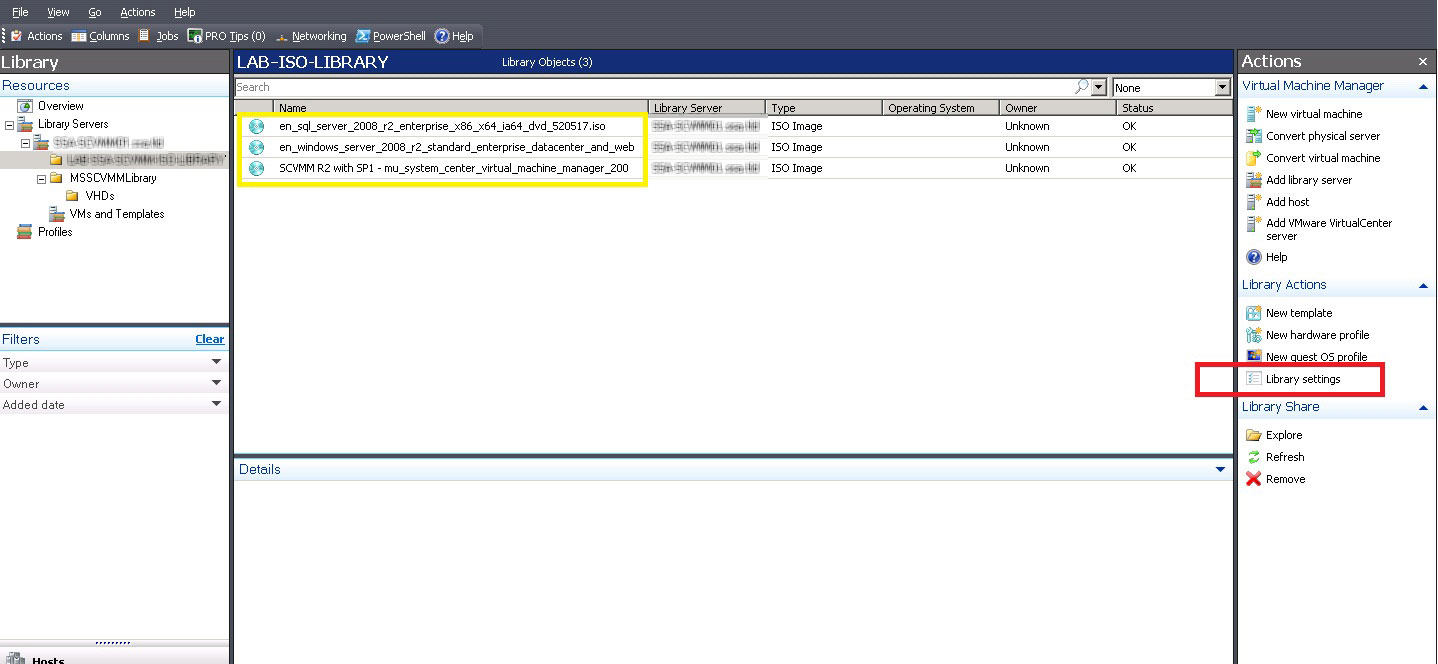 |
Figure 2. The virtual media files are now present in the library. (Click image to view larger version.) |
At this point, a new virtual machine can be created leveraging these virtual media files. They will access the CD-ROM .ISO files over the share that was created, and be installed directly on the Hyper-V host. Depending on the I/O patterns of CD-ROM .ISO files, it may be desirable to put these resources on a dedicated file server instead of on the SCVMM server. The options are effectively the same, except a library server is added with SCVMM to then add a designated share with the CD-ROM .ISO files.
What tricks have you employed in configuring library shares within SCVMM? Share your comments here.
Posted by Rick Vanover on 08/09/2011 at 12:48 PM7 comments
Since vSphere 5 has been announced, a number of new features and requirements of the product may require the typical vSphere administrator to revisit the design of the vSphere installation. New features are paving the way for even more efficient virtual environments. But the new licensing model has been discussed just as much if not more than the new features. The new pricing model accounts for the amount of RAM that is provisioned to powered-on virtual machines (vRAM). How we go about designing vSphere environments has changed with the new features and the new licensing paradigm. Here are some tactical tips to consider with the new features and vRAM implications:
1. Consider large cluster sizes.
The ceiling of 48 GB of vRAM per CPU at Enterprise Plus (and the lower levels) works best when pooled together. The vRAM entitlement is pooled across all CPUs in a cluster and the allocated memory for active virtual machines that are consuming against the vRAM pool. With a larger vSphere cluster, there are more CPU contributions to the vRAM allocation. Basically for production environments, many administrators found themselves stopping at 8 for cluster sizes. Historically, it was a good number.
2. Combine development, test and production vSphere clusters.
This may seem a bit awkward at first, but having hard lines of separation between environments may need to soften as the costs are considered against the benefits of pooling all CPU vRAM entitlements to fewer environments. Further, this has always been the driving thought of core functionality: Pool all hardware resources, and allow the management tools to ensure CPU and memory resources are delivered; including across production and development zones.
3. Get more out of storage with Storage DRS.
Storage DRS is one of my favorite features of vSphere 5. This is not to be confused with storage tiering solutions that may be available from a SAN vendor, as Storage DRS is a solution for like tiers of storage. Basically, a pool of similar storage resources is logically grouped and vSphere will manage latency and free space automatically. Storage DRS isn’t the solution for mixing tiers (such as SAS and SATA drives), as it is intended to manage latency and free space across a number of similar resources. I see Storage DRS saving a lot of time that administrators manage looking at datastore latency and free space to then perform Storage vMotion tasks; this will be a big win for the administrator.
4. VMFS-5 unified block size makes provisioning easier.
There are a number of critical improvements with VMFS-5 as part of vSphere 5.The most underrated is the fact there is now a unified block size (1 MB). This will save a lot of accidental formats at a smaller size like we had with VMFS-3 volumes for VMDK files larger than 256 GB. The more visible feature of VMFS-5 is that a single VMFS-5 volume can now be 64 TB. That’s huge! This will make provisioning much simpler for large volumes on capable storage processors. This will greatly simplify the design aspect of new vSphere 5 environments, but will also make upgrades require some consideration. I recommend reformatting all VMFS-3 volumes to VMFS-5, especially those at block sizes other than 1 MB. A VMFS-3 volume at 2, 4 or 8 MB block size can be upgraded to VMFS-5; but if you can move the resources around; I recommend a reformat.
5. Remote environments not leveraging virtualization? Consider the VSA.
The vSphere Storage Appliance (VSA) is actually the only net-new product with the vSphere 5 (and related cloud technologies) launch. While the VSA has a number of version 1 limitations, it may be a good solution for environments that have been too small for a typical vSphere installation. The VSA simply takes local storage resources and presents them as an NFS datastore. Two or three ESXi hosts are leveraged to provide this virtual SAN on the local storage resources. The big limitation is that vCenter cannot be run on that special datastore, so consider a remote environment leveraging the central vCenter instead of a remote installation.
Do you see major design changes coming due to the new features of vSphere 5 or due to the new vRAM licensing paradigm? Share your strategies here.
Posted by Rick Vanover on 08/02/2011 at 12:48 PM2 comments
One of the best technologies for vSphere is the virtual machine migration technology, vMotion. vMotion received plenty of fanfare and has been a boon to virtualized environments for nearly five years. While this technology is rather refined, we can still encounter configuration issues when implementing it. Here are five vMotion configuration errors you'll want to avoid:
1. Lack of separation.
This is clearly the biggest issue with vMotion. vSphere can permit roles to be stacked on a network interface and spread across multiple IP addresses on a network. To ensure vMotion events bring the best performance, security and reduction of impact to other roles, implementing as much separation as possible will increase the quality of the vSphere environment. Keep in mind also that the vMotion event that transfers the memory of a virtual machine is sent unencrypted, so separation, at the least by VLAN, is a good idea. The best separation would be to have all vMotion traffic occurring on an isolated network on dedicated media that doesn't share physical connections with other vmkernel interfaces, management traffic or guest virtual machine networking.
2. Careless configuration that breaks requirements.
How many times have we tried to move a virtual machine with something silly getting in the way? Sloppy practices such as creating a VMDK on a local disk resource or mapping a CD-ROM device to a datasatore can prohibit the vMotion event. Further, extreme examples such as not zoning all datastores to all hosts or putting a single virtual machine's disk resources on a number of datastores that are not fully zoned across the cluster can cause migration issues. Take the time to make sure these issues are not going to cause migration issues, which, in most situations, can be addressed by a Storage vMotion task first.
3. DRS configured too aggressively.
Just because you can vMotion, doesn't mean that we need to do it -- so much. Pay attention to the cluster statistics and spot-check behavior of individual VMs that migrate a lot. If DRS is set too aggressively or one VM has behavior that may fool DRS, it may be worth a manual configuration value for the VM or make the cluster's configuration be less aggressive for DRS.
4. DRS not aggressive enough or set to manual.
The DRS setting can also be scaled back too conservatively in clusters that have a limited amount of resources, yet a dynamic workload that DRS can't do too much for. Further, if DRS is set to the automatic option but only the most conservative setting, the cluster's performance could be better if it was engaged a tad more. If DRS is set to manual, then vMotion events will not happen automatically as the cluster or individual VMs become busy.
5. Virtual machine configuration becomes obsolete.
It's always a good idea to keep the VM hardware version and VMware tools up to date. This can help vMotion as well as Storage vMotion events, as features are continually added to the platforms. Of course, the individual unit (the VM) needs to be able to support these new features, and the virtual hardware version and VMware Tools installation are critical to make this happen. If there are any VMs that are still at hardware version 4, take the time to get them updated to the current version (vSphere 4.1 is hardware version 7).
These tips will knock out the majority of issues, both with traditional vMotion and Storage vMotion tasks. While definitely not a catch-all list, thse issues outside of the host are usually tied to this list above.
What configuration mistakes get in the way of successful vMotion events in your vSphere environments? Share your comments here.
Posted by Rick Vanover on 06/28/2011 at 12:48 PM8 comments