I've been working with ESXi for a while in both private lab and non-production workloads. For VI3 installations, ESXi 3 was relegated to toy and science experiment levels. With vSphere, I'm putting ESXi as the single product going forward in my virtualization practice.
Before the hecklers roll in, let me first clarify a few things about ESXi.
First of all, ESXi is fully capable of all of the vCenter features that are available to ESX. This includes vMotion, HA, Fault Tolerance and DRS. These features come alive when the host is configured to use the licensing allocated from the vCenter Server. While it's true that the free edition of ESXi doesn't support the management features, it's just a licensing difference to the same product.
For new vSphere implementations, I'm starting out with ESXi in production-class workloads. Is this going to be a learning curve? Absolutely. But each of these workloads is fully covered with VMware support. Just as we learned tricks in ESX to kill orphaned virtual machines, we may have to learn tricks on ESXi.
My conservative side has arranged avenues of escape, should I change my mind. (We've never changed our mind in virtualization, now, have we?) In a licensed vSphere cluster with features like DRS and vMotion, a running virtual machine can be migrated to an ESX host from an ESXi host. The shared storage driver (VMFS), of course, is fully compatible between the two platforms. This makes for an easy host reconfiguration should that course of action be required. Even with the current sticking point of an issue that can affect ESXi hosts by not being able to update the host hypervisor, the simplicity of ESXi is welcome and clearly VMware's direction.
Thus far, it has been a very smooth transition. Waiting for vSphere Update 1 was likely a good indicator of readiness (conservative side showing through), as well as ample lab and test time. Where are you with ESXi? Share your comments below.
Posted by Rick Vanover on 12/14/2009 at 12:47 PM0 comments
Last week, VMware released Update 5 for VMware Infrastructure 3. This is an important update as many organizations have not yet migrated to vSphere (version 4). There are a number of new features with this release, among them:
- Support for Intel Xeon 3400 series processors with Enhanced vMotion support.
- Driver updates for network and host bus adapter controllers as well as some new controllers are now supported.
- Increased guest operating system support to include Windows 7, Windows Server 2008 R2 and Ubuntu 9.04 (Desktop and server).
This is on the heels of the vSphere Update 1 release that included the Windows operating system support for the recently released Microsoft products. When going about the upgrade, be sure to get vCenter upgraded first, then apply to the hosts.
I was a little surprised to see that ESX 3.5 Update 5 did not include the version 3.33 driver for vStorage VMFS when formatting VMFS volumes. VMFS versions are generally something that no one pays attention to, but it is important to know what versions are in play. ESX 3.5 Update 5 and ESXi 3.5 Update 1 still format new VMFS at version 3.31. When vSphere was released, we see the 3.33 version of the VMFS file system available on newly created VMFS volumes. VMFS is backwards and forwards compatible, so this difference is academic.
Many organizations are still on VI3 for their VMware platforms, so having continued development on the prior platform is important. VMware wants everyone to migrate to vSphere, if you haven’t noticed.
Did Update 1 seal the deal to start planning your migration to vSphere? Or is VI3 still your platform of choice? Share your comments here.
Posted by Rick Vanover on 12/10/2009 at 12:47 PM3 comments
As a blogger, I have a particular challenge to work with a lot of technologies that extend beyond my primary responsibility. To me, this is an opportunity to extend my skill set to many other segments of the larger IT space. To do this, I need to provide an infrastructure to support this effort in my private lab.
Currently my private lab has two servers, a handful of workstations, an ioSafe fireproof hard drive for select backups, a few networks and power protection. One is a newer HP ProLiant server and the other is an older generic server. Both are capable of running all of the virtualization platforms that make a great environment to evaluate a number of products.
Since the blogging activity has matured for me, I've made it a point to make my primary holiday gift something to boost the infrastructure in the private lab. Last year it was the newer ProLiant server. Neither of the servers have a Nehalem series processor, so one option is to get an additional server to take advantage of this new processor. The other candidate for my private lab is storage-related. I have frequently used the Openfiler as a virtual machine for much of the shared storage activities in the private lab. For most of my VMware blogging research, I take advantage of the ESX on ESX practice. But, I can not yet do that practice for Microsoft Hyper-V or Citrix XenServer.
With that, I've decided that I will be purchasing a shared storage device. Luckily, I know just what to buy. During Tech Field Day last month, I had an opportunity to see a Drobo Pro unit from Data Robotics. Select Drobo models offer iSCSI connectivity, allowing me to utilize my beloved VMFS file system.
I mentioned in an earlier blog how the Drobo would be a great device for test storage, which is where I will be doing my holiday shopping this year. That's the easy decision; now, which model should I purchase? There are two new Drobo models, one which would work for my application. The new DroboElite unit continues all of the exciting features of the product line, including BeyondRAID which allows mixed drive sizes and makes, automatic resizing of arrays and file content awareness. The DroboPro is also an option as well.
I've got some decisions to make, but am very excited to be purchasing the unit later this month. It may sound a little much for the private lab, but I take my virtualization pursuit seriously.
Are you purchasing any fun items this year to help advance your virtualization journey? Share your wish list here.
Posted by Rick Vanover on 12/08/2009 at 12:47 PM6 comments
For ESXi installations, command-line options are available for virtualization administrators. For licensed installations with vCenter, the VI Toolkit is a very powerful interface to manage the hosts. For unmanaged (or free ESXi), there are options to manage virtual machines, the hosts and other aspects of virtualization as well.
One common task is to add an additional disk file (VMDK) to a virtual machine. While this can be done in the vSphere client, things like this can be done via the command line as well. The command we will need to perform this task is the vim-cmd series of commands for ESXi. Let's go through a common scenario of adding an additional virtual disk that is thick-provisioned to a running virtual machine:
- Get to a command line on ESXi. You can find how to do this by reading my May 2009 How-To post.
- Determine the vmid of the virtual machine you want to add the disk to:
vim-cmd vmsvc/getallvms
The result is Fig. 1.
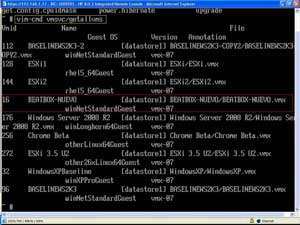 |
| Figure 1. In my example, the virtual machine "BEATBOX-NUEVO" will be receiving the additional VMDK and is vmid #16. (Click image to view larger version.) |
- Enter the command to add a 10 GB disk:
vim-cmd vmsvc/device.diskadd 16 10000 scsi0 2 datastore1
This adds to vmid 16 a 10000 KB disk on the SCSI0 controller, as the second disk (there is already a disk at the 1 position), to datastore1.
Once that command is passed, the VM now has the disk attached and did not require downtime to add the additional storage.
Posted by Rick Vanover on 12/03/2009 at 12:47 PM4 comments
Don't get me wrong. I am really excited for the recent updates to VMware and Microsoft recently. With Windows Server 2008 R2 and VMware's vSphere Update 1 being released, this is a good time for a facelift to the modern data center.
vSphere Update 1 brings a lot of new features to the table, but Windows Server 2008 R2 and Windows 7 support are where I am focused now. What concerns me is now that Windows Server is 64-bit only (x64), we may run into higher memory provisioning scenarios. For 32-bit (x86) Windows OSes, the memory limits were a softer 4 GB for Windows Server 2003 x86 Standard Edition and select editions of the x86 Windows Server 2008 base release.
With Windows Server 2008 R2, x86 is dead in favor of x64 only. So, gone, too, is our 4 GB limit for RAM for the Standard editions of Windows Server, which, in many data centers, is the most common operating system. Now that virtualization is very comfortable in the data center, will we see a higher number of virtual machines with assignments greater than 4GB? I'm not sure, and every environment will depend on many factors.
What does this really mean? Primarily, it can be a consolidation ratio killer. In my virtualization practice, the occasional virtual machine with 4 GB of RAM was not uncommon but was definitely not the norm. If the occasional 8 or 12 GB of RAM virtual machine start to show up in the mix, I would start to get concerned about my host provisioning practice. As of late, I am sure we all have enjoyed relatively low costs for RAM in virtualization hardware, but I am not sure that will be the case forever.
For VMware environments, we still can rely on the memory management technologies such as the balloon driver and transparent page sharing. But, I don't want to rely on those as a host-provisioning practice.
How are you approaching large RAM virtual machines? Share your comments below.
Posted by Rick Vanover on 12/01/2009 at 12:47 PM5 comments
It amazes me how many people are interested in virtualization, yet feel that they can't get started with it. I believe that anyone can get started with virtualization, with or without a lot of tools. Read Scott Lowe's recent vWord column online or in the recent print issue of Virtualization Review; it's a good resource to get started.
I want to offer encouragement. Virtualization is a technology that can apply to any organization, big or small. Virtualization is not just VMware-based big metal in datacenters. Sure, that segment of virtualization has changed my life. But the opportunities are so broad in virtualization, that I feel anyone can do it with the right resources and desires to succeed.
Aside from large datacenter virtualization, there is an incredible small and medium business market that can benefit from virtualization. I am convinced someone can get very wealthy from free virtualization products. If you become familiar enough with the free ESXi or Hyper-V offerings, there could be a very lucrative consulting business with these products.
Developing skills in popular tools like VMware vCenter Converter, Windows Server operating systems and VMware ESXi can lead to opportunities in consulting for the very small business that can lead to additional growth. Further, I can officially say that 'mastering' the standalone vCenter Converter tool is truly not a challenge. Windows Server is pretty straightforward as well. ESXi is quite a bit different for the run-of-the-mill Windows administrator, but even virtualization people don't spend much time outside of the vSphere Client while working with ESXi.
Do you see obstacles in gaining experience with virtualization or how to get started? If so, I can help. Post a comment below or e-mail me directly and I'll provide coaching to get you started.
Posted by Rick Vanover on 12/01/2009 at 12:47 PM1 comments
During this week's
VMware Communities Podcast, nested ESX came up with a lot of feedback. The user community seems to demand more from VMware than what is available for this practice. The concept is simple: VMware's current products technically allow ESX to run as a virtual machine. This is a great tool for testing, but is officially unsupported by VMware and is a performance no-no for production-class virtualization workloads.
Setting it up is very easy. VMware employee Eric Gray provides the how-to for this topic on his VCritical blog. Like many other administrators, this is one of the only ways to set up test environments to play with new features of vSphere without allocating large amounts of hardware. Couple this with a virtual machine that functions as an iSCSI target, such as the Openfiler storage device, you can craft a 'datacenter in a box' with shared storage and multiple hosts.
The issue here is that what does VMware want to offer as an official stance for this practice? It is an unsupported configuration, but everyone does it for certain test configurations. In fact, VMware had a special build of the Lab Manager product to provision ESX as a virtual machine to support lab environments at VMworld. While we will never see that as an official guest operating system for Lab Manager or other products, it begs the question: What is the support direction on nested ESX?
During the podcast, it was clear that VMware is contemplating what to do with this feature. My opinion is that a limited support statement can be the only real option for this practice. This limited support statement could be limited to not relying on memory overcommit for the guest ESX hosts and forbidding production virtual machines to be run as guests within or alongside a virtualized ESX host. It will be interesting to see what comes of it, but don't expect anything quick, as there are more important things to tackle.
If you haven't used this feature, it is a great training tool. It is definitely worth the effort to take the time to make a few ESX hosts and a vCenter Server system all as virtual machines to use as a training environment. It is much less riskier than performing the same experiments on other environments.
What is your expectation of how VMware could issue a support statement for nested ESX? Share your comments below.
Posted by Rick Vanover on 11/19/2009 at 12:47 PM5 comments
At last week's
Gestalt IT Field Day, I saw a series of
3PAR demonstrations using storage connected to a vSphere installation.
Architecturally, 3PAR storage maintains good access between each controller and set of disks. The key technology to deliver the individual paths between disk and controller is 3PAR's mesh-active technology. This is where each volume is active on every controller on the array with its own connection (fibre channel, iSCSI, etc.). For VMware installations, this is a fully supported configuration on the hardware compatibility list.
Redundancy and data protection is also a critical point of the 3PAR storage offering. In that day's discussion, a description of why storage protection is important is made very simple by comparing networks and storage. Loosely quoting the presenter at 3PAR, if the network drops one packet in a million, nobody cares. If the storage network drops a single packet in a billion, it can be data destructive to storage resources. This is especially important in virtualized environments, where entire LUNs or virtual machines can be affected.
During the demonstration, a controller failure was evoked. We quickly saw a dip in the I/O, but a seamless recovery quickly followed. This unplanned event is transparent to the operating systems, which is an important distinction. From a behavior observation, it may feel like when a virtual machine is paused. What you don't see is hard disk errors in the event log. Applications may report timeouts, but won't report a loss of access to the storage.
3PAR storage systems also use an on-disk chunklet. This allows many disks to be accessed simultaneously to increase disk access speed. All physical disks are broken into chunklets at 256 MB. Each of these 256 MB chunklets is viewed as an individual disk. Logical drives contain the chunklets and are organized by a number of ways. One of these practices is to not allow chunklets in the same logical drive to exist on both SAS and SATA storage, and this is common on many storage platforms.
3PAR goes further with the chunklets to prevent hotspots on disks of busy chunklets with tools such as dynamic optimization that will spread the hot chunklets around to protect disk performance. Without the dynamic optimization feature, the alternative is a random I/O of the chunklets, which works for most environments. Fig. 1 shows how chunklets exist on disk.
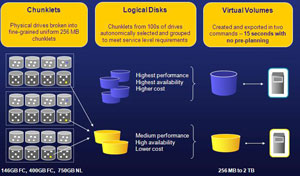 |
| Figure 1. The 3PAR chunklets are shown across a large collection of disks and how they are represented in logical disks and virtual volumes. (Click image to view larger version.) |
I am a fan of built-in efficiencies for storage environments, especially in virtualized environments. This is similar to the VMware's vStorage VMFS file system. I really like the VMFS sub-blocks to eliminate waste on the disk.
Disclosure: I am attending this event and have been provided airfare, meals and accommodations by the event organizer. The opinions mentioned above are a result of an in-person demonstration of the technologies discussed.
Posted by Rick Vanover on 11/17/2009 at 12:47 PM1 comments
Another stop at
Gestalt IT Field Day was to Data Robotics, Inc., makers of the Drobo storage devices. The Drobo currently has two models, the Drobo and the DroboPro. During our visit, we had a demo of the popular storage devices and it was clear that I walked away with Drobo-envy. I want one for my home lab instead of using a device like an OpenFiler for my test shared storage configuration, and I can format it with my beloved VMFS file sytem.
While I don’t have a device (nor did I get a freebie), we were shown how Data Robotics takes a different approach to storage, effectively eliminating all of the pain points we have with RAID on current storage systems. The DroboPro is targeted to very small installations, but it has some on-board smarts that make it attractive.
The DroboPro has a few built-in features that make it attractive to administrators in general, including VMware administrators:
- The device is supported for VMware Infrastructure 3 as an iSCSI device on the VMware HCL for up to two hosts.
- The blue lights on the right (see Fig. 1) go vertical indicating the amount of space consumed on the disks.
- The green lights on the horizontal axis indicate drive health.
- A dual parity can be configured, which can accommodate dual drive failures.
- The drives in the array can be of different geometry (mix and match), and the array is grown automatically by adding new drives.
- The DroboPro holds up to 8 disks at 2 TB each.
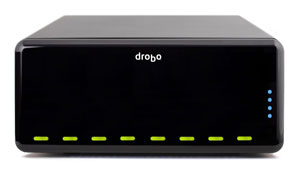 |
| Figure 1. DroboPro's outer case, showing the lights that indicate disk usage. |
There is a short list of downsides to the DroboPro, however. The first is that the device needs to be attached to a Windows system to run the driver software, but you can configure the iSCSI target to run separately for connecting to ESX hosts. The other main downside is that the DroboPro has a single Ethernet interface and power supply. But, keep in mind this is a good device for test and development storage.
Data Robotics informed me that many small customers have moved this device into production roles, however.
As for vSphere support, I left with the impression that this will happen soon for the device.
The DroboPro device starts at $1,499 and is a low-cost device for shared storage in selected configurations.
Have you used a Drobo for virtualization? Share your comments below.
Disclosure: I attended this event and have been provided airfare, meals and accommodations by the event organizer. The opinions mentioned above are a result of an in-person demonstration of the technologies discussed.
Posted by Rick Vanover on 11/17/2009 at 12:47 PM2 comments
VMware Server 2.0.2 was released on October 26, 2009 as a maintenance release to the Type II hypervisor. As with all VMware product, the best resource to see what is new for this version is to read the release notes. For 2.0.2, there are really no corrected issues of interest. More importantly, there is no support for two newly released operating systems: Windows Server 2008 R2 and Windows 7. The base release of Windows Server 2008 is available on VMware Server 2.0.2 for both x86 and x64 editions, however. Even so, it is somewhat disturbing that there is a long list of known issues for the 2.0.2 release.
VMware Server is a Type 2 hypervisor, which runs on top of an operating system such as Windows or Linux. Check out this blog post from earlier in the year differentiating Type 1 and Type 2 hypervisors. VMware Server has a lot of internal pressure of sorts from ESXi. ESXi is free as well, but is a Type 1 hypervisor. There are realistically two reasons that VMware Server would be chosen over ESXi. The first would be hardware compatibility and the second would be the preference of a host operating system.
Many users have not liked the VMware Server 2 series for the less than optimal console and Web-only administration tools. The version 1 series had a Windows client that was very reliable and favored by many users of the two (see Fig. 1).
 |
| Figure 1. VMware Server 2 features a web-based administration console. (Click image to view larger version) |
Though this release is somewhat flat, I still have upgraded one of my lab environments to version 2.02. VMware Server 2.0.2 is a free product and is available for download at the VMware Web site.
Posted by Rick Vanover on 11/12/2009 at 12:47 PM10 comments
This week, I am at Gestalt IT Field Day in Northern California. One of the presenters here was Xsigo. During Xsigo's presentation, it is clear that I/O virtualization is the next chapter for many datacenters to consolidate.
During the presentation, a lot of thoughts come to mind for infrastructures as we know it today. In most situations, it doesn't make sense to rip everything out. But, what about new implementations where you have a lot of I/O requirements? Like many in the current technology landscape, I have to battle challenges about new technologies and infrastructure that is already in place.
One thing that was presented was Xsigo's I/O virtualization. We had a nice discussion about the challenges that face current infrastructure. Many of the comments from the discussion and the presentations in general can be found on our Twitter trending topic, TechFieldDay.
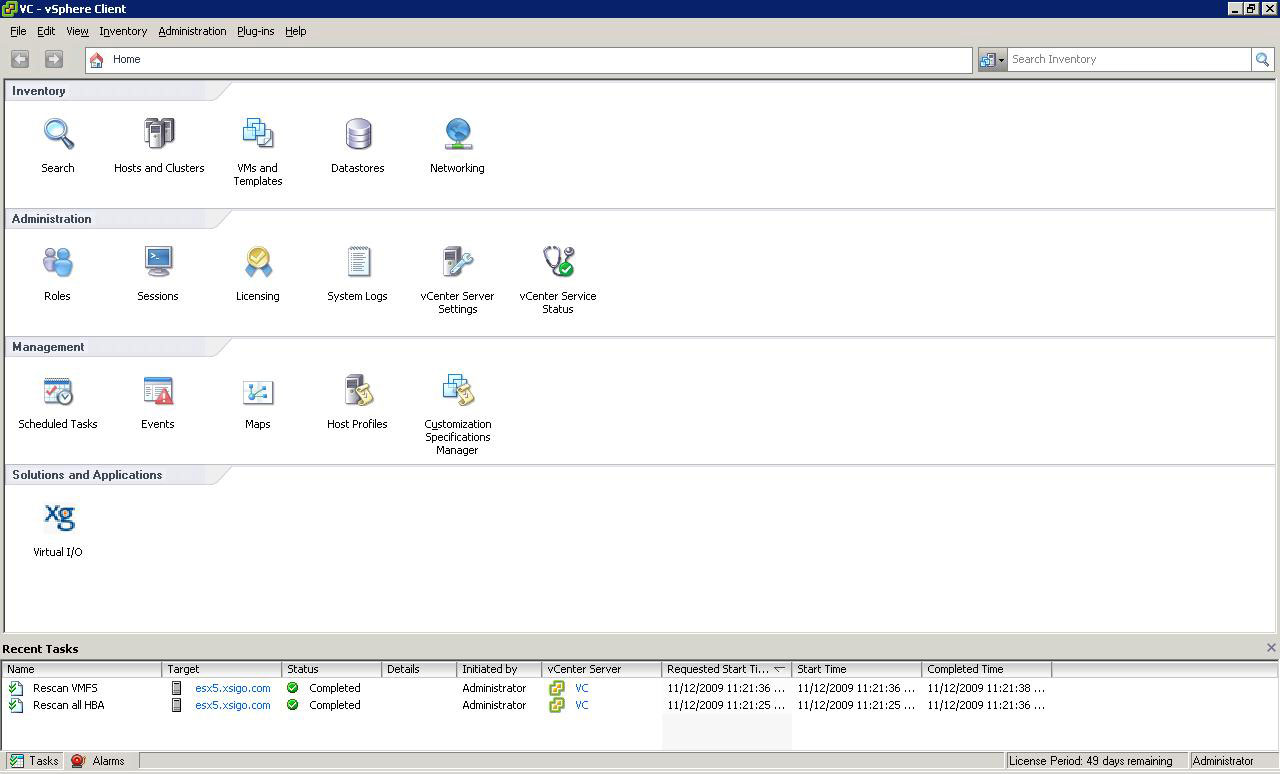
For virtualization installations, and in particular VMware installations, Xsigo has a solution that they claim breaks down infrastructure islands that are created by fixed I/O. Xsigo-virtualized I/O addresses connectivity issues associated with network and storage interfaces. I had a chance to demo the software, and it was quite easy to set up and provision I/O resources to a vSphere environment. Installed in vSphere, the Xsigo virtual I/O plug-in shows up on the home page (see Fig. 1).
 |
| Figure 1. Managing virtualized I/O is done within the vSphere client with Xsigo. (Click image to view larger version) |
During our lab, we provisioned both a virtual host bus adapter (HBA) and a virtual network interface to assign to vSphere. It is done quite easily with the Xsigo Management System (XMS), which is launched within the vSphere Client. One point of interest was deploying the virtual HBAs and virtual network interfaces were done without interruption to the host. The XMS console integrates to the vSphere Client and allows the virtualized resources to be managed centrally (see Fig. 2).
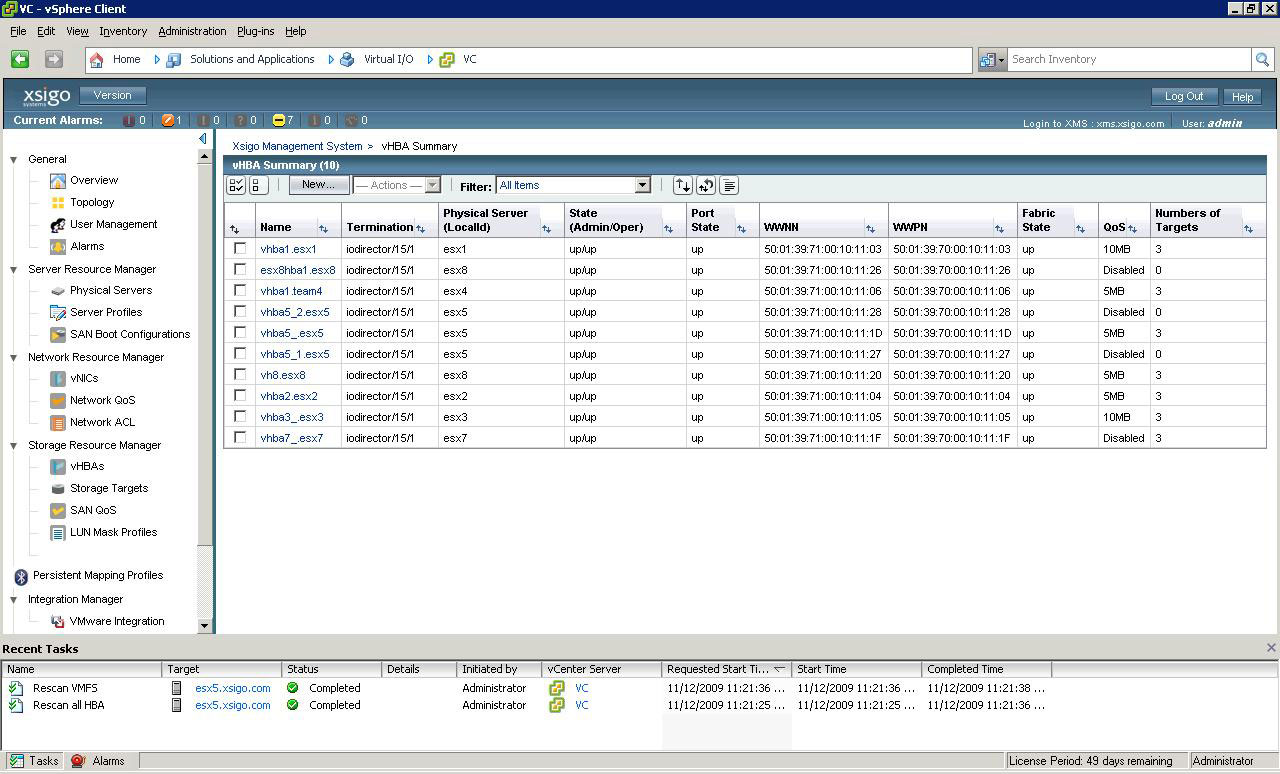 |
| Figure 2.The XMS console allows centralized management of virtualized I/O resources. (Click image to view larger version) |
Where are you on virtualized I/O? This is new to me, but compels me a bit to consider it for new builds – especially large infrastructures. Share your comments below or e-mail me.
Disclosure: I am attending this event and have been provided airfare, meals and accommodations by the event organizer. The opinions mentioned above are a result of an in-person demonstration of the technologies discussed.
Posted by Rick Vanover on 11/12/2009 at 12:47 PM0 comments
For the last few posts, I've featured my experiences and observations of the
iland workforce cloud. This offers a hosted virtual desktop as well as hosted server infrastructure. One of the major experience points about anything in the cloud is latency, the hosted virtual desktops can access hosted virtual servers on a local (Gigabit) network. There are other considerations as well for a cloud installation. Chances are, any cloud implementation will involve some segment of an IT footprint instead of the whole inventory. Like other cloud providers, the iland workforce cloud offers networking options.
For a hosted virtual desktop, this is where it starts to get interesting. For the iland situation, every installation includes a basic firewall and private VLAN for use for the hosted infrastructure. Further, the VPN can be configured to link into your on-premise data center or private cloud, if you will. This can be done via IPSEC or SSL, extending your network to the cloud.
A use-case for a hosted virtual desktop with site-to-site VPN can be the remote field office. In this situation, you don't want a server sitting in the remote office that the small workgroup needs access to, yet there isn't bandwidth at the remote site to host the server at your primary site. If a hosted infrastructure is created for virtual desktops and a select number of servers, you can provide the remote site with quick access (local) to the server resources without standing up a datacenter at the remote site. The virtual desktops and servers can be on your IP address space as well, making domain integrations simple for a cloud installation.
The other half of that is the device experience. I have been using the VMware View client running in Windows to access the iland workforce cloud. This service can also be accessed from thin-client devices that support VMware View. One such device is the Dell OptiPlex FX160 as well as other leading devices. This is a critical decision point as well. I have never been a fan of virtual desktops that are accessed from systems with operating systems, as you end up managing double the clients. This is more the case for task workers, certain types of knowledge workers of course can be an exception. These devices can also support seamless device redirection as well, making a remote site truly a zero-touch site.
Does the hosted virtual desktop make sense yet? Share your thoughts here.
Posted by Rick Vanover on 11/10/2009 at 12:47 PM0 comments