How-To
Simplify Kubernetes in AWS with the Amazon EKS Service, Part 2: Required Prep Work
Now that you've got Kubernetes set up on AWS, here are the next steps you have to take before you can install the Kubernetes dashboard.
In my previous article, I showed you how to set up Kubernetes on Amazon Web Services (AWS) by way of the Amazon Elastic Container Service for Kubernetes (EKS) service. In this blog post, I want to continue the discussion by showing you the prep work that's required before you can install the Kubernetes dashboard.
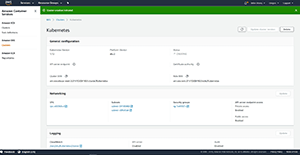
I began the process by creating a Kubernetes cluster, as outlined in the previous blog post. You can see the cluster's configuration in Figure 1. It's worth noting that after you launch the cluster creation process, you may have to refresh the display before it will show the cluster as being active.
 [Click on image for larger view.]
Figure 1. I began the process by creating a cluster.
[Click on image for larger view.]
Figure 1. I began the process by creating a cluster.
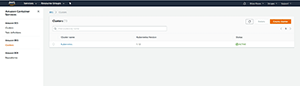
If you look at Figure 2, you can see that the Amazon Container Services collectively list the ECS, EKS and ECR services. You can easily switch between these various services by clicking on the links on the left side of the screen. You can also see that the screen capture is currently displaying my recently created Kubernetes cluster.
 [Click on image for larger view.]
Figure 2. The console lists my Kubernetes cluster.
[Click on image for larger view.]
Figure 2. The console lists my Kubernetes cluster.
So now that the cluster is up and running, you'll need to download and install the Kubernetes client. You can find the client here. You will have to open the AWS CLI environment, and then use one of the commands listed on the page to download and install the client component. In doing so, there are three things that you need to pay attention to:
- Be sure to choose a client that matches your Kubernetes version.
- Pay attention to the tabs listed on the Web page. AWS provides separate tabs for macOS, Linux, and Windows, and Windows is not the default option.
- You will need to create a folder to install the client into. You cannot install the client into the default AWS CLI folder.
The next thing that you need to do is install the AWS IAM Authenticator. The command that I used to do this is:
curl -o aws-iam-authenticator.exe https://amazon-eks.s3-us-west-2.amazonaws.com/1.13.7/2019-06-11/bin/windows/amd64/aws-iam-authenticator.exe
You can find the full instructions on the AWS documentation page.
Once you've downloaded the client and the authenticator to the folder that you've created, you need to add that folder to the system path. The method of doing this will vary based on your OS, but in Windows 10, you can go to Settings and then click on System Info. When the System Info screen appears, click on Advanced System Settings, followed by the Environment Variables button. The path is listed among the environment variables. Do not skip this step, because the rest of the process won't work if the binaries are not included in the path.
Now it's time to create a kubeconfig file for your Kubernetes cluster. This file connects the client to your cluster. Although this process is relatively straightforward, it's important to make sure that you're running Python version 2.7.9 or higher and version 1.16.156 or higher of the AWS CLI. The process that I'm about to show you will fail if you're not running the correct versions of Python and AWS CLI.
With that said, here's the command used to create the kubeconfig file:
aws eks --region <region> update-kubeconfig --name <cluster name>
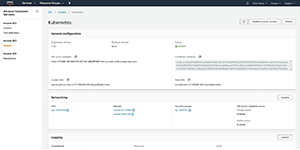
You will, of course, have to replace <region> and <cluster name> with your region name and cluster name. You can find these by switching back over to the GUI environment, and clicking on the cluster (shown in Figure 2). The cluster name is shown at the top of the resulting screen (in my case, it's named Kubernetes), and the region is listed within the Cluster ARN. You can see what this looks like in Figure 3.
 [Click on image for larger view.]
Figure 3. This screen provides the cluster name and the region name.
[Click on image for larger view.]
Figure 3. This screen provides the cluster name and the region name.
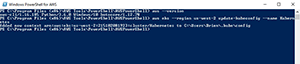
You can see what this process looks like (as well as the version that I'm using) in Figure 4.
 [Click on image for larger view.]
Figure 4. This is how you create the kubeconfig file.
[Click on image for larger view.]
Figure 4. This is how you create the kubeconfig file.
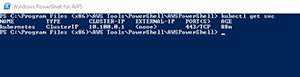
The last thing that you need to do is to make sure that the Kubernetes client is attaching to your cluster. To do so, enter the following command:
Kubectl get svc
This command should return the cluster name and cluster IP address, as shown in Figure 5. Assuming that this information is returned, everything is good and the Kubernetes dashboard can be installed.
 [Click on image for larger view.]
Figure 5. Make sure that the Kubernetes client is working properly.
[Click on image for larger view.]
Figure 5. Make sure that the Kubernetes client is working properly.
I'll show you how to install the Kubernetes dashboard in my next article.
About the Author
Brien Posey is a 22-time Microsoft MVP with decades of IT experience. As a freelance writer, Posey has written thousands of articles and contributed to several dozen books on a wide variety of IT topics. Prior to going freelance, Posey was a CIO for a national chain of hospitals and health care facilities. He has also served as a network administrator for some of the country's largest insurance companies and for the Department of Defense at Fort Knox. In addition to his continued work in IT, Posey has spent the last several years actively training as a commercial scientist-astronaut candidate in preparation to fly on a mission to study polar mesospheric clouds from space. You can follow his spaceflight training on his Web site.