Simplify Kubernetes in AWS with the Amazon EKS Service, Part 3: Dashboard and Components
Brien Posey walks through how to deploy the Kubernetes dashboard and its supporting components, which include Heapster and Influxdb.
So far in this article series, we've done a lot of work in preparation for running Kubernetes on Amazon Web Services (AWS). In this article, I want to conclude the series by showing you how to deploy the Kubernetes dashboard and its supporting components, which include Heapster and Influxdb.
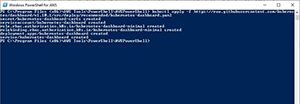
The first step in the process is to deploy the Kubernetes dashboard to the previously created cluster. You'll have to do this from the command line. The command used for deploying the dashboard is:
kubectl apply -f https://raw.githubusercontent.com/kubernetes/dashboard/v1.10.1/src/deploy/recommended/kubernetes-dashboard.yaml
You can see what this process looks like in Figure 1.
 [Click on image for larger view.]
Figure 1. This is how you deploy the Kubernetes dashboard.
[Click on image for larger view.]
Figure 1. This is how you deploy the Kubernetes dashboard.
The next step in the process is to deploy Heapster. If you aren't familiar with Heapster, it's the component that enables cluster monitoring and performance analysis. While it's true that Heapster has been deprecated, Amazon still requires its use.
The command used to deploy Heapster is:
kubectl apply -f https://raw.githubusercontent.com/kubernetes/heapster/master/deploy/kube-config/influxdb/heapster.yaml
You can see what the installation process looks like in Figure 2.
 [Click on image for larger view.]
Figure 2. This is how you deploy Heapster.
[Click on image for larger view.]
Figure 2. This is how you deploy Heapster.
Now you'll need to deploy Influxdb. The command used for the deployment is:
kubectl apply -f https://raw.githubusercontent.com/kubernetes/heapster/master/deploy/kube-config/influxdb/influxdb.yaml
Figure 3 shows the installation process.
 [Click on image for larger view.]
Figure 3. This is how you deploy Influxdbe.
[Click on image for larger view.]
Figure 3. This is how you deploy Influxdbe.
Now that the three required components have been installed, you'll need to bind Heapster to the Kubernetes dashboard. The command used for this task is:
kubectl apply -f https://raw.githubusercontent.com/kubernetes/heapster/master/deploy/kube-config/rbac/heapster-rbac.yaml
You can see what this step looks like in Figure 4.
 [Click on image for larger view.]
Figure 4. The binding is now complete.
[Click on image for larger view.]
Figure 4. The binding is now complete.
The Kubernetes dashboard is technically functional at this point, but the default permissions are completely inadequate. That being the case, you'll need to create an account that has cluster-level admin permissions and then authorize that account for use with the dashboard. Amazon recommends that you complete this task by creating a YAML file that defines a service account and a cluster role binding, and then apply the file to your cluster. To complete this task, you'll need to create a text file named eks-admin-service-account.yaml. Here's the text (as provided by Amazon) that should be included in the file:
apiVersion: v1
kind: ServiceAccount
metadata:
name: eks-admin
namespace: kube-system
---
apiVersion: rbac.authorization.k8s.io/v1beta1
kind: ClusterRoleBinding
metadata:
name: eks-admin
roleRef:
apiGroup: rbac.authorization.k8s.io
kind: ClusterRole
name: cluster-admin
subjects:
- kind: ServiceAccount
name: eks-admin
namespace: kube-system
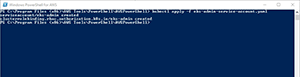
You can create the account from the file by using this command:
kubectl apply -f eks-admin-service-account.yaml
You can see what this looks like in Figure 5. Incidentally, I saved my eks-admin-service-account.yaml text file in the C:\Program Files (x86)\AWS Tools\PowerShell\AWSPowerShell folder.
 [Click on image for larger view.]
Figure 5. The service account has been created.
[Click on image for larger view.]
Figure 5. The service account has been created.
Before you'll be able to connect to the Kubernetes dashboard for the first time, you're going to have to acquire an authentication token, and you'll need to start the kubectl proxy. To retrieve the authentication token, enter the following command:
kubectl -n kube-system describe secret $(kubectl -n kube-system get secret | grep eks-admin | awk '{print $1}')
When you enter this command, the system will spew a large number of tokens. Search through the list to find the token for ca.crt. I have included a partial screen capture in Figure 6, but have cut off a portion of the token in the interest of security. You'll need to copy your token to the Windows clipboard.
 [Click on image for larger view.]
Figure 6. You'll need the token associated with ca.crt.
[Click on image for larger view.]
Figure 6. You'll need the token associated with ca.crt.
Now, start the proxy by entering this command:
Kubectl proxy
Finally, open your Web browser and go to: http://localhost:8001/api/v1/namespaces/kube-system/services/https:kubernetes-dashboard:/proxy/#!/login.
When you do, you'll be prompted to supply either a kubeconfig file or a token. Choose the Token option, and then paste the token from your clipboard, and click the Sign In button.
About the Author
Brien Posey is a 22-time Microsoft MVP with decades of IT experience. As a freelance writer, Posey has written thousands of articles and contributed to several dozen books on a wide variety of IT topics. Prior to going freelance, Posey was a CIO for a national chain of hospitals and health care facilities. He has also served as a network administrator for some of the country's largest insurance companies and for the Department of Defense at Fort Knox. In addition to his continued work in IT, Posey has spent the last several years actively training as a commercial scientist-astronaut candidate in preparation to fly on a mission to study polar mesospheric clouds from space. You can follow his spaceflight training on his Web site.