How-To
Migrating VMs to AWS: Organizing Servers by Application
In this second article of a three-part series, Posey shows how to organize your discovered servers by application.
In the first article of this three-part series, I showed you how to install the Amazon Web Services (AWS) data collection agent onto a virtual machine (VM) that's running on-premises. In my case, the VM is being hosted on a Hyper-V Server, but the technique that I demonstrated would've worked just as well if the migration had involved a physical server, or even a VM running on a standalone VMware ESXi host (without vCenter).
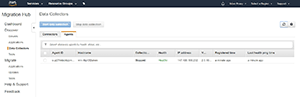
Now that the agent is installed, it's time to begin the data collection process. To do so, open the Migration Hub within the AWS console, expand the Discover container, and click on Data Collectors. When the Data Collectors screen opens, be sure to select the Agents tab. Next, click Refresh a couple of times, and you should see the server on which you installed the migration agent, as shown in Figure 1.
 [Click on image for larger view.]
Figure 1.The server that's being migrated is displayed on the Agents tab.
[Click on image for larger view.]
Figure 1.The server that's being migrated is displayed on the Agents tab.
Admittedly, it can sometimes be a little bit tricky to get the server to show up in the console. If you have difficulties, there are a few things to check:
- Make sure that you entered the Key ID and Secret Key correctly, and that you're using information for a key that's active.
- Make sure that your account has permission to perform a migration.
- Verify that the agent is running on the server, and that firewalls aren't blocking communications over Port 443.
- Perhaps most importantly, use a search engine to check the official current time, and then make sure that your server's clocks match the official time. Clock skew can cause the registration process to fail.
- Make sure that you've waited for at least 15 minutes.
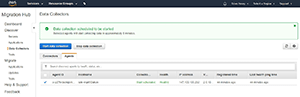
Once the server shows up in the console, the next step in the process is to start the data collection process. To do so, just select the checkbox corresponding to the server (which you can see in Figure 1), and then click on the Start Data Collection button. When you do, you'll see a message indicating that data collection is scheduled to start. The message will also give you an approximate wait time, as shown in Figure 2.
 [Click on image for larger view.]
Figure 2. The data collection is scheduled to start.
[Click on image for larger view.]
Figure 2. The data collection is scheduled to start.
View the Discovered Servers
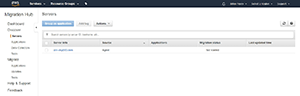
After giving the data collection process time to run, within the Migration Hub, go to Discover | Servers. You should see your server listed on this tab, as shown in Figure 3. As you can see, the server's name is hyperlinked, and you can click on the server name to view detailed information about the server.
 [Click on image for larger view.]
Figure 3. Your server should be listed on the Servers tab.
[Click on image for larger view.]
Figure 3. Your server should be listed on the Servers tab.
Creating an Application
The next step in preparing to migrate the server is to define the application that's running on the server. This involves creating a new application object within the Migration Hub, and then adding the server to that application object.
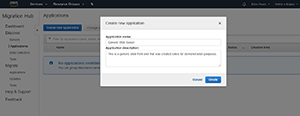
To define an application, select the Applications tab, and then click on the Create New Application button. You will then be prompted to enter a name and a description of the application that you're defining. You can see what this process looks like in Figure 4.
 [Click on image for larger view.]
Figure 4. Enter a name and a description for the application that you're defining.
[Click on image for larger view.]
Figure 4. Enter a name and a description for the application that you're defining.
Once you finish creating an application object, it will appear within the list of applications shown on the Applications tab. The next step in the process is to add your server to the newly created application object. To do so, select the application's checkbox, and then choose the Add Servers to Application option from the Actions menu, as shown in Figure 5.
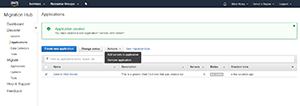 [Click on image for larger view.]
Figure 5. Choose the Add Servers to Application option from the Actions menu.
[Click on image for larger view.]
Figure 5. Choose the Add Servers to Application option from the Actions menu.
At this point, you'll see a list of the servers that have been discovered. Select the checkbox corresponding to the server that you plan to migrate, and click the Add button. You'll then be taken back to the Applications screen, and you should see the count within the Servers column increase for the selected application.
So that's how you organize discovered servers by application. In Part 3, I will wrap things up by showing you what the actual migration process looks like.
About the Author
Brien Posey is a 22-time Microsoft MVP with decades of IT experience. As a freelance writer, Posey has written thousands of articles and contributed to several dozen books on a wide variety of IT topics. Prior to going freelance, Posey was a CIO for a national chain of hospitals and health care facilities. He has also served as a network administrator for some of the country's largest insurance companies and for the Department of Defense at Fort Knox. In addition to his continued work in IT, Posey has spent the last several years actively training as a commercial scientist-astronaut candidate in preparation to fly on a mission to study polar mesospheric clouds from space. You can follow his spaceflight training on his Web site.