How-To
Introduction to Docker, Part 3: Networking
This is the third article in a series on Docker. Previously, I walked you through installing a Docker container and downloading/starting images to create one or more run instances of the images. Almost all applications use networking to obtain and transmit information to other applications or the outside world. I showed how I was able to ping my local router from an Alpine Linux instance to verify that it had internet connectivity. However, running ip -a showed that its IP address was different than that of the host on which it was running, and did not come from my local DHCP server. In this article, I will cover how networking works with containers.
Docker has various networking schemes, and if you are going to run and/or manage Docker containers in large-scale production environments, you will want to spend time with the official Docker document on them. In this article, I will just be covering the basics of networking with Docker.
Docker supports various types of networking schemes -- bridge, host, none, macvlan, and overlay -- each of which is designed for a different use case. You can see these by entering:
docker network ls
 [Click on image for larger view.]
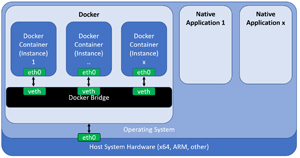
Bridge Networking
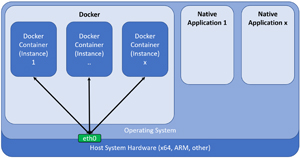
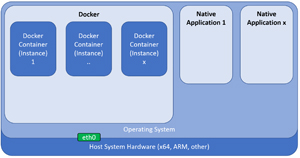
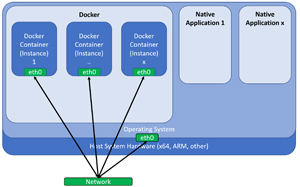
The default networking scheme for Docker containers is bridge. When the dockerd process is started, a bridge network is built, and when new images are instantiated, they will be connected to it. The bridge allows containers to connect to one another and the outside world, but they will have an IP address assigned to it by Docker and use NAT to communicate externally.
 [Click on image for larger view.]
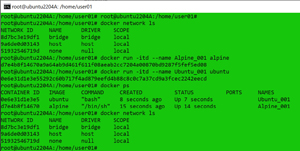
As an example, I was able to show the status of the Docker network, instantiate two different Docker Linux instances, show the status of the instances, and show the status of the networking again by entering:
    docker network ls
    docker run -itd --name Alpine_001 alpine
    docker run -itd --name Ubuntu_001 ubuntu
    docker ps
    docker network ls
 [Click on image for larger view.]
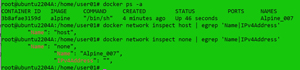
I then showed the host names and IP addresses that were assigned to the instances by entering:
docker network inspect bridge | egrep 'Name|IPv4Address'
 [Click on image for larger view.]
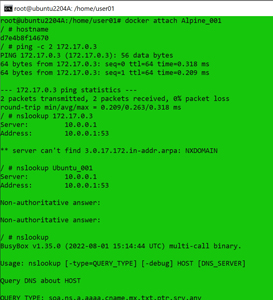
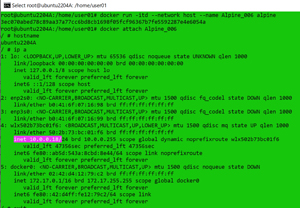
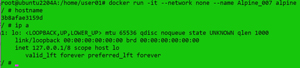
I attached to the Alpine instance, displayed its host name and IP address, pinged the other Linux instance, and then looked to see if I could resolve the other instance's host name by entering:
    docker attach Alpine_001
    hostname
    ping -c 2 172.17.0.3
    nslookup 172.17.0.3
    nslookup Ubuntu_001
 [Click on image for larger view.]
This told me that, although there was networking on the instance, they didn't have DNS entries.
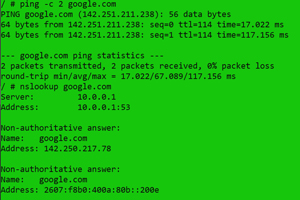
I was able to ping and do a name lookup for Google.
 [Click on image for larger view.]
Bridged networking is a quick way to get internet access to instances; however, it is not recommended for production as they will have DNS names attached to them and programmatic deployment will have issues as the IP address of the instances will not be resolvable.
Host Networking
Unlike bridged networks, host networks use the networking of the host machine; as such, only certain ports will be assigned to the instance, which are most often specific applications. The --network host switch is used to designate a host network when instantiating the image.
 [Click on image for larger view.]
I instantiated an Alpine Linux image using the host network by entering:
    docker network ls
    docker run -itd --network host --name Alpine_006 alpine
 [Click on image for larger view.]
The instance showed the same hostname and IP address as the host machine. Obviously, the container having the same IP address as the host machine could cause issues. To overcome these limitations, application images can only expose specific ports; for example, nginx is a highly performant reverse proxy server load balancer, HTTP cache and a web server.
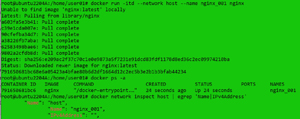
In the example below, I instantiated an image (ngnix) that was designed to work with host networking by entering:
    docker run -itd --network host --name nginx_001 nginx
    docker ps -a
    docker network inspect host | egrep 'Name|IPv4Address'
 [Click on image for larger view.]
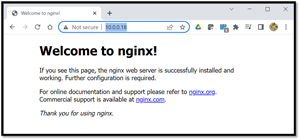
I entered the host's IP address in the web browser and was presented with the Nginx home web page.
 [Click on image for larger view.]
None Networking
Sometimes you will want to have a totally isolated image with access to the internet. The --network no switch can be used to designate this.
 [Click on image for larger view.]
In the example below, I instantiated a Linux instance without IP networking access and verified it:
    docker run -itd --network none --name Alpine_007 alpine
    hostname
    ip a
 [Click on image for larger view.]
I exited the instance, restarted, and examined it to see if it had an IP address attached to it.
 [Click on image for larger view.]
Upon inspecting the "none" network, I could see the instance and also confirm that it didn't have an IP address.
Macvlan Networking
If you want an instance to appear as any other device with its own unique IP address, you can create and use a macvlan network. Using macvlan does come with some cautions, including the fact that the NIC needs to handle promiscuous mode, and that you can consume all the IP addresses or overload your local networking due to the number of instances that you can create.
 [Click on image for larger view.]
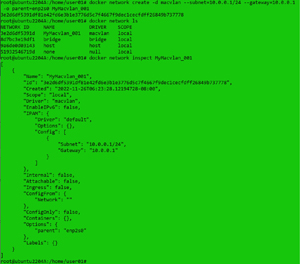
I created a new macvlan network and listed it by entering:
    docker network create -d macvlan --subnet=10.0.0.1/24 --gateway=10.0.0.1  -o parent=enp2s0 MyMacvlan_001
    docker network ls
    docker network inspect MyMacvlan_001
 [Click on image for larger view.]
This created a new macvlan network (MyMacvlan_001) on my home network using the wired interface (enp2s0) on the host.
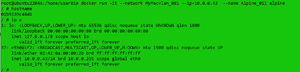
I created a new Linux instance attached to the macvlan (MyMacvlan_001) with an assigned IP address (10.0.0.43). I displayed the instance's host name and IP address by entering:
    docker run -it --network MyMacvlan_001 --ip=10.0.0.43  --name Alpine_011 alpine
    hostname
    ip a
 [Click on image for larger view.]
I checked connectivity to my local router and Google by entering:
    Ping -c 2 10.0.0.1
    Ping -c 2 google.com
 [Click on image for larger view.]
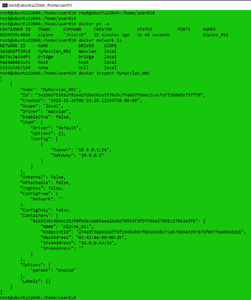
I exited the instance, displayed the active instances, listed the networks, and displayed the macvlan network by entering:
    docker ps -a
    docker network ls
    docker inspect MyMacvlan_001
 [Click on image for larger view.]
This showed the subnet and gateway of the macvlan network and indicated that it had a container named Alpine_011 with an IP address of 10.0.0.43.
I stopped and removed the containers. Then, I removed the macvlan network by entering:
docker network rm MyMacvlan_001
 [Click on image for larger view.]
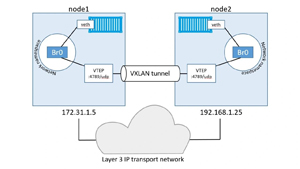
Overlay Networking
Not all networking is local to a single host, and in many cases, you will want to span two or more hosts. To facilitate this, Docker has overlay networks that use VXLAN tunnels to pass container traffic seamlessly and transparently between instances running on different hosts.
As this is just a basic primer on Docker, however, we will not be discussing overlay networks.
 [Click on image for larger view.]
Conclusion
Below is a summary list of Docker commands used in this article:
|
Command
|
Notes
|
|
docker
network ls
|
List the
container networking schemes
|
|
docker
network inspect bridge | egrep 'Name|IPv4Address'
|
List the
instances that use the bridge network and use grep to display the name of the
instance and IP address of them
|
|
docker run
-itd --network host --name Alpine_006 alpine
|
Use the host
network with the instance
|
|
docker run
-itd --network none --name Alpine_007 alpine
|
The instance
will not have any network connectivity
|
|
docker
network create -d macvlan --subnet=10.0.0.1/24 --gateway=10.0.0.1 -o parent=enp2s0 MyMacvlan_001
|
Create a
macvlan network
|
|
docker run
-it --network MyMacvlan_001 --ip=10.0.0.43 --name Alpine_011 alpine
|
Use the
macvlan network with the instance
|
|
docker
network rm MyMacvlan_001
|
Remove the MyMacvlan_001
network
|
Networking is an enabling technology in IT. Docker realizes this and provides various options to meet most situations. For example, it has bridge networking that gives instances their own IP address and allows them to communicate with each other. It also has host networking where the IP address is shared with the instances. For isolated instances, you can specify the "none" network. If you want your container to have a routable IP address, you can use macvlan networking. When deploying containers on multiple nodes, an overlay network can be used.
So far in this series of articles, we have not worried about the persistence of data. In the next article, however, we will remediate this by discussing persistent storage for Docker.
Update: Part 4 is now available here.