I recently took a look at one of the larger VMware vSphere and Microsoft Hyper-V environments I work with, and noticed that I had high number of powered-off VMs. Approximately 35 percent of the environment's nearly 800 VMs were powered off. This is a practice of mine in my home labs, but I was shocked to see how somewhat sloppy I've become with powered-off VMs outside of that setting.
Given that this is a large number of powered off VMs, a few interesting attributes come into play. First of all, I was holding on to these VMs "only if I'd need them"; and based on the timestamps of the its last activity, it was usually quite awhile ago. Secondly, I really don't have the infrastructure size to power them all on at once. These two characteristics made me wonder if I really need to hold on to them any more.
Backup, Then Delete
I've decided it's best to back these VMs up and then delete them. I like the idea of backing them up, as almost any backup technology will have some form of compression and deduplication, which will save some space. And by holding on to these unused VMs, I've been effectively provisioning precious VMware vSphere and Microsoft Hyper-V primary datastore and volume space for something I may not use again. Reclaiming that primary space is a good idea.
This is especially the case since I'm going to start getting back into Windows Server Technical Preview and the Hyper-V features soon. At Microsoft Ignite I took a serious look at the Hyper-V and next-generation Windows features, as I'm very interested in both them and the bigger picture, especially as it works with Microsoft Azure.
Another consideration is the size of the environment. In the larger, non-lab setting, I find it makes more sense to back up the VMs, then delete them. For smaller environments, it may make more sense to leave the VMs on the disk rather than deleting them all.
Tips and Tricks
Speaking of powered-off VMs for lab use, I did pick up an additional trick worth sharing. There are plenty of situations where a powered-on VM makes more sense than one that's powered off. For those, there are several ways to have powered-on VMs that are more accessible, but take up fewer resources:
- Set up Windows Deployment Services and PXE boot VMs with no hard drive. They'll go right to the start of the Windows installer menu (but without a hard drive, they won't install) and have a console to see, but they don't do much.
- Leverage a very small Linux distribution. DSL, for example, is only around 50 MB. (More options for this have been blogged about by my good friend Vladan Seget.)
How do you handle the powered-off VM? Do you archive them via a backup and then delete them or put them on a special datastore or volume, and use them when you need them? There's no clear best practice for both lab and non-lab environments, but I'm curious if any of you have tips to share.
Posted by Rick Vanover on 05/12/2015 at 8:21 AM0 comments
I've been following the vSphere 6.0 release process for what seems like forever, but I still need to make sure I understand a few of the key concepts before upgrading my lab environments. In particular, I need a better grasp of a few of the new storage concepts. It's pretty clear there are key changes to storage as we know it, and storage policy-based profile management (SPBM) is what I'll look at in this post.
SPBM becomes increasingly important as new vSphere storage features are considered and implemented. This is applicable in particular to VMware Virtual SAN and vSphere Virtual Volumes (VVOLs), but it also applies to traditional vSphere storage options. The concept of SPBM isn't exactly new, but with vSphere 6.0 it's become much more important.
I frequently look at new features and ask myself, What's the biggest problem this will solve? From my research and limited lab work, these are the top benefits SPBM brings:
- Make storage arrays VM-aware (specifically for VVOLs)
- Common management across storage tiers
- More efficient VM tasks such as clones and snapshots
- Changes in storage policy may not necessarily mean it has to move on the back-end
- It forces us to look closer at our storage and its requirements
This list is a pragmatic or even possibly pessimistic approach (remember, I'm a grumpy evangelist by day) to these new features. But the rubber meets the road on the last point. I can't go on any more not really knowing what's going on in the datacenter, and what type of storage is needed from my VMs. There was a day when free space was the only consideration. Then datastore latency was the thing to watch. Then IOPs on VMs were the sharpshooter's tool. When you put it all together now, you're going to need policies and centralized configuration to do it right. The point is that having features like SPBM is great; but it still doesn't solve the problem of not having enough of the right kind of storage.
The crucial aspect of SPBM is ensuring that any key infrastructure changes adhere to policy.This is especially important when you consider ways that VMs can move around or be recreated. One way is storage Distributed Resource Scheduler (DRS), which can automatically move a VM to a new storage resource based on performance measurements.
Another consideration is the process of backing up and then restoring a VM that may have been accidentally deleted. When a storage policy is in place, these events need to be considered, as the VM may move around. Specifically, consider the policies you make and ensure they'll be enforceable for these types of events. Otherwise, why bother setting up storage policies?
Of course, there are always situations where you might need to violate performance or availability policies; but keep in mind in that you might need to have storage resources in place to satisfy the VM's storage policy. Figure 1 shows what can happen.
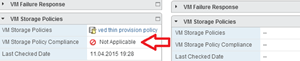 [Click on image for larger view.]
Figure 1. This isn't what you want from storage policy-based profile management.
[Click on image for larger view.]
Figure 1. This isn't what you want from storage policy-based profile management.
I'm just starting to upgrade my environments to vSphere 6.0, and SPBM will be part of the journey. Even if I don't migrate to VMware Virtual SAN or start using VVOLs, SPBM can apply to the storage practices I've used previously, and provide that additional level of insight.
Have you started playing with SPBM yet? Share your experiences, tips and tricks below.
Posted by Rick Vanover on 04/28/2015 at 7:10 AM0 comments
I've been using Data Domain deduplicating storage systems as part of my datacenter and availability strategy. Like any modern storage system, there are a lot of features available, and it's a very capable and purpose-built system. In the course of using Data Domain systems over the years, I've learned a number of tips, tricks and ways to obtain information through the command line, and wanted to share them. Personally, I prefer user interfaces or administrative Web interfaces, but sometimes real-time data is best retrieved through a command line.
Here's the first command:
system show stats int 2
This command displays a quick look at real-time statistics for key system areas, including: CPU, NFS and CIFS protocols, network traffic, disk read and write rates and replication statistics. This is a good way to measure raw throughput on the storage system. Figure 1 shows this command in action:
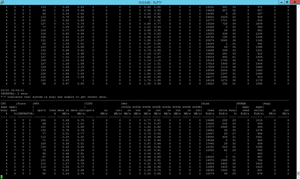 [Click on image for larger view.]
Figure 1. The system statistics in one real-time view.
[Click on image for larger view.]
Figure 1. The system statistics in one real-time view.
The next command is probably my new favorite command to show Data Domain Boost statistics in real time. Data Domain Boost is a set of capabilities for products outside the storage system that make backups faster. One way to look at it is that the deduplication table is extended out to additional processors. This is important, as it will greatly reduce the amount of data that needs to be transferred. Here's the command to view Data Domain Boost statistics in real time:
ddboost show stats int 2
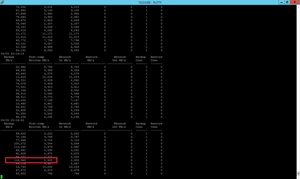 [Click on image for larger view.]
Figure 2. The transfer savings of Data Domain Boost can be dramatic.
[Click on image for larger view.]
Figure 2. The transfer savings of Data Domain Boost can be dramatic.
Note the one highlighted entry in Figure 2. Approximately 116 MB of data was scheduled to move during the backup, but only 2.4 MB was ultimately transferred.
While I'm convinced that Data Domain Boost is the way to go, I realize it's not available for all situations. In that case, you'll likely have to choose between two network protocols: CIFS or NFS. While CIFS is easier, you'll want NFS for most situations, because it's faster and one less layer on the file system root of the Data Domain storage system.
Finally, be aware that if you're using the Data Domain to hold backups, NFS uses an out-of-band authentication from Active Directory. This can be important if you're restoring Active Directory. Before you go into the NFS realm (especially if you're not a Linux expert), you may want to check out the Linux Tuning Guide (login required). But if you go down the NFS route (which I recommend), you'll notice that the Linux command to mount the NFS share is quite particular:
echo 262144 > /proc/sys/net/core/rmem_max

echo 262144 > /proc/sys/net/core/wmem_max

echo 262144 > /proc/sys/net/core/rmem_default

echo 262144 > /proc/sys/net/core/wmem_default

echo '8192 524288 2097152' > /proc/sys/net/ipv4/tcp_rmem

echo '8192 524288 2097152' > /proc/sys/net/ipv4/tcp_wmem

echo 2097152 > /proc/sys/net/core/wmem_max

echo 1048576 > /proc/sys/net/core/wmem_default

/sbin/service nfs start

mount -t nfs -o nolock,hard,intr,nfsvers=3,tcp,bg  1.2.3.4:/data/col1 /dd/rstr01/backup
Note that: 1.2.3.4 is the IP address (or DNS name) of the Data Domain system, /data/col1 is the exported path on that system, and dd/rstr01/backup is the local file system path for the NFS mount. The point of interest is the –nolock flag. This is because the NFS implementation on the Data Domain doesn't support NFS flock. This isn't bad, it's just something to note as to why the command isn't standard for NFS mount commands.
These are my top three commands that make my life easier with Data Domain systems. Do you use a Data Domain? What have you found on the command line to make your life easier? Share your comments and commands below.
Posted by Rick Vanover on 04/17/2015 at 10:38 AM0 comments
As I last wrote, I'm preparing to make some changes in my home lab. I want to thank each of you who shared your advice on home labs -- and for the lively Twitter debate, as well. I think it's a good idea to share some lab tips for ease of use and ensuring you don't get into trouble. So in this post, I'll share a handful of home lab tips I've learned over the years.
- Keep a static networking configuration for static items. Likewise, if you plan on testing networking configurations, make a different network for that.
- Have a backup on different storage. I shouldn't have to tell people today to back up what's important, but sometimes people learn the hard way. Specifically for a home lab, I don't do any of the lab functions on the storage dedicated to backups. You want the option to blow away a volume in the lab, but not on the same storage system as the backups. In the last blog, I mentioned that I'll have new storage resource backups, but they'll be fully separate from where the virtual machines (VMs) run.
- Leverage the powered-off VM. Many of the things you test in the lab can be performed on both powered-on and powered-off VMs. This can save memory usage; in addition, if you're doing any nested virtualization, performance will be much better.
- Go for solid state storage (SSD) wherever possible. Few of the home lab situations I've done over the years involved a very large storage profile. Most of the time the home lab is a test bed for sequencing and configuration tweaks that you can't (and often shouldn't) do in your work-based production environment. The SSD will help with any excessive swapping; if your environment is anything like mine, memory is the most constrained resource.
- Use a unique domain name and address space. I use RWVDEV.INTRA and 10.187.187.0/24 as my network. I blog about this network a lot, and I occasionally do Web searches for some of this text. That way I can see if anyone is illegally using my blog content as their own. I wrote a personal blog post on this topic, if you want to check it out.
- Windows evaluation media isn't all that bad. I used to be upset about the discontinuation of Microsoft TechNet subscriptions for IT pros; but given the nature of the lab, the evaluation media actually does the trick nicely for me.
- Set auto power on for critical VMs. If your power goes out or if you turn off the lab when not in use, it's nice to have the parts needed start up automatically. I'm a growing fan of "powered off unless used," and that can apply to the hosts, as well.
- Hold on to the old stuff. Keep .ISO files around for everything, because you never know when you'll need them. I know a few examples where someone had to power on an NT 4 VM just for a while to make a new application that emulated the old one (whole separate discussion). The takeaway is that the .ISOs of older VMware ESXi, Workstation, Server and other hypervisors will have VMware Tools installation kits for the older OSes. Same goes for old installations of VMware Converter and other tools you probably use every day.
- Purchase the best hardware you can with thoughts of upgrading. In my experience, I've saved up money to buy the best servers possible. But months later I added memory and storage as the lab budget was replenished. Related: consider starting small if you're making a new home lab (two systems should do).
- Don't underestimate the power workstation/laptop as a host. Microsoft Hyper-V and VMware vSphere have processor requirements to provide the correct virtualization support. Many laptops and desktops are capable of running them, so this may be an option compared to purchasing a traditional server.
- Put Internet limits on your lab components. Related to the note earlier about static networking, make sure you don't hijack your home Internet connection with your excellent script that auto-deploys 1,000 Windows VMs that need to now get Windows Updates. I recommend running one or more Untangle appliances to set up easy segmentation (there's also a VMware virtual appliance edition that works for the free offering).
There are so many considerations for a home lab, and it really depends on what you want to do with it. For me, it's playing with the newest vSphere and Hyper-V platforms, as well as a few storage tips and tricks. Have you set up a home lab yet? What specific things have you done to make it work well for you? Share your comments below.
Posted by Rick Vanover on 03/30/2015 at 9:59 AM0 comments
For IT pros, I think that the home lab has been one of the most critical tools to allow us to further our professional careers, prepare for certifications and go into the workplace with confidence. Further, if you're like me, the home lab does part of the household IT services. My most popular personal blog post is my rough overview of my home lab from January 2010. It is indeed rough, as I (shudder) diagrammed my home lab at the time with a permanent marker.
That was more than five years ago. Some of those components were new at the time, some have come and gone, and yet some are still there. Recently, my primary battery unit to power the whole lab failed. I was very lucky, though; I got nearly eight years out of a 2U rack-mount battery. Due to this failure, my initial thought was to just get a new battery. But I thought: It's 2015. What's the role of the home lab? What do I need to do differently or additionally to use new technologies? Figure 1 shows my current setup.
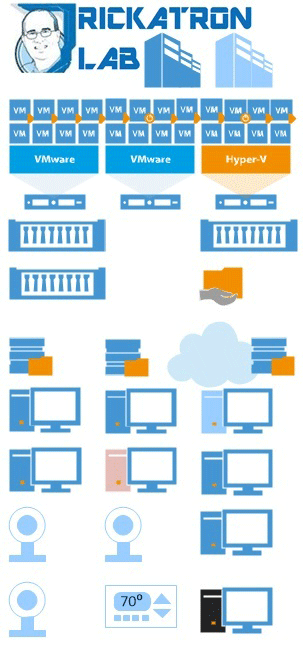 Figure 1. Rick's home lab is quite complex.
There's a lot going on here, but primarily note that there are two VMware vSphere 5.5 hosts and one Hyper-V Server 2012 host with a number of VMs. I have a large file server as a VM that holds every piece of data my family or I would ever need, and it's quite large. In fact, this lab is something of a production environment, as I have a proper domestic business with an official employee. So the data I store is important for that.
There are three iSCSI storage systems, one NAS system and one iSCSI storage device dedicated to backups. There's also a fireproof hard drive for backups, and a cloud backup repository. All the PCs, tablets, webcams, streaming media players, phones, TVs and the thermostat are connected to the network behind an Untangle virtual appliance. The Untangle is staying, that's for sure -- it's the best way to do free content filtering.
Single Hypervisor?
The whole lab arrangement is complex, but I understand it and know how to support it. Additionally, most of the blogs I do here are seeded in this lab. That's where I am today, but what's the next logical step in the home lab? Part of me wants to retire each of the older VMware hosts and just use the Hyper-V host because it's newer. That would require me to settle on a single hypervisor, which is a discussion for another day.
I still think there are benefits to having two hosts in a home lab. For one, availability and migration are options in case of a failure. But what needs to change are all the storage devices. They draw a lot of power and have hard drives that will surely soon fail (don't worry – I'm good on the backups).
I've gone all solid state on endpoints, and that's an investment with which I've been happy. With all of that being said, I still want the Rickatron lab to do the fun stuff like nested virtualization, vMotion, high availability and more.
The new home lab will have a reduced number of storage devices. I'm tempted to go all local storage and use replicated VMs in addition to my backups. Because I only have one Hyper-V host and it's newer, I'll move all of those VMs to local storage.
The VMware VMs, though, need to keep their ability to migrate, so I think the right step today is to get one storage resource that's faster and offers more capacity than what I have now. Also, for the home lab I don't need features such as VMware Virtual SAN because two hosts are fine for me, and Virtual SAN requires three.
Backups
Regarding backups, I'm still going to practice the 3-2-1 rule. It states that there should be three different copies of data on two different forms of media, with one of them being off-site. I like this rule as it doesn't lock into any specific technology and can address nearly any failure scenario.
For the lab, I may also invest in a new backup storage resource. Besides, when I need it, I need it to work and be fast. So whatever the primary storage device will be, I'll likely purchase a second one dedicated to backup storage. I'll still leverage the cloud repository backup strategy, as well, which will address my off-site requirement.
My use case for a home lab is unusual, with a design that shares many small business requirements minus the mixed hypervisor twist. Do you have a home lab? What would you do differently if you had to change it? I'm going for fewer devices next time. Share your strategies in the comments section.
Posted by Rick Vanover on 03/18/2015 at 9:10 AM0 comments
CoreOS is a lightweight Linux OS that supports running containers. While I'm no application developer, I do think that infrastructure professionals need to get CoreOS in their lab now. Make sure you know how to deploy this new OS, configure it and make it available in the datacenter. VMware says that it's committed to making CoreOS fit in nicely with other workloads; what the blog post doesn't say is that it's a pain to deploy.
A very detailed knowledgebase article, VMware KB 2104303, outlines how to deploy CoreOS on vSphere. I recently went through the drill; while it was long, no step of the journey is impossible. I'm also a Windows junkie, so the Linux-heavy aspects of CoreOS did slow me down a bit. Still, I found a way.
If you're an infrastructure professional, I recommend going through this drill so that when your application teams reach out, you already have experience deploying CoreOS and being container-ready. In other words, if you have nothing for them, they'll go elsewhere. Here are a few points to note when deploying CoreOS.
Bzip compressor is used for the base disk of the CoreOS image. You can run the Bzip compressor in Windows; downloading it was a straightforward process, although the bunzip2 command took quite a bit of CPU during the decompression task and made the SSD work hard (as you can see in Figure 1).
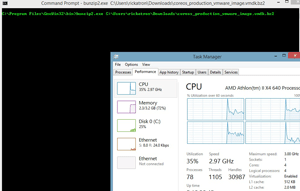 [Click on image for larger view.]
Figure 1. The bunzip2 command line will decompress the CoreOS disk image.
[Click on image for larger view.]
Figure 1. The bunzip2 command line will decompress the CoreOS disk image.
The image produced by CoreOS for VMware supports the Fusion and ESXi hypervisors. I prefer to use ESXi with vCenter, which means converting it to Open Virtualization Format (OVF). One way to do this is with VMware Converter, but there may be slightly more steps involved. The VMware Open Virtualization Format Tool was easy to use and swiftly converted the extracted disk file to an OVF-importable format. Windows (32-bit and 64-bit) and Linux versions of the tool are available; they make easy work of creating the OVF to be imported into vSphere, as shown in Figure 2.
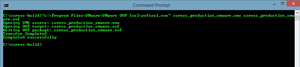 [Click on image for larger view.]
Figure 2. The CoreOS image must be imported to vSphere via an OVF.
file.
[Click on image for larger view.]
Figure 2. The CoreOS image must be imported to vSphere via an OVF.
file.
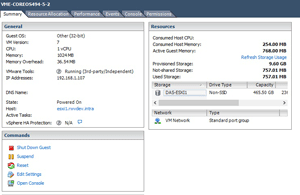
Once this step is done, the process of importing a virtual machine (VM) with the vSphere Client or vSphere Web Client becomes easy and familiar. But pay attention to the last parts of the KB article, where the security keys of the VM are created; just because you have a VM doesn't mean you're done. The VM is running Open Virtual Machine Tools (open-vm-tools), an open source implementation of VMware Tools, so it fits in well with a vSphere environment (see Figure 3).
 [Click on image for larger view.]
Figure 3. A CoreOS virtual machine, ready for application containers.
[Click on image for larger view.]
Figure 3. A CoreOS virtual machine, ready for application containers.
Containerized application development is a very interesting space to watch, and I don't expect it to go away. But if the applications are running anything important, I'd advise using the trusted platform to keep them available, manage performance and offer protection capabilities.
The current process of running CoreOS in vSphere is a bit of work, though I expect it to get easier over time. Additionally, save the OVF that you have made for future steps as it will make subsequent deployments easier. Are you looking at CoreOS or other ways of supporting these new application models? What considerations and priorities do you have to get there? Share your comments below.
Posted by Rick Vanover on 03/05/2015 at 2:43 PM0 comments
Too many times when a new major Microsoft OS is released, other features or even separate products may overshadow some of the things that really make me excited. Windows 10 Technical Preview (the next client OS after Windows 8.1) and the Windows Server Technical Preview are hot topics right now. There's also a System Center Technical Preview. That's a lot of software to preview! Also in the mix is Hyper-V Server and the corresponding server role.
I've been playing with the Windows Server Technical Preview on a Hyper-V host for a while, and I'm happy to say that it's worth a look.
The Windows Server Technical Preview is adding a lot of Hyper-V features I'm really happy to see. I felt that the upgrade from Windows Server 2008 R2 to Windows Server 2012 brought incredible Hyper-V improvements, but didn't feel the same from Windows Server 2012 to Windows Server 2012 R2. You can read the full list of what's new in Hyper-V on TechNet; today, I want to take a look at some of my favorite new features and share why they're important to me.
Rolling Hyper-V Cluster Upgrade
Without question, the biggest and broadest new feature in Hyper-V for the Technical Preview is the Rolling Hyper-V Cluster Upgrade. This capability offers a familiar construct called Cluster Functional Level. This permits a cluster to have a host running the Technical Preview for a Windows Server 2012 R2 Hyper-V cluster and move virtual machines (VMs) to the new hosts, permitting host upgrades of the older hosts. This is meant as a cluster upgrade technique; it's not a broad backward- and forward-compatible administration technique for long-term existence, but rather a framework for how clusters will be upgraded going forward.
There are some improvements in the Hyper-V Manager administration tool, as well. For most of the environments I administer, the Hyper-V installations are small and I'm fine administering with Hyper-V Manager. For larger environments, System Center Virtual Machine Manager is the way to go. Figure 1 shows the new Hyper-V Manager.
 [Click on image for larger view.]
Figure 1. The Hyper-V Manager administration interface is materially unchanged, but now supports password connections for different accounts.
Integration Services
[Click on image for larger view.]
Figure 1. The Hyper-V Manager administration interface is materially unchanged, but now supports password connections for different accounts.
Integration Services
The final cool feature in the Technical Preview I'm happy to see is that Integration Services are now delivered through Windows Update to the Hyper-V guest VMs. This has been a real pain point in the past. Take, for example, a situation in which there's a Windows Server 2012 R2 host (with no update), and a VM that's created and is running Integration Services. Then assume that the host is updated (via Windows Update) and a subsequent VM is created. The two VMs now have different versions of Integration Services. Troubleshooting in this scenario is no fun.
Additional features, such as hot add of network and memory, are a big deal for critical production VMs running on Hyper-V, and I can't wait to give those a look, as well. If you haven't downloaded the Technical Preview, you can do so now for free. Now is really the time to take a look; the next version of Hyper-V will be here before you know it, and you should be prepared when it reaches general availability.
Have you started playing with the Technical Preview? If so, what Hyper-V features do you like or look forward to most? Share your comments below.
Posted by Rick Vanover on 02/17/2015 at 8:56 AM0 comments
I was recently deploying a virtual appliance, and found that a very specific BIOS setting on CPU power management was causing consistency issues in my vSphere cluster. Specifically, if I used one host for this virtual appliance, it worked fine. But the moment the vSphere Distributed Resource Scheduler (DRS) would assign the virtual appliance to another host, it wouldn't power on. This virtual appliance was requiring specific CPU settings in the host BIOS. After the issue was resolved, I decided to investigate further.
What I found is that I had a cluster that was, generally, set up well and consistently. Consistent configuration of your hosts is the key to a vSphere cluster performing well. The one area where I had an anomaly was the CPU power management policy in the host BIOS, which is a very specific setting. It reminds me a lot of the "virtualization-enabled" situation that I had a few years ago, but this one was much more specific. The host CPU BIOS is displayed as a power management value in the vSphere Web Client, as shown in Figure 1.
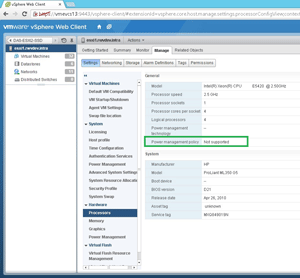 [Click on image for larger view.]
Figure 1. The host has specific information on the CPU visible as a policy object.
[Click on image for larger view.]
Figure 1. The host has specific information on the CPU visible as a policy object.
The "Not supported" value in this example is where the host CPU power management policy can't be applied. This feature is documented on the VMware site as you'd expect, but this is an interesting area to consider. Regardless of how I arrived at this problem, I think it's worth taking a look at each host in a vSphere cluster to see if this value is consistent for each host.
Personally, I feel that performance is more important than power management for today's modern processors. Hosts that I manage with modern processors have different options, such as balanced or high performance and so on. You can change part of the option in the vSphere Web Client, but it depends on what options are set in the BIOS.
Has CPU power management ever interfered with a virtualization configuration you've used? Further, are your hosts configured consistently in this regard? Share your experience about CPU power management below.
Posted by Rick Vanover on 01/30/2015 at 10:26 AM0 comments
Many admins are either implementing or considering the VMware Virtual SAN, to dive more fully into the software-defined storage space. After having spent time there myself, I wanted to share a tip. You know that it's important to check out the VMware Compatibility Guide when shopping for components. But just as important as compatibility is performance.
The good news is that the Guide now includes information for controllers and drives (both solid state and rotational drives) that are supported for use with VMware Virtual SAN. Figure 1 shows the new compatibility guide.
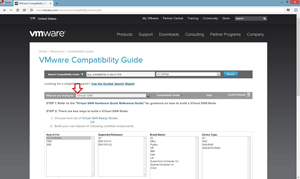 [Click on image for larger view.]
Figure 1. The VMware Compatibility Guide has a dedicated VMware Virtual SAN section.
[Click on image for larger view.]
Figure 1. The VMware Compatibility Guide has a dedicated VMware Virtual SAN section.
This is important for both lab and production environments. Pay particular attention to the solid state drive (SSD) component of the Virtual SAN, if you're using those. Although SSDs not in the compatibility guide may work, their performance may surprise you – by being even worse than Hard Disk Drives (HDDs).
I can say from direct experience that I've run ESXi hosts with unlisted SSDs, and they were actually slower than the regular hard drive I'd used previously. Thus, if you're using unsupported devices with Virtual SAN, you likely won't get a sense of how well it works.
As you may know, Virtual SAN uses both SSDs and HDDs to virtualize the storage available to run virtual machines (VMs). When you decide to add SSDs, consider PCI-Express SSDs. That allows you to use a traditional server with HDDs in the normal enclosure (and the highest number of drives), then add the SSDs via a PCI-Express card.
The PCI-Express interface also has the advantage of higher throughput, as compared to sharing the SAS or SATA backplane, as is done with HDDs. I've used the Micron RealSSD series of PCI-Express drives within an ESXi host (Figure 2); what's great is the performance delivered by these and other enterprise SSDs. They can hit 30,000-plus writes per second, which is the Class E tier on the compatibility guide. This underscores an important point to remember when researching storage: all SSDs are not created equal!
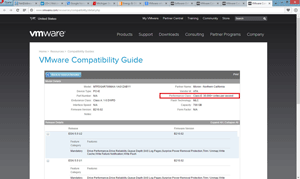 [Click on image for larger view.]
Figure 2. When shopping for SSDs, be sure to look at the performance class section in the VMware Compatibility Guide.
[Click on image for larger view.]
Figure 2. When shopping for SSDs, be sure to look at the performance class section in the VMware Compatibility Guide.
Have you given much thought to the SSD device selection process with vSphere and Virtual SAN? What tips can you share? What have you learned along the way? Share your comments below.
Posted by Rick Vanover on 01/12/2015 at 11:01 AM0 comments
The message from vSphere Client when I try to perform a task that can't be done in the Windows Client is a quick reminder of a few things. First of all, I need to use the vSphere Web Client more. Second, I need to know, going in, which tasks can be done in which administrative interface for day-to-day work. The message I'm referring to is shown in Figure 1.
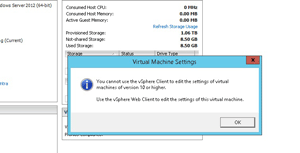 [Click on image for larger view.]
Figure 1. Sorry, you can't do that here.
[Click on image for larger view.]
Figure 1. Sorry, you can't do that here.
The rule for now is that full VM administration for hardware version 8 can be done in the Windows vSphere Client (the C# client). The vSphere Web Client enables full administration of hardware version 10 VMs.
But what if there's a mix of hardware version 8 and 10 VMs? Let's assume that both the vSphere Web Client and vSphere Client are in use. What tasks can't be performed in the vSphere Client on hardware version 10 VMs? Here's a list of some of the most notable ones:
- Edit virtual machine settings
- Edit resource allocation (e.g., CPU, memory limits)
- Manage storage profiles
- Export a VM as an Open Virtualization Format (OVF) template
- Configure hardware version 10-specific features, including: virtual machine disks (VMDKs) larger than 2 TB; Virtual SAN; input/output operations per second (IOP) limits for VMs; vSphere Tags; vSphere Flash Read Cache
The inability to edit VM settings is the big one. That means not adding VMDKs, CPU or memory, among other drawbacks. I've long used the vSphere permissions model to let application owners use the vSphere Client to do day-to-day administration of their VMs; this is a practice ripe for a refresher with the vSphere Web Client. A temporary reprieve has been granted since the vSphere Client will be around for the next version of vSphere; still, it's the right time to move all substantive administrative tasks to the vSphere Web Client.
An important takeaway is that when the vSphere Client is used on newer hardware versions, the core administrative tasks can still be performed, including:
- Migrate
- Power on/Power off
- Open console
- Alarm management
- Deploy VM template
- Permissions assignment
- Display performance and storage views
You can see in Figure 2 that the Web Client UI has all the functionality you need.
 [Click on image for larger view.]
Figure 2. All the settings are here, in the Web Client. Time to get on board.
[Click on image for larger view.]
Figure 2. All the settings are here, in the Web Client. Time to get on board.
Have you found any other core day-to-day stopping points where you can't do certain things with hardware version 10 VMs in the vSphere Web Client? If so, what was it? Share your situation in the comments.
Posted by Rick Vanover on 12/19/2014 at 8:19 AM0 comments
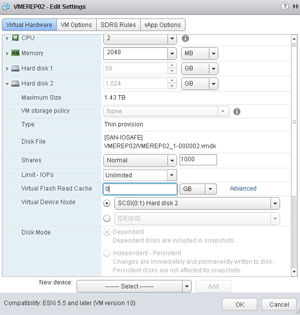
vSphere 5.1 raised the maximum virtual machine (VM) size to 62TB. There is a catch, however: hardware version 10, along with the vSphere Web Client, must be used. That's OK, because I'm convinced the benefits outweigh any issues with day-to-day administration. I believe the 62TB Virtual Machine Disk (VMDK) is the best way to avoid any bad habits that may have been developed over the years for VMs that needed more than 2TB of space.
The large virtual disk format is primarily a safeguard; it keeps admins from doing bad things to good vSphere environments. When I say bad things, I primarily mean storage configurations that don't make sense anymore for VMs. I see five key reasons to use the large disk format in a vSphere environment:
1. No More RDMs. Raw device mappings (RDMs) are used to directly present block devices to VMs. This is done primarily to ensure that application configurations, such as clustering with two VMs, can be done within vSphere. It basically means shoehorning a physical application design into a virtualization layer.
There's also a thought that RDMs perform better than VMDKs. The reality is that the performance difference is trivial -- at best -- today, given the latest improvements and designs.
Furthermore, RDMs complicate everything. You can't easily move these VMs to new hosts, and they can cause issues when using the vSphere APIs for Data Protection.
2. Better iSCSI Management. I remember a time when, to attach an iSCSI LUN, I would just create a VM and run the iSCSI initiator inside the guest VM. That seemed like a great way to avoid the 2TB virtual disk format limit -- that is, until I needed to move the VM's storage. Using the 62TB VMDK allows a VM to be fully contained in the vSphere environment, simplifying things; using iSCSI in the VM only complicates the VM's portability.
3.
The End of Dynamic Disks. If the first two options aren't used, dynamic disks can deliver more than 2TB on a single guest OS volume. But they're generally a weak solution. I don't use the Windows dynamic disks much; they have legendary issues when something goes wrong. Additionally, there are some interesting performance considerations if multiple VMDKs are part of the same dynamic disk set, but are on different datastores with variable performance. I like simple. Large VMDK files can provide the needed size, yet still be in the simplest configuration within Windows. This saves time and troubleshooting later on.
4. The Benefits of Thin Provisioning. Thin provisioning of virtual disks allocates a maximum size (up to 62TB), but only uses what a VM will put on it. For example, if I create a VM with Windows Server 2012 on it, I can specify a 62TB VMDK. It starts at just 8GB for a base installation, however, freeing up space elsewhere.
Thin provisioning is a good safeguard for times when the size of the VM grows beyond a common threshold, such as 2TB. You can dynamically expand virtual disks, but if more than 2TB, the VM may need to be powered off and upgraded to VM hardware version 10. I recommend switching to using large disks, so that a VM with an expanding storage requirement won't be stopped in a disruptive manner. Figure 1 shows a 62TB VMDK in the vSphere Web Client.
 [Click on image for larger view.]
Figure 1. A 62TB Virtual Machine Disk with thin provisioning.
[Click on image for larger view.]
Figure 1. A 62TB Virtual Machine Disk with thin provisioning.
A natural objection to letting all VMs have as much room as they need is the danger of running out of disk space. That's indeed a risk; I'll cover it in a future blog posting.
5. Less Complicated VMs. I deal with a lot of different people in a lot of different situations; they're all in various places in their virtualization journey. Every now and then I'll get a question about a VM, and it's been configured with something like 12 virtual disks. I cringe in those situations, as I prefer a simple configuration from the infrastructure perspective. If there's one really complicated VM, let the VM be complicated within the OS; don't make a pretty infrastructure ugly and more difficult to manage with one VM that sticks out like a sore thumb.
For these five reasons, I'm encouraging you to use the latest and greatest configuration techniques on all your vSphere VMs. In particular, the 62TB VMDK along with the VM hardware version 10 are the latest advances in the specific VM configuration options that can prevent problems down the road. Have you replaced a bad storage habit with the 62TB VMDK? If so, share your experiences below.
Posted by Rick Vanover on 12/10/2014 at 11:41 AM0 comments
Early in my virtualization career, VMware vCenter Converter was one of the first tools that helped me get started with building a virtualized data center. Converter is a physical-to-virtual (P2V) tool that converts physical servers to virtual machines for us in vSphere environments. My days of using Converter on a daily basis are over, but I still do use it.
And every so often, there are updates to Converter that bring interesting new features (or deleted capabilities). Because of that, it's important to know what's going on with this tool. The standalone version of Converter is now at version 5.5.3, and it has a few points of interest I wanted to pass along. You can, of course, read the whole user guide or release notes, but I prefer a short and sweet summary of the key changes:
- The big "What's New" is OpenSSL update. You may want to forget about the Heartbleed bug, but if you're using an older version of Converter, this fix alone should be reason enough to update. It protects you against OpenSSL security vulnerabilities, including Heartbleed.
- No support for Windows 2000 systems. This isn't new or specific to the latest release, but don't think that Converter will save the day for a VM or obsolete server that's been ignored forever, since Converter 5.5.3 can't convert Windows 2000 servers. Windows 2000 and NT system support was discontinued in Converter 4.3, meaning that Converter 4.0.1 is the last build to include 2000 and NT support. I'm not encouraging you to keep these operating systems, but if you need to move them, Converter 4.0.1 may still be worth having.
- VMware Server removed. There was a time that I used VMware Server 2.0 for almost everything. That was before ESXi and a critical change in my data center practice. VMware Server was popular for small environments, but has been dead since 2009 in VMware talk. VMware Server is not a supported source VM for the newest Converter. Note that VMware Workstation 7, 8, 9 and 10 are supported, as are VMware Player 3, 4, 5 and 6.
- Windows Server 2012 R2, Not R2. In the documentation, only "Windows Server 2012" is listed as a supported operating system. It doesn't specify R2, which is strange, as R2 is likely to be the default version of Windows Server 2012 for most. Its absence as a listed system doesn't mean it won't work, but it's something to be aware of. By way of convention, both Server 2008 and 2003 have their "R2" designations separate. Read the release notes if you'd like to verify this for yourself.
- Converter 5.5 keeps up with ESXi 5.5 and vCenter Server 5.5. Try to use the latest version of Converter in all situations. And whatever you do, don't use the same version of Converter from five years ago with your shiny new vSphere cluster. Newer vSphere editions may work with older versions of Converter, but drives and VM inventories may not be built as expected, especially if newer features like VMFS-5 volumes or VMware Virtual SAN are in use.
- VMware Virtual SAN supported. Again, it's not a new feature for 5.5.3, but in the area of Virtual SAN, be aware that Converter 5.5.1 had introduced support for the new storage option with vSphere.
Converter may not be the coolest part of my virtualization practice nowadays, but when I need some help it has always been there for me. I do my best to check back on it often, since it doesn't get the promotion that the other mainstream products get; but I don't want to ever be in a situation to find out that a capability I had before is no longer available.
Do you still use Converter? If so, how do you use it? Share your use cases and comments on the latest features below.
Posted by Rick Vanover on 12/03/2014 at 11:08 AM0 comments