Benchmarking a Portable AI Workstation: Lenovo ThinkPad P16 Gen 3, Part 1
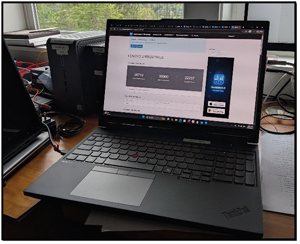
Recently, I reviewed the Lenovo ThinkPad P16 Gen 3, a machine that redefines what a portable workstation can do with local AI. This laptop has a rugged magnesium-aluminum frame on the outside and workstation-class specs inside.
I found it had a stunning 16-inch display and struck a nice balance between military-grade durability and good looks.
 [Click on image for larger view.]
Under the hood, it has an Intel Core Ultra 9 285HX processor and an incredible 192GB of RAM. But what impressed me the most was its sheer AI capability driven by the NVIDIA RTX 5000 Blackwell GPU. With the GPU's 24GB of GDDR7 VRAM, I was able to run local LLMs like Qwen 27B in real time and process over 500 tokens per second with smaller models.
The P16 performance rivaled, and in some cases even surpassed, my cloud-based AI sessions. I also found the dedicated NPU surprisingly efficient for low-power tasks like OCR, allowing me to work without triggering the laptop's cooling fans. Overall, I found this to be a future-proof beast that delivers genuine workstation-level performance in a laptop form factor.
In this article, I will go over the AI tests I ran on this system. Before that, I want to go over some of the issues I encounter when reviewing AI systems.
What LLM to Use
Determining which Large Language Models (LLMs) will run effectively on a Windows-based PC often involves navigating a maze of hardware variables, from dedicated NVIDIA VRAM to system-level RAM and CPU instruction sets. I searched for a solution to deal with these issues and found LLMfit. LLMfit provides a lightweight, command-line tool that scans your system resources to find an LLM that runs well on it. For Windows users, this is useful because of how the OS manages memory and GPU priority. LLMfit provides a clear list of models that can be used on your system and eliminates the frustration of downloading an LLM (some are up to 10GB) only to find it "spills over" into system RAM, which considerably slows down AI applications.
LLMfit is a free, open-source project hosted on GitHub at AlexsJones/llmfit.
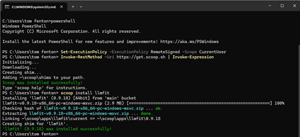
I found that the easiest way to download and install llmfit on Windows is to use the Scoop package manager. However, it is also available in the Microsoft Store, or you can download binaries manually from GitHub.
Tom's Tip -- You can download pre-compiled Windows binaries (e.g., llmfit-v0.9.x-x86_64-pc-windows-msvc.zip) directly from the AlexsJones/llmfit GitHub Releases page.
Scoop is a popular command-line application installer. If you have Scoop, you can run scoop install llmfit in PowerShell to install it.
Tom's Tip -- If you need to install Scoop, you can do so by running the following commands:
Set-ExecutionPolicy -ExecutionPolicy RemoteSigned -Scope CurrentUser
Invoke-RestMethod -Uri https://get.scoop.sh | Invoke-Expression
scoop install llmfit
 [Click on image for larger view.]
Once installed, type llmfit in your terminal. This will launch an interactive Terminal User Interface (TUI) that detects your GPU and ranks models by how well they "fit" your specific memory envelope.
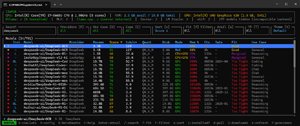
Below is llmfit running on my older, non-GPU-equipped laptop. Notice that only two DeepSeek models would be a good fit for it.
 [Click on image for larger view.]
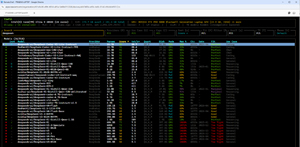
When I ran llmfit on the P16, all but the largest DeepSeek models were a perfect fit for it.
 [Click on image for larger view.]
Geekbench AI
As local AI is relatively new in IT, there aren't many benchmarking tools for AI. After looking around and talking to AI professionals, I decided to use Geekbench AI.
 [Click on image for larger view.]
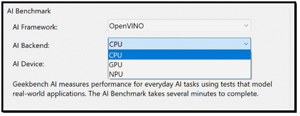
Primate Labs developed Geekbench AI as a cross-platform benchmarking tool designed to evaluate the machine learning and AI capabilities of modern systems. I like it because it lets you select the AI accelerator you want to test against. This includes CPUs, GPUs, and dedicated Neural Processing Units (NPUs).
 [Click on image for larger view.]
The tool measures performance across 10 different workloads, including image classification, object detection, and natural language processing, using real-world frameworks such as ONNX, OpenVINO, and Core ML.
Tom's Tip -- I found that OpenVINO outperforms ONNX on Intel chips, as most CPUs lack native FP16 execution units, so they need to "cast" FP16 numbers to FP32, which adds overhead.
Geekbench AI uses a three-tier scoring system that reflects the different data precision used in AI development: Full Precision (FP32), Half Precision (FP16), and Quantized (INT8). This acknowledges that high-end GPUs dominate high-precision tasks, while mobile devices and dedicated AI accelerators excel in quantized workloads, where models are compressed for better efficiency. The tool also includes an accuracy metric, ensuring that hardware isn't "cheating" by sacrificing output quality to achieve faster processing times. The scores are calibrated against a baseline of 1,500 points, using an Intel Core i7-10700 as the reference system.
Geekbench AI provided a way to verify the performance of the CPU, GPU, and NPU on the system, and how the specific hardware handles AI stress.
Monitoring the System
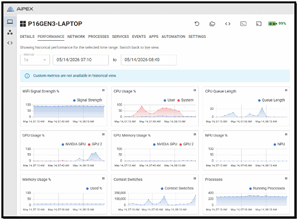
Once I had a way to identify which LLMs were suitable for the system and to quantify their AI accelerators' performance for my convenience, I needed a way to remotely manage them, capture screenshots, and monitor their performance. I have used tools to do this in the past, but none of them supported NPU-equipped systems or systems with more than one GPU. I put out a message on LinkedIn and discovered that Aipex by Tassient could handle it all. As I worked with its developers in the past, I had high hopes for it. I was not disappointed, as I found that not only would it handle all my monitoring needs, but it also offers AI-powered assistance for device management and troubleshooting.
 [Click on image for larger view.]
I installed it in under 5 minutes, and it began to monitor my systems instantly. I found its stability rock-solid, and the developers were very accommodating when I suggested improvements (e.g., GPU memory monitoring). I also found the AI assistant very helpful at times. I hope to find time to write a full article on it.
SPECworkstation 4
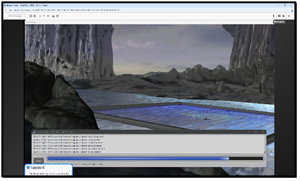
Before diving into my AI tests on the P16, I wanted to get a feel for how well the system performs, not just how well it handles AI workloads. To do this, I ran SPECworkstation 4.
I have found that for enterprise IT professionals and systems architects, SPECworkstation 4 serves as a neutral arbiter for evaluating hardware using real, demanding enterprise workloads. I like that rather than relying on arbitrary synthetic scores, it simulates real-world pipeline stress across key verticals--such as AI/data science, product development (CAD/CAM), financial modeling, and media rendering. It taxes the CPU, GPU, storage, and memory subsystems of a device.
I do have to admit that it was interesting to watch the images scream across the screen while the graphics tests were running and stressing the NVIDIA GPU.
 [Click on image for larger view.]
Aipex showed how hard the hardware was being pushed during the tests. It made it easy to visualize when the CPUs and GPUs were being used. Unfortunately, it also showed that the NPU and GPU's memory were not stressed, which is a shame, as with 24GB of GPU VRAM, I feel that it would have excelled in tests that stressed it.
 [Click on image for larger view.]
These SPECworkstation 4 results reveal, as expected, that it is heavily GPU-centric workstation-class hardware. With exceptional scores in graphics (8.35) and hardware acceleration (5.20), the system is well-suited for GPU-dependent applications in the life sciences and media and entertainment verticals, which score 2.52 and 2.44, respectively.
It should be noted that for CPU-bound workloads like productivity and financial services, for which it was not designed, it did not perform as well. For enterprise IT use, this system is ideal for 3D content creators, CAD product designers, and AI workloads.
Final Thoughts
The SPECworkstation scores for the P16 were impressive and better than I have seen on any other laptop. But now that I have all the tools in place, I can begin my AI testing on the P16. In my next article, I will show you the results of how powerful the Lenovo P16 Gen 3 really is for AI workloads.