How-To
I Asked AI to Provision and Benchmark Storage for a $259 NAS. Here's What Happened
This article started as a fairly conventional review of a reasonably priced all-flash NAS, but then I tumbled down a rabbit hole and ended up with a much more interesting series of articles about whether I could use AI prompts to provision storage, virtual machines, and even a multi-tiered application. But I am getting ahead of myself.
By way of background, last year, before Christmas, when NVMe drives were cheap and plentiful, I wanted to set up a new all-flash NAS. So, during Cyber Monday, I bought half a dozen of them and a Beelink ME Mini PC NAS to house them.
 [Click on image for larger view.]
In this article, I'll cover the device that started me on this journey: the Beelink ME Mini. I'll cover its specs, how I set it up, and how I used AI to benchmark its storage. In later articles in this series, I will show you how I used AI to provision storage and compute.
An All-Flash Cube NAS
The Beelink ME Mini system I bought (they make different models) has an Intel Twin Lake Processor N150, 12 GB of RAM, dual 2.5GbE interfaces, and an integrated internal power supply in a compact, cube-like appliance. But what really sets it apart is that it supports 6 NVMe drives. This device was designed to serve as a home media server, storage for home labbers, or an enterprise edge deployment.
The Cost of Going All-Flash
As mentioned above, I bought the NAS and the flash from Amazon in November 2025 during a Black Friday sale. I will compare what I paid to their current (September 2026) prices.
I paid $259 for the device during the sale. Now, it's $359.
For storage, I wanted a mix of different NVMe drives to see how well they performed.
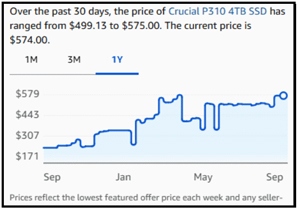
Their non-sale prices have more than doubled since I bought mine.
- Crucial P310 4TB SSD, PCIe Gen4 NVMe M.2 2280 - $239 now $574
- Crucial P510 1TB Gen5 NVMe SSD -- $89.99 now $208
- Kingston NV3 1TB M.2 2280 NVMe SSD - $79.99 now $159
- WD Black SN7100 1TB NVMe SSD - $99 now $189
I used Amazon's price history chart to show how storage prices have more than doubled in the last year, using the 4TB Crucial NVMe drive as an example.
 [Click on image for larger view.]
If you are interested, you can read about why memory has increased and how VMware is helping elevate the issue using software in my article on "Navigating the DRAM Crisis: Memory Tiering in vSphere 9."
Taking a First Look at the ME Mini
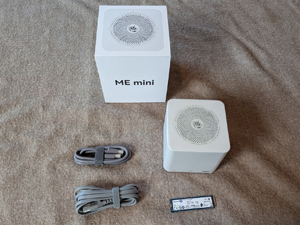
The Beelink ME Mini came in a box roughly the same size as the device. It had a power cord and an HDMI cable. The device is compact in size. I placed an NVMe drive next to it so you can see how diminutive it is.
 [Click on image for larger view.]
With its built-in power supply, the device had some heft and felt sturdy in my hand.
Inside ME Mini's Compact Design
I found the device attractive with its minimalist cube design.
The front panel has an LED-backlit power button and a front-facing USB 3.2 Gen 2 Type-C port (10Gbps).
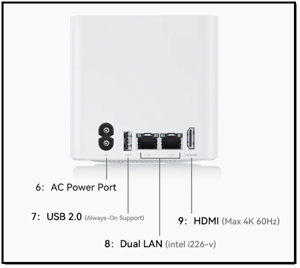
The rear of the device has dual RJ45 2.5GbE ports driven by Intel i226-V controllers, one HDMI 2.0 (up to 4K 60Hz), one USB 3.2 Gen 2 Type-A port (10Gbps), one USB 2.0 port for legacy peripherals (such as keyboards), and a two-prong AC receptacle.
 [Click on image for larger view.]
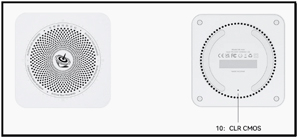
The top of the device has a Beelink logo and ventilation holes, while the bottom has ventilation holes, a clear CMOS access hole for a hard reset, and four screws covered by pads to access the inside.
 [Click on image for larger view.]
A Clever Approach to Cooling Six NVMe
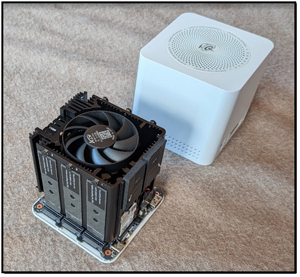
To get a better look at its innards, I removed the four screws on the bottom of the device and pulled off the case top cover to inspect the hardware and install an NVMe.
 [Click on image for larger view.]
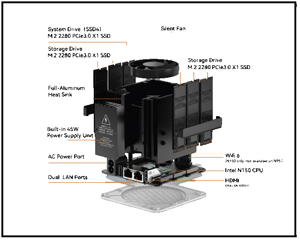
At first, I thought the cube design was purely aesthetic, but on closer inspection it makes sense: the cube's inner surface serves as a heat sink for the NVMe drives and power supply, and the fan sits in the middle to disperse the heat.
While using the device, the fan was virtually silent at idle, with only a slight hum under heavy load.
 [Click on image for larger view.]
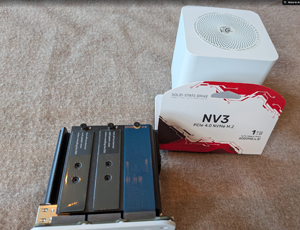
With the cover off, I installed the Kingston NV3 1TB M.2 2280 NVMe SSD in the device.
 [Click on image for larger view.]
Interestingly, the top of the NVMe drive (the chip side) lies flat against the metal inner cube.
Understanding the ME Mini's Hardware Limits
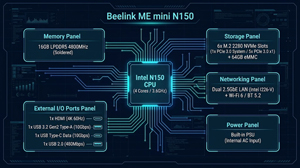
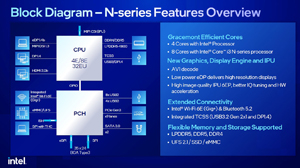
The Intel Processor N150 (Twin Lake) has four Gracemont cores, a 6W base TDP, and a hardware-accelerated media engine (Intel Quick Sync) for on-the-fly streaming. The CPU can run at 3.6 GHz when in turbo mode. This is a highly efficient CPU and has a base TDP of only 6 watts.
The device has 12 GB (or 16 GB) of soldered LPDDR5-4800 running in single-channel mode. An integrated 64GB eMMC module serves as an out-of-the-box base boot disk for its preinstalled Windows 11 Home OS.
 [Click on image for larger view.]
The CPU's modest I/O governs the device's storage topology: the processor natively has 9 PCIe Gen 3.0 lanes but lacks SATA ports, which isn't a concern since this device is a pure flash device and has no internal or external SATA ports.
 [Click on image for larger view.]
The system's real strength is its six M.2 2280 NVMe slots. The primary slot runs at PCIe 3.0 x2, while the remaining five run at PCIe 3.0 x1. While x1 bandwidth caps sequential burst speeds at around 900 MB/s per lane, the six concurrent channels provide an opportunity to aggregate bandwidth for higher IOPS and parity pools.
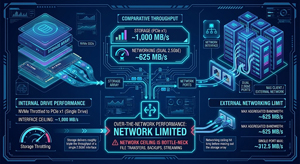
The primary external I/O bottleneck on this device is its NICs. The Intel N150 processor stretches its PCIe Gen 3.0 lanes across six M.2 slots (one slot running at PCIe 3.0 x2 and five slots throttled to PCIe 3.0 x1), with two lanes dedicated to the dual 2.5GbE network controllers.
 [Click on image for larger view.]
I did some back-of-the-envelope calculations for its theoretical throughput. Internally, each x1 drive is constrained to an interface ceiling of roughly 1,000 MB/s; this is far below what modern NVMe drives can push. However, from an external NAS client's perspective, the dual 2.5GbE ports top out at roughly 312.5 MB/s each (or 625 MB/s aggregated across both ports).
In other words, even a single x1 NVMe slot has more bandwidth than a single 2.5GbE network connection. For typical NAS traffic, network throughput is therefore likely to become the limiting factor before the storage interface is saturated.
Replacing a Home OS with a NAS-Friendly OS
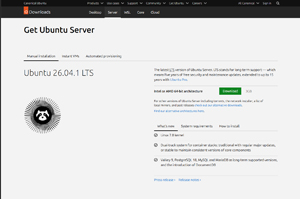
The device came with Windows Home preinstalled, which isn't ideal for a NAS device. Although the device can run many NAS software stacks, I chose Ubuntu Server for my initial investigation because it would give me flexibility and ease during initial testing. I later found this was a good choice when I started investigating the possibility of AI-created and managed storage.
I downloaded the latest version of Ubuntu Server without any issues.
 [Click on image for larger view.]
I used Rufus to install the Ubuntu ISO image onto a USB thumb drive.
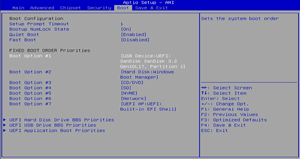
Because the device is set to boot from its pre-installed Windows 11 Home on the eMMC, I needed to tell the BIOS to boot from the USB drive.
I could have tapped F7 during startup to open the one-time boot menu and select my USB drive, but I wanted to get a feel for the BIOS.
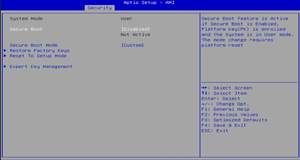
I powered on the device and repeatedly pressed the Delete key to enter the UEFI/BIOS setup screen.
 [Click on image for larger view.]
I then navigated to the Security tab and disabled Secure Boot.
 [Click on image for larger view.]
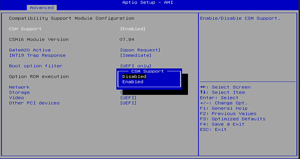
I went to the Advanced settings tab and made sure CSM support was disabled.
 [Click on image for larger view.]
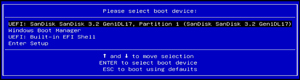
I navigated to Save and Exit to store my changes and reboot.
 [Click on image for larger view.]
I installed Ubuntu on the Kingston SSD drive. I could have used the built-in 64 GB eMMC storage module, but I wanted to preserve the Windows image.
During the Ubuntu installation, I followed the on-screen prompts to set up my user account, time zone, and keyboard layout, then finished the installation and rebooted the device.
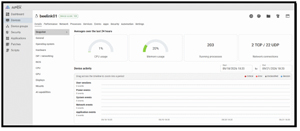
I installed Aipex by Tassient to monitor the system.
 [Click on image for larger view.]
That choice led me into the broader scope of this series. I initially intended to use Aipex only to monitor the device, but once I started using its AI assistant, I realized I could ask it to do more than report what was happening. You can read my earlier write-up on Aipex here
A Bidirectional AI Agent Changed the Direction of the Experiment
I wanted to get a general idea of the device's performance before I started my serious benchmarking tests.
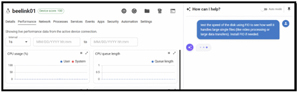
This is where things got interesting. While looking up the syntax for the FIO command to test the NVMe device, I decided to see if I could use Aipex AI Assistant to create the FIO command.
I issued the following prompt.
Test disk speed with FIO to see how well it handles large single files (like video processing or large data transfers). Install FIO if needed.
 [Click on image for larger view.]
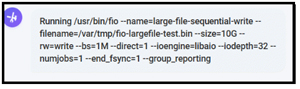
It installed FIO and tested the system by running the FIO command.
 [Click on image for larger view.]
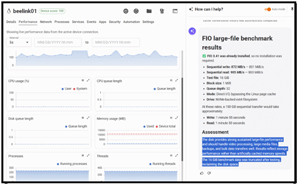
Since I haven't used Aipex this way before, I was surprised when the test ran without issues, and then the AI Assistant analyzed the results and told me my FIO test showed the storage handled the load without issues.
 [Click on image for larger view.]
I then wondered if AI could create and run a simple benchmarking test. Could I use it to run other tests? Could I use it to create iSCSI targets and NFS shares? What about creating and managing virtual machines? How about a multi-tiered application?
Initial Thoughts
I bought the ME Mini to see how well a small, inexpensive all-flash NAS would perform. That was the plan, anyway. Once I started testing it and started using AI to do things that I had previously done by hand, I found this stream far more interesting than simply benchmarking the device. But more importantly, it got me thinking about what AI-driven infrastructure provisioning might look like. In subsequent articles, I will look into that.
About the Author
Tom Fenton has a wealth of hands-on IT experience gained over the past 30 years in a variety of technologies, with the past 20 years focusing on virtualization and storage. He previously worked as a Technical Marketing Manager for ControlUp. He also previously worked at VMware in Staff and Senior level positions. He has also worked as a Senior Validation Engineer with The Taneja Group, where he headed the Validation Service Lab and was instrumental in starting up its vSphere Virtual Volumes practice. He's on X @vDoppler.